

Liquid Sculpey® Lovely Lace Liquid Necklace
Liquid Sculpey® Lovely Lace Liquid Necklace
Designed by Amy Koranek
Read More
Read Less
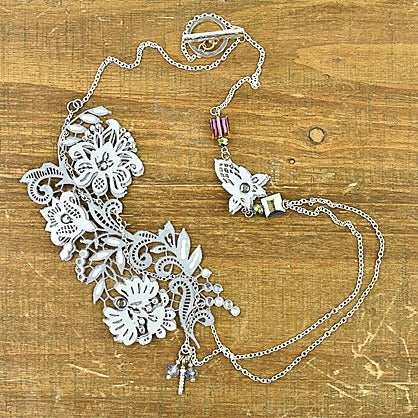
Design a stand alone liquid necklace with the Silicone Lace Mold by Sculpey®. The pieces are delicate enough to create a one of a kind statement piece but strong enough to be worn.
TIME TO COMPLETION: 90 minutes including assembling
SKILL LEVEL:
Beginner liquid clay skill; Intermediate jewelry construction
ADDITIONAL SUPPLIES
- Silicone baking liner for mixing Liquid Sculpey®
- Paper towel
- Scissors
- 2mm White heat set crystals (25)
- 3mm Smoke heat set crystals (4)
- Wire cutters
- 26” Bright silver tone fine chain - divided
- Flat nose jewelry pliers
- Round nose jewelry pliers
- Bright silver tone eye pins (2)
- Bright silver tone head pins (3)
- 3mm Bright silver tone jump rings (5)
- 4mm Bright silver tone jump rings (5)
- Bright silver tone loop and toggle clasp
- Smoke square crystal beads (2)
- Smoke lentil crystal beads (2)
- Bright silver tone seed beads (9)
- White seed beads (4)
Project Instructions
- Getting Started:
- Baking:
In a silicone baking cup, place equal amounts of Silver Liquid Sculpey® (LS) and Black LS.

Stir the colors completely together.

Fill the Lace Mold with the Silver/Black mixture. Squeegee off excess and return it to the silicone cup. Bake the lace mold following the baking instructions for LS. When the mold is completely cool, gently flex it to release the piece

Fill the Lace Mold with Silver LS. Repeat Step 4 to make and bake a Silver lace piece.

Trim the Silver/Black piece with scissors as shown.

Trim the four major bloom elements out of the Silver piece as shown.

Use a little Silver LS as glue and position the Silver elements over the Silver/Black lace as shown

Add heat set crystals using a little Silver LS to hold them in place as shown. Add Pearl LS to the center of the leaves and little dots on the pods. Bake the piece again to set all the pieces in place following the baking instructions for LS.

Cut a 6” piece of the fine chain and weave it in and out of the design so that a short tail of chain extends beyond both ends of the lace piece.

Attach a 4 mm jump ring to each end of the chain with flat pliers. Make decorative dangles from head pins, crystal beads, and seed beads as shown. Trim the head pins to 3/4” and turn loops in them with the round nose pliers. Open the bottom jump ring and slide the decorative dangles on. Close the jump ring again.

At this point I decided to remove the pod along the top right side so that it could be a balancing detail on the other side of the necklace and also give this larger piece a less rectangular shape. Snip this pod out with scissors

Insert eye pins into the square crystals and the lentil crystals. Trim the eye pins to 3/4” and turn loops in each one with the round nose pliers. Attach these elements to the pod with a series of 3 mm jump rings and then 4 mm jump rings at the top and bottom.

Back to the main piece: Attach 4” of fine chain to the top jump ring. Attach the toggle half of the clasp to the end of this chain. Attach 4” of fine chain with a jump ring to the chain that is woven through the lace design. Attach 5.5” of fine chain with a jump ring to the jump ring that has the decorative dangles.

Attach both of the bottom chains with one jump ring to the pod piece on the other side. Cut 5” of chain and attach it with a jump ring to the top of the pod. At the other end of this chain attach the loop part of the clasp with a jump ring.

Here’s a look at how all the component parts go together

Voila! Designer’s Note - When I’m all finished with a project, I fill the mold with any remaining tinted LS and bake the pieces to save for later projects. Then I bake the silicone cup with the residue of the LS in it. When it is completely cool, the residue can be peeled out of the cup and discarded. Wipe out the cup with paper towel and store to use again later. The silicone cups I use are from the baking department and designed for use as cupcake liners.
