

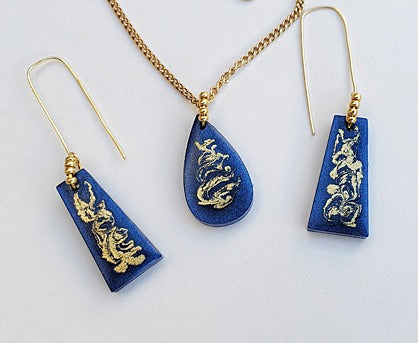
Liquid Sculpey® Golden Swirl Jewelry Set
Liquid Sculpey® Golden Swirl Jewelry Set
Designed by syndee holt
Read More
Read Less
Liquid Sculpey® teams up with Jacquard Golden Pinata Ink to create these unique jewelry pieces.
ADDITIONAL SUPPLIES
- Jacquard Piñata Rich Gold Ink
- Toothpicks (about 3)
- Large oval gold-toned jumprings (3), gold-toned earwires (2), gold-toned chain
- Jewelry pliers
- Optional: small gold beads
Project Instructions
- Getting Started:
- Baking:
Place the mold on a sturdy baking sheet (I use cardboard box flaps) Stir the LS well before pouring slowing into the mold (I like to use a Sculpey Etch n’ Pearl to stir because it wipes clean so easily!). Once you have the mold filled, let it set a moment and then you will notice that you can see the edges of the mold a little more. I add a couple of drops to the CENTER of the mold and let it reflow and settle (sometimes I can gently move it with my toothpick). The goal is to slowly fill the molds so that only tension is holding the surface in the mold. See how there is a curve to the edges of my filled molds? I’ve filled the molds completely. Don’t worry if it overflowers the peg at the top – it is pretty easy to pop out after baking. The goal is to have a rounded surface on the top working surface and not a “lip” on the edges. You can use the toothpick to gently pop any bubbles that appear while you wait for the molds to level. I usually assemble finished pieces while I wait for the leveling to take place, so that I don’t rush it!

Shake the ink well and apply a small drop to a clean toothpick. Add the small amount to the bezel, by gently dipping the tip of the toothpick into the LS. Repeat to make several small dots of ink. Preheat oven.

Use the toothpick to gently swirl the inks from top to bottom. The toothpick is pressed just below the surface, not all the way to the bottom of the mold. Carefully place the finished molds into the oven to bake according to the directions in Step 1 above.

You can repeat these steps above to make the second earring if you don’t have two molds. Once all your pieces are baked, apply a small amount of Sculpey gloss glaze to the tip of a moistened brush and apply to the surface of the pieces to bring up the beautiful metallic gleam in the LS.

While the pieces are drying, you can assemble your jewelry findings. My oval jump rings come in a small assorted size package, so I choose three of the largest ones for this project. I decided to add some small gold beads on the jump rings as well as shown.
TIP: if you add a second jump ring near the top of your chain, you can make the pendant adjustable to two different lengths.
TIP: if you add a second jump ring near the top of your chain, you can make the pendant adjustable to two different lengths.


