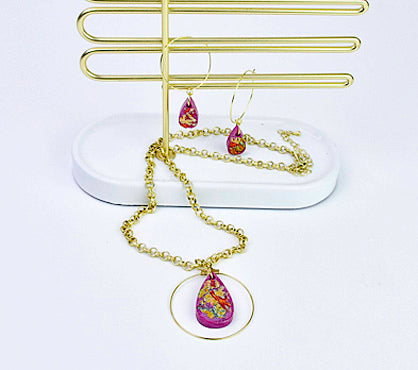

Liquid Sculpey® Foiled Teardrop Pendant & Earrings
Liquid Sculpey® Foiled Teardrop Pendant & Earrings
Designed by Amy Koranek
Read More
Read Less
This gorgeous pendant and earring set get their richness both from the foils and the metallic Liquid Sculpey® colors.
TIME TO COMPLETION:50 minutes to make/bake/assemble
ADDITIONAL SUPPLIES
- Paper towel
- Silicone baking cup
- Variegated leaf either in a sheet or flakes
- Tweezers
- 9mm Gold tone jump rings (3)
- 6mm Gold tone jump ring (3)
- Gold tone chain with clasp
- Gold tone ear wires (2)
- 5” Gold tone circle connector
- Gold tone chunky chain
- Flat nose pliers

Project Instructions
- Getting Started with Liquid Sculpey:
- Baking:
Press pieces of variegated leaf into the bottom of the teardrop shapes. Use your fingertip to make sure the leaf is laying flat and sticking to the bottom. You may find it helpful to use tweezers for placing the leaf in the cavities. In this picture I was working on another project at the same time so only focus on the tear drop shapes.

Silicone baking cups come in very handy for mixing small amounts of Liquid Sculpey® (LS). When all the LS is removed from the cups, you can simply bake them and then peel out the residual LS.
Place equal amounts of Pearl and Garnet LS in the bottom of a small silicone baking cup - about 1 tablespoon of each color.
Place equal amounts of Pearl and Garnet LS in the bottom of a small silicone baking cup - about 1 tablespoon of each color.

Stir the colors together completely.

Fill the teardrop shapes to level with the Garnet/Pearl LS. Gently tap the mold on the work surface to release air bubbles. When the mold is full, bake following the baking instructions for LS.

When the mold is completely cool remove the pieces by gently flexing it.

Assemble the jewelry pieces as shown. For the pendant piece, make sure the circle connector is secure. Both sides of the circle ring should be snuggly fit into the little connector piece at the top. If one side slides out, bend the very end up to a 90 angle with flat nose pliers so it cannot pull back out. Attach the pendant shape to the connector with a 9mm jump ring using flat nose pliers. Add a 6mm jump ring to the top of the connector and connect it to the chain.
For the earrings, you can either string the clay pieces directly onto the ear wires or you can attach them with two jump rings each. If you wish, you can bend a 90-degree angle in the tail end of the wire so that it fits more securely into the loop.
For the earrings, you can either string the clay pieces directly onto the ear wires or you can attach them with two jump rings each. If you wish, you can bend a 90-degree angle in the tail end of the wire so that it fits more securely into the loop.
