

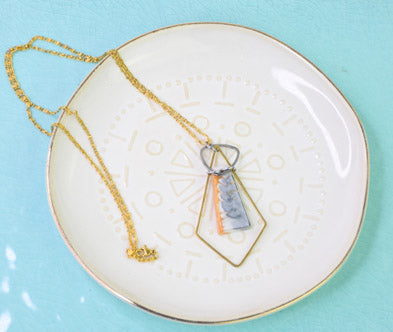
Liquid Sculpey® Cherry Tree Collaboration Necklace
Liquid Sculpey® Cherry Tree Collaboration Necklace
Designed by Amy Koranek
Read More
Sculpey teams up with Cherry Tree Beads to create a super slick pendant necklace
TIME TO COMPLETE:
60 Minutes to make, bake, and assemble one style
Read Less
ADDITIONAL SUPPLIES
- Paper towel
- Cherry Tree Accessories:
- Coated Silver-Plated Brass 19 mm Rounded Triangle Link (1)
- Raw Brass 34 mm Kite Geometric Shaped Components (1)
- Coated Silver-Plated 8 mm jump rings (3)
Project Instructions
- Getting Started with Liquid Sculpey®:
- Baking:
First make some jewelry elements using the Oven-Safe Silicone Mold. If you want to make more than one shape, you can experiment with the design that you like or you can make several pieces at once. Either way, since the mold cures all at once, it’s easy to make several shapes at one time.
After stirring the Liquid Sculpey® (LS) colors completely, open the tip of the Gold LS and squirt a line of Gold LS along the left edge of each of the four large shapes.
After stirring the Liquid Sculpey® (LS) colors completely, open the tip of the Gold LS and squirt a line of Gold LS along the left edge of each of the four large shapes.

Next, squirt a line of Pearl LS right next to the Gold LS. Then squirt a line of Silver LS along the right side of each shape.

Add more Gold LS on top of the Gold, more Pearl on top of the Pearl, and more Silver on top of the Silver, until the mold is filled to level.
Tap the mold gently on your flat work surface to release air bubbles. Stubborn air bubbles that float to the top can be popped with the needle tool.
Use the knife tool to drag lines starting in the Gold line, dragging through the Pearl, and finishing up in the Silver. Once the tip of the knife is inserted into the Gold, make sure the tip goes all the way through to the bottom of the mold. Do not lift the tip while dragging it through each color. Once the tip reaches the right-hand side, ending in the Silver, then carefully lift the knife tip out allowing it to drip back into the Silver.
Then lift the tip carefully away and wipe it clean with paper towel before dragging the next line through the liquids.
You can see in this photo that I started at the top of the shape and dragged lines about 1/8” apart until I reached the bottom.
Repeat this process for each of the shapes.

Bake the filled mold following the baking instructions for LS. When the mold is completely cool, remove the pieces by gently flexing the mold. Here is how the top side of each piece looks.

Flip the pieces over and see how the backs look. You can use whichever side you prefer. I prefer the more swirly side.
Trim away any stray bits of LS that may have crept up the sides or over the edges of each piece with small sharp scissors.
Trim away any stray bits of LS that may have crept up the sides or over the edges of each piece with small sharp scissors.

Now for assembly. Our focus piece was finished by placing two of the largest jump rings through the same hole in the top of the trapezoid shape. While the jump rings are still open, add the triangular connector to the front and the large offset diamond to the back. Then close the jump rings using flat nose pliers.
Add another large jump ring holding the top of the offset diamond and the top of the rounded triangle together.
Add another large jump ring holding the top of the offset diamond and the top of the rounded triangle together.

Close this jump ring and use it to string a chain through for wearing.

- Choosing a selection results in a full page refresh.
- Opens in a new window.