

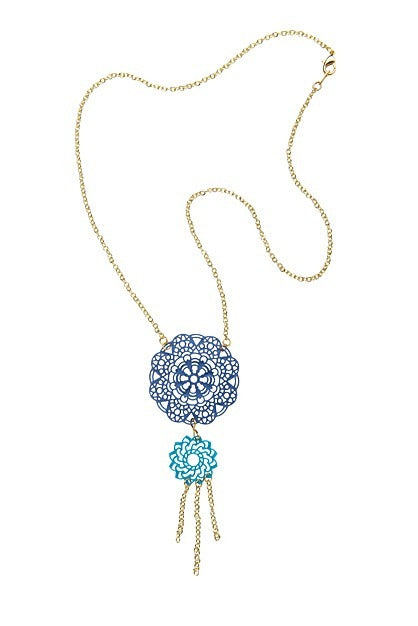
Liquid Sculpey® Boho Chic Blue Necklace
Liquid Sculpey® Boho Chic Blue Necklace
Designed by Amy Koranek
Read More
Read Less
Liquid Sculpey® teams up with the Sculpey® Silicone Mandala Mold to help you create this boho-style pendant!
TIME TO COMPLETION:90 Minutes to make and bake
ADDITIONAL SUPPLIES
- Paper towel
- Knitting needle or skewer for stirring Liquid Sculpey®
- Rubbing alcohol
- Gold tone double connector
- Gold tone small jump rings (5)
- Gold tone medium jump rings (2)
- 18” -20” Gold tone chain with clasp
- 5” Gold tone chain
- Wire cutters
- Flat nose pliers
Project Instructions
- Getting Started:
- Baking:
Remove the caps completely from Liquid Sculpey® (LS). Stir colors thoroughly with a knitting needle or skewer. Replace as much of the displaced LS into the bottle as possible. Replace caps tightly. Wipe tools clean for later use.
Squirt a small amount of Navy Metallic into the mandala shapes that you want to mold. Designer’s Tip: When I fill a thin mold like the Mandalas or Butterflies, I usually fill every cavity whether I need them or not. Then I store the unused baked pieces for later projects. This instruction is written to fill the entire mold. But you can certainly save liquids and time by just filling the areas that you want specifically for this project.
Squirt a small amount of Navy Metallic into the mandala shapes that you want to mold. Designer’s Tip: When I fill a thin mold like the Mandalas or Butterflies, I usually fill every cavity whether I need them or not. Then I store the unused baked pieces for later projects. This instruction is written to fill the entire mold. But you can certainly save liquids and time by just filling the areas that you want specifically for this project.

Next spread the LS into the mold cavities with either the squeegee or with your fingertip.

Squeegee away excess LS. Scrape the excess LS from the edge of the squeegee back into the open bottle for later use.

Fold one paper towel very neatly into a thick pack about 2” x 3”. Dampen one edge of the pad with rubbing alcohol. Firmly squeegee this pad across the LS filled cavities to remove residual LS from the raised surfaces. This will really help clean the little windows in the mandalas. You can see the little bit of LS that was removed when I did this. Just do this one time and re-check the mold to make sure all the little areas are still filled. This tip should only be done on very thin molds like the mandalas and the butterflies.

Bake the mold following the baking instructions for LS. When the mold is completely cool, remove the pieces by gently flexing the mold. Then repeat Step 1-5 to create a set of mandalas in Peacock Pearl as well. In this photo I’m showing how easy it is to peal the baked mandalas out of the silicone mold.

Decide how you want to arrange your pieces for your necklace.

Connect the small mandala to the larger one with the double connector. Cut the chain in half opposite the clasp and attach each end of the chain to the large mandala at the top with medium jump rings using the flat nose pliers to open and close them. Cut two 1” lengths of chain and one 1.5” length of chain with wire cutters. Add these to the small mandala at the bottom with small jump rings using the flat nose pliers to open and close them.
