

Liquid Sculpey Blue Blossoms Jewelry Set
Liquid Sculpey Blue Blossoms Jewelry Set
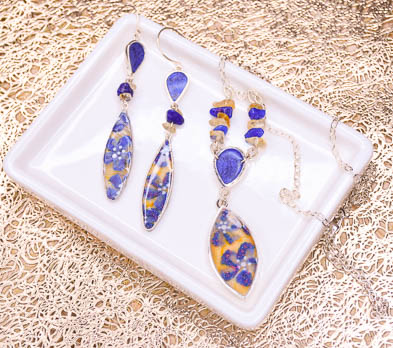
Designed by Cindi McGee
Read More
Read Less
Cindy created this wonderful pendant and earring set for our Sculpey® Liquid Clay Challenge using a variety of textures and colors to create this translucent collage effect.
TIME TO COMPLETION: About 90 minutes including bakingADDITIONAL SUPPLIES
- Microbeads – Navy and deep purple, or colors of choice
- Fine paintbrush
- Ceramic tile
- Craft knife
- Nunn Designs:
- 2 – Itsy Link Double Loop Drop bezels in silver
- 2 – Ear Wire Open Oval in silver
- 2 – Ear Wire Hooks in silver
- 5 – Textured Jumprings in silver
- Textured Cable Chain in silver
- Navette bezel pendant in silver
- Open Pendant Small Drop in Silver
- Eye Pins in silver
- Plain silver jumprings
- Glass chip beads in coordinating shades
- Jewelry pliers
- Palette™ Inkpad in Cognac, or similar permanent inkpad
- DecoArt® Metallic Lustre™ Silver Spark
- Heat tool
- Parchment paper
- Towel
Project Instructions
- Getting Started with Liquid Sculpey®:
- Getting Started with Liquid Sculpey®:
- Baking:
- It is important to use oven thermometer when you bake the liquids so that you can ensure your oven is at the correct temperature.
- Do not microwave the liquids. They must be baked in a Preheated oven at 275 ºF (130 ºC) for liquid colors and 300 ºF (149 ºC) for Clear – Do not exceed baking temperatures.
- If your piece is less than 1/4” bake for 15 minutes. For thicker pieces that are 1/4” or above bake for 30 minutes.
- If your liquid project has become yellowed or discolored in the oven, when you remake it, tent it by placing either – folding an index card in half and placing your project under it or by using aluminum foil over your project.
Apply Amber Translucent Liquid Clay to a ceramic tile. How much will depend on
how much of the design you wish to create.

Smooth the Amber Translucent Liquid Clay to create a flat pool. Bake according
to the manufacturer instructions. Let cool.

Pour a small amount of Navy Metallic Liquid clay onto the tile. Dip a fine
paintbrush in the liquid clay, and impress it against the Amber Translucent sheet of baked clay to make the
first petal. Continue adding petals, then additional flowers, over the surface. Bake according to
manufacturer instructions. Let cool.


Pour a small amount of White Liquid Clay onto the tile. Use the tip of the
Etch & Pearl tool to make small dots in a ring around the center of each flower. Bake according to
manufacturer instructions. Let cool.

Add a small line of Navy Metallic Liquid Clay on one side of the flowers
petals.

Pour the microbeads over the surface. They will adhere to the liquid clay
areas. Bake according to manufacturer instructions. Let cool.

Use the tip of the Etch N’ Pearl tool to add a dot of White Liquid Clay to the
centers of the flowers. I added the centers after the outer ring of dots was baked so there would be less
risk of them pooling together before baking. Bake according to manufacturer instructions. Let cool.


Use clay blade to carefully remove sheet from the tile.

Apply permanent ink to surface of desired pattern on Sculpey Tools™ Texture
Sheet.

Place the decorated clay sheet face down on a towel. Place inked area of the
texture sheet against the back of the clay sheet and press to transfer the pattern. Let ink dry. A heat tool
can be used to speed the process.

Place the open earring wire bezels onto the decorated sheet to determine where
you would like to cut the sheet.

Use a craft knife to carefully cut around each wire. Remove the excess sheet
and set aside.

Add a small amount of Clear Liquid Sculpey® around one side of the earring
wire bezels.

Carefully place the cut shapes against the bezel with the textured side facing
the bezel itself. Bake according to manufacturer instructions. Let cool.

Fill the open area in each bezel with Clear Liquid Clay. Bake according to
manufacturer instructions.

Upon removing from oven, use a heat tool to immediately add heat and bring out
the gloss in the liquid clay.

Turn over each earring. Use the fine paintbrush and the Navy Metallic Liquid
Clay to add petals over the petals on the front side. You will be able to see them through the clay sheet.
Bake according to manufacturer instructions

Use the tool and White Liquid Clay to add the dots for the centers. Bake
according to manufacturer instructions. Let cool.

To help the edges of the clay sheet blend with the wire a bit more, apply
Silver Spark Metallic Lustre around the outer edge of each earring.

Fill the two Nunn Designs Itsy Link Double Loop Drop bezels with Navy Metallic
Liquid Clay. Bake according to manufacturer instructions. Let cool.

For Assembly: Place 3 glass chip beads onto two silver eye pins. Trim the end
and create eye on opposite end. Connect the floral print earrings to one end of the bead embellishments.
Connect the teardrop shapes to the other end. Add the earring wires.

We will use more of the liquid clay sheet created for the earrings for
the necklace.
We will use more of the liquid clay sheet created for the earrings for the necklace.
We will use more of the liquid clay sheet created for the earrings for the necklace.

Add a thin layer of White Liquid Sculpey to the inside bottom of the Navette
bezel.

Carefully place a piece of the clay floral sheet into the bezel. Bake
according to manufacturer instructions and let cool.

Add two silver jumprings to the Nunn Designs Open Pendant Small Drop as shown.

Mix Navy Metallic Liquid Sculpey with microbeads to create enough of a thick
mixture to fill the bottom of the Nunn Designs Open Pendant Small Drop.

Fill the bottom of the Nunn Designs Open Pendant Small Drop as shown. Bake
according to manufacturer instructions. Let cool.

Prop up the end of the bezel without the jump rings to level it. Fill the open
area of the bezel with Navy Metallic Liquid Sculpey. Bake according to manufacturer instructions. Upon
removing from oven, use a heat tool to immediately add heat and bring out the gloss in the liquid clay.

Fill the open area over the floral sheet in the Navette bezel with Clear
Liquid Sculpey. Bake according to manufacturer instructions. Upon removing from oven, use a heat tool to
immediately add heat and bring out the gloss in the liquid clay.

ASSEMBLY Add desired amount of glass chip beads to 2 silver
eye pins. Trim ends and create eye on opposite ends.

Spacing them about 1/2” apart, use textured jump rings to add beaded eye pins
to textured silver chain. Then add textured jumprings to the eyes on the opposite ends.

Attach the jump rings om the Navy Metallic teardrop to the textured jump rings
as shown.

Use a textured jump ring to attach the Navette bezel to the teardrop.
