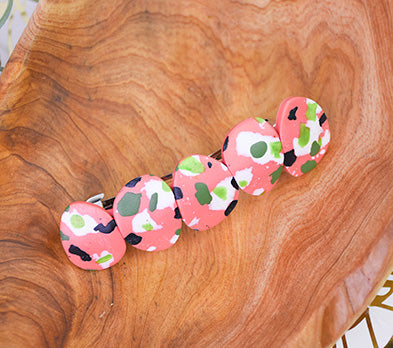

Sculpey Premo™ Coral Terrazzo Hair Clip
Sculpey Premo™ Coral Terrazzo Hair Clip
Designed by Amy Koranek
Read More
Creating terrazzo slabs is a fun and easy way to make multicolored custom accessories.
COMPLETION TIME:
45 Minutes to make and bake
Read Less
ADDITIONAL SUPPLIES
- Metal hair clip
- Silicone glue

Project Instructions
- Getting Started:
Start with clean hands, unwrap and knead clay until soft and smooth, or condition by running clay though a Pasta Machine. We recommend using a designated machine for clay purposes only. When working with multiple colors, clean hands with soap and water or baby wipes (we have found that baby wipes work best) before switching colors. Shape clay, pressing pieces firmly together. Wash hands after use.
- Baking:
We will build our terrazzo pattern on top of a background (also called a slab) of Coral. Create a 1/8” thick sheet from 1/4 block of Coral.

In order to get really random sizes and shapes of the terrazzo style colors, I like to pinch the clay from the edges of the bar. Pinch off bits of White and press these onto the Coral slab.
Generally I did try to keep the White pinches larger than the other colors so that I could later put pinches of the greens on top of the White.
Roll the sheet with the Acrylic Clay Roller to set the bits level into the background.
Generally I did try to keep the White pinches larger than the other colors so that I could later put pinches of the greens on top of the White.
Roll the sheet with the Acrylic Clay Roller to set the bits level into the background.

Pinch off pieces of Black and set these randomly in place. Roll the sheet with the Acrylic Clay Roller to set the bits level into the background.

Pinch off pieces of Spanish Olive and set these randomly in place. Positioning them on top of White pieces will help them to pop. Roll the sheet with the Acrylic Clay Roller to set the bits level into the background.

Repeat Step 5 with pinches of Bright Green Pearl. Roll the sheet with the Acrylic Clay Roller to set the bits level into the background.

Roll a little log of Coral that fits nicely on top of the flat part of your hair clip.

Flatten the little log to the hair clip making sure the clay follows the curve of the metal clip.

Cut out five medium sized Irregular Ovals and place them sides touching on top of the hair clip making sure they are well connected to the Coral base on top of the clip. Also make sure these follow the curve of the clip.
Bake the hair clip following the baking instructions in Step 1 above. Allow to cool completely before handling. Gently pop the baked clay off of the clip and glue it on permanently with silicone glue.
Bake the hair clip following the baking instructions in Step 1 above. Allow to cool completely before handling. Gently pop the baked clay off of the clip and glue it on permanently with silicone glue.

- Choosing a selection results in a full page refresh.
- Opens in a new window.