

Liquid Sculpey® Lustrous Swirl Barrette
Liquid Sculpey® Lustrous Swirl Barrette
Designed by Amy Koranek
Read More
Read Less
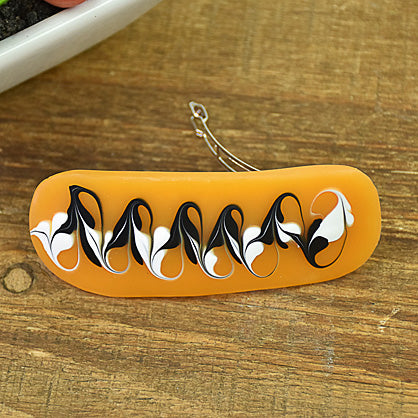
A Liquid Sculpey® doodle becomes a pretty barrette design.
TIME TO COMPLETE:45 Minutes to make and bake
ADDITIONAL SUPPLIES
- Paper towel
- Clean and smooth piece of glass
- Sharp scissors
- Barrette finding
- Silicone glue
Project Instructions
LIQUID
- Getting Started:
- Baking:
Remove the caps from the Liquid Sculpey® (LS) bottles. Stir the liquids completely with the knife tool. Clean the tool between colors with paper towel. Replace the caps.
On a clean and smooth piece of glass squirt a puddle of Amber LS in the shape of a rectangle with rounded corners. I’m using a piece of glass that has a grid marked on the back side of it so that I can see how large my puddle is. You could also place a template under the glass to act as a guide for the size and shape of your design.
On a clean and smooth piece of glass squirt a puddle of Amber LS in the shape of a rectangle with rounded corners. I’m using a piece of glass that has a grid marked on the back side of it so that I can see how large my puddle is. You could also place a template under the glass to act as a guide for the size and shape of your design.

Squirt a series of White LS dots down the center of the Amber LS.

Squirt a series of Black LS dots between the White dots.

Place the tip of the needle tool into the first dot and without lifting the needle, drag from one dot to the next.

At the final dot, lift the tool out of the LS and wipe it with a paper towel. You should have a series of connected heart shapes.

Next, poke the needle tool into the first White dot again. But this time arch the needle upward into the Amber LS and then back down into the Black dot next to the White one. Repeat without lifting the needle alternating up and down in arching motions through all the dots. At the end lift the needle tool out of the liquids and wipe it off with paper towel.
On the right end of my design you can see where I made a couple little bobbles with the liquid. This will not be a problem because little mistakes on the edge like this can be trimmed away after baking with scissors.
On the right end of my design you can see where I made a couple little bobbles with the liquid. This will not be a problem because little mistakes on the edge like this can be trimmed away after baking with scissors.

Bake the glass with the design on it following the baking instructions for LS. While the liquid design is baking, sheet Amber Premo through the pasta machine on the thickest setting or make a sheet with the Acrylic Clay Roller that is 1/8” thick.
When the liquid design is completely cool, carefully peel it off of the glass. Trim around the edges with sharp scissors if necessary to remove little mistakes.
Place the liquid design on top of the Amber Premo sheet. Burnish the design down with your fingertips or roll it to the Premo with the Acrylic Clay Roller.

Trim around the outside of the liquid design with the clay knife. Smooth the cut edges with your fingertips.

Drape the clay piece over the curve of the barrette and make sure it follows the shape. Bake the piece again balanced on top of the barrette finding.

When the piece is completely cool, pop it off of the barrette finding and glue it on permanently with silicone glue.

- Choosing a selection results in a full page refresh.
- Opens in a new window.