

Souffle™ Funky Boho Striped Earrings
Souffle™ Funky Boho Striped Earrings
Read More
Read Less
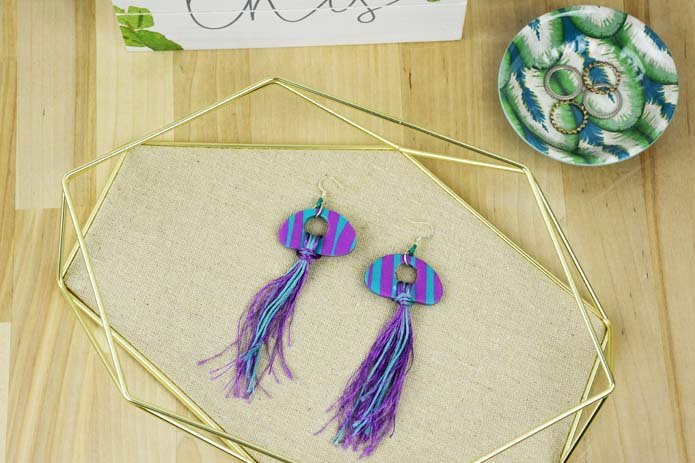
Souffle clay colors create a light and swingy pair of earrings. Perfect stripes are NOT necessary for these quick earrings! In fact, they look better the more irregular they are.
ADDITIONAL SUPPLIES
- Silver-toned ear wires
- 10mm silver-toned jump rings(4) or use color coordinated small Oh! Rings
- Embroidery thread in matching blue and purple
- Small piece of stiff cardboard about 4 inches high to wrap the thread around
Project Instructions
- Getting Started:
Start with clean hands, unwrap and knead clay until soft and smooth, or condition by running clay though a Pasta Machine. We recommend using a designated machine for clay purposes only. When working with multiple colors, clean hands with soap and water or baby wipes (we have found that baby wipes work best) before switching colors. Shape clay, pressing pieces firmly together. Wash hands after use.
- Baking:
Make a snake of each color of Souffle that is about 3/8 wide by 3 inches long. Twist these two pieces together so that the colors start to create vertical stripes. Use your fingers to press on the ends of the twists to help create the verticals.


Gently press the twisted clay flat using your hands and an acrylic roller – always keeping the stripes as vertical as possible. Sheet the striped clay through the clay conditioning machine on the widest setting. Keep those stripes as straight as you can.


Use the largest irregular oval cutter to cut out two earrings. Remember! The shape needs to be reversed for one of the earrings, so you can just flip one of the earrings after cutting or flip the sheet of clay before you punch out the second earring.

Use the round cutter from the Mini Cutter Geometric set to put holes near the rounded side of each earring. Bake according to the directions in Step 1.

Add a jump ring through the top of each hole and link either another jump ring or a color coordinated Oh! Ring. Finally, add the ear wire.

While the clay is baking, wrap each color of embroidery thread around the 4 inch piece of cardboard about 4 times for each color. Cut the wraps at one end. Gently mix the two colors together. Fold the strings in the center to create a loop. Push the loop through the hole in the COOLED and baked clay from the back of the earring. Tuck the ends of the threads through the loop and pull tight to create the tasseled fringe. Repeat for the other earring. NOTE: a small drop of instant glue on the back of the tassel will help hold the knot in place if it feels like it will slip.
