

Sculpey Soufflé™ “Scribbled” Earrings
Sculpey Soufflé™ “Scribbled” Earrings
Designed by syndee holt
Read More
Read Less
Sculpey Soufflé™ has the perfect baked surface texture to use these great Sakura Permapaque markers to create a one-of-a-kind pair of earrings!
TIME TO COMPLETION: 75 minutes
TIPS FOR USING STENCILS:
- Put the clay on a smooth surface like a small tile or piece of glass, so that the clay will stick to the surface.
- Use a new blade if possible
- Keep a relaxed grip on the blade. Allow the stencil to guide the blade-don’t try to “drive” the blade.
- If you accidentally cut away from the template – leave it and reverse your direction. The clay will often times “heal” itself.
- Slide your clay blade under the clay after the shape is cut to help separate it from the smooth surface and set aside on a clean sheet of paper.
ADDITIONAL SUPPLIES
- Sakura Permapaque markers – I’ve used two sets: The 1.0 color set with the green and light blue marker and the 1.0 metallic set, Sakura Pentouch 2.0 Metallic set.
- Clean white paper
- Small smooth ceramic tile or piece of glass
- Craft knife (like Exacto)
- Jump rings in color to match your design – I’ve used 7 mm copper toned (4)
- Ear wires to match your design (2)
- At least one pair of jewelry pliers
- Pasta machine to flatten clay (optional)
- Small piece of graphing paper (optional)
Project Instructions
- Getting Started:
Start with clean hands, unwrap and knead clay until soft and smooth, or condition by running clay though a Pasta Machine. We recommend using a designated machine for clay purposes only. When working with multiple colors, clean hands with soap and water or baby wipes (we have found that baby wipes work best) before switching colors. Shape clay, pressing pieces firmly together. Wash hands after use.
- Baking:
Roll 1/2 of the conditioned Cornflower clay out to about 1/8 inch thickness (on a pasta machine, you can make it a medium setting). I elected to create the center design with this cool mid-century shape. Cut 2 (or 3) of these shapes .

Cut 2 each of the large and middle circles.

Use the needle tool to put the holes in each piece. Make sure to hold the needle tool straight up.
TIP: It helps me to lay the pieces out in the design on a small piece of graphing paper to help line all the holes up.
Bake all the pieces according to the directions above. Allow the pieces to cool.
TIP: It helps me to lay the pieces out in the design on a small piece of graphing paper to help line all the holes up.
Bake all the pieces according to the directions above. Allow the pieces to cool.

Once the pieces have baked and cooled, you can start creating your design.
I used the Green and Light Blue marker from the Pastel set of Permapaque fine point markers and the Copper and Silver from the metallic set of the same pens.
I like to create a “makers mark” design with dashed lines. (and it is really easy!) I used this design for the larger circle
I used the Green and Light Blue marker from the Pastel set of Permapaque fine point markers and the Copper and Silver from the metallic set of the same pens.
I like to create a “makers mark” design with dashed lines. (and it is really easy!) I used this design for the larger circle

I used those same marks and added some simple spirals and coils to the design. Again, I didn’t attempt to match the patterning on the two earring pieces.

I drew simple coils and radiating lines on the smaller circle to integrate the designs on the other two pieces.

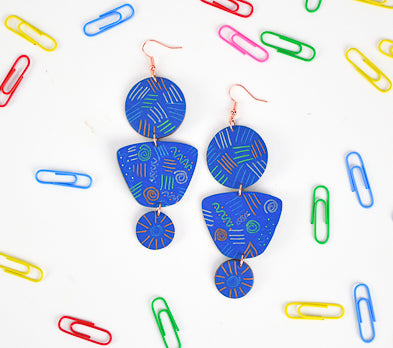
Here are my final pieces. These are so colorful and lightweight!

I used the larger PenTouch 2.0 mm Copper pen to edge the sides. Even though you see the front of the design in this photo, I prefer to edge my pieces from the BACK so that if the pen slips slightly it is on the back of the design!

Add your jump rings and ear wires to complete your new earrings!

Sometimes the connecting loop on the ear wire is facing the wrong way for your construction design, as is the case with these earrings. You can turn the loop carefully by grasping the part of the wire that goes in the ear with one pair of pliers and then gently turning that connecting loop at the bottom of the ear wire 90 degrees with another pair of pliers. Now we don’t have to add another jump ring to the top of the design to accommodate the ear wire!

- Choosing a selection results in a full page refresh.
- Opens in a new window.