

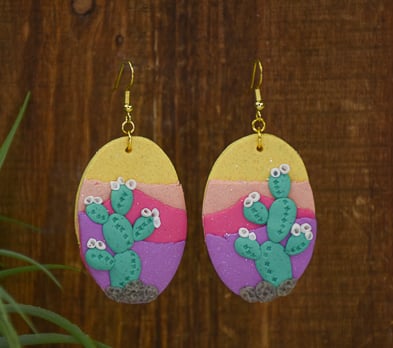
Sculpey Premo™ and Sculpey Souffle™ Sedona Sunset Earrings
Sculpey Premo™ and Sculpey Souffle™ Sedona Sunset Earrings
Designed by Amy Koranek
Read More
Bring a little bit of the Southwest to your wardrobe with these colorful earrings created with both
Sculpey Premo™ + Sculpey Souffle™. You can use your open stock colors or the Sculpey Premo™ + Sculpey SouffleTM Multi-Pack to create this design!
COMPLETION TIME:
60 Minutes to make, bake, and assemble
Read Less
ADDITIONAL SUPPLIES
- Small Phillips screwdriver
- Gold tone ear wires (2)
- 6 mm Gold tone jump rings (2)
- 4 mm Gold tone jump rings (2)
- Flat nose pliers
Project Instructions
- Getting Started:
Start with clean hands, unwrap and knead clay until soft and smooth, or condition by running clay though a Pasta Machine. We recommend using a designated machine for clay purposes only. When working with multiple colors, clean hands with soap and water or baby wipes (we have found that baby wipes work best) before switching colors. Shape clay, pressing pieces firmly together. Wash hands after use.
- Baking:
For this project we are going to make some sandy custom colors. To each color we will add Rose Gold Glitter (RGG), Frost White Glitter (FWG), and Igloo so that all of the blended colors have a consistency running through them which will marry them nicely into a family of colors.
The quantities of each color listed are based on the 1 ounce Premo™ and the .9 ounce Soufflé™ bar that come in the Premo™ + Soufflé™ Multi-pack:
Sandy Yellow = 1/4 bar FWG + 1/8 bar RGG + 1/16 bar Canary + 1/8 bar Igloo;
Sandy Orange = 1/4 bar FWG + 1/8 bar RGG + 1/16 bar Pumpkin + 1/8 bar Igloo;
Sandy Pink = 1/4 bar FWG + 1/8 bar RGG + 1/16 bar Cherry Pie + 1/8 bar Igloo;
Sandy Purple = 1/4 bar FWG + 1/8 bar RGG + 1/16 bar Turnip + 1/8 bar Igloo.
For the cactus we will mix up a new color:
Cactus = 1/16 bar Sea Glass + 1/16 bar Shamrock + 1/16 bar Gray Granite + 1/16 bar Igloo
For the base, use the Acrylic Clay Roller to make a thin sheet of Sandy Yellow. Cut out two of the largest oval shapes from Sandy Yellow.

Roll a very thin sheet of Sandy Orange and cut out two large ovals. Tear the ovals dividing 1/4 from 3/4 of the oval length.
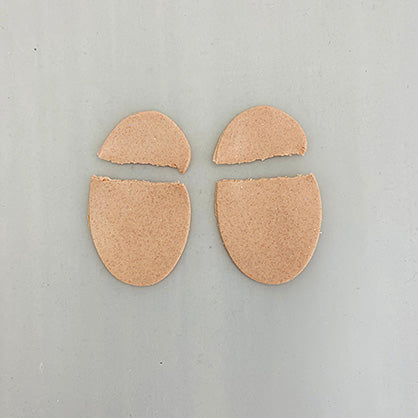
Press the large part of the torn oval over the bottom of the Sandy Yellow background. Roll over the Sandy Orange to make sure it is laying flat to the Sandy Yellow.

Roll a very thin sheet of Sandy Pink and cut out two large ovals. Tear the ovals dividing them approximately in half.

Press half of the torn oval over the bottom of the Sandy Orange. Roll over the Sandy Pink to make sure it is laying flat to the Sandy Orange.

Roll a very thin sheet of Sandy Purple and cut out a large oval. Tear the oval dividing it approximately into thirds.

Press a piece of the torn oval over the bottom of the Sandy Pink. Roll over the Sandy Purple to make sure it is laying flat to the Sandy Pink.

Use the oval cutter to re-cut the oval shapes. During the assembly, the ovals have probably stretched out a bit and re-cutting them will make them look neat again.
From the Cactus color, make little balls and flatten them to make Opuntia Cactus in the foreground.
From the Cactus color, make little balls and flatten them to make Opuntia Cactus in the foreground.

Add little Igloo buds to the tops of each area of the cacti. Poke holes in them with the Blunt Point Tool.
Add little Gray Granite stones around the bottoms of the cacti.
Add little Gray Granite stones around the bottoms of the cacti.

Use the tip of a Phillips screwdriver to make rows of prickles on the cacti.
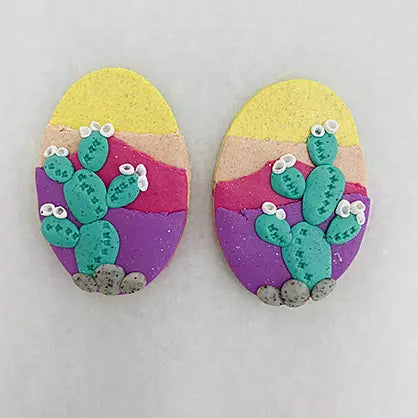
Add texture to the Gray Granite stones with the Blunt Point Tool.

Poke holes in the tops of the pieces (using the Blunt Point Tool) so that after they are baked, they can be assembled with jump rings. Here is the layout for the earrings showing the placement of the jump rings.
Bake following the baking instructions for Sculpey Premo™. Allow to cool completely before handling.
Bake following the baking instructions for Sculpey Premo™. Allow to cool completely before handling.

Assemble the earrings using flat nose pliers to open and close the jump rings as shown.

- Choosing a selection results in a full page refresh.
- Opens in a new window.