

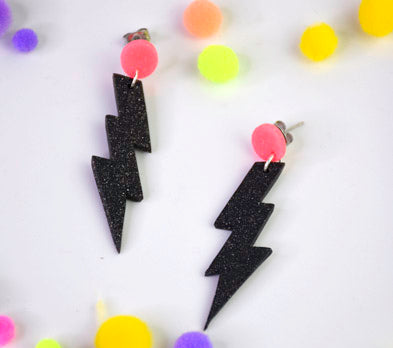
Sculpey III® Glittering Lightning Bolt Earrings
Sculpey III® Glittering Lightning Bolt Earrings
Designed by Phoebe Doehring
Read More
Create a glittering pair of lightning bolt earrings in just about half an hour, using Sculpey III®.
Read Less
ADDITIONAL SUPPLIES
- Silver jump rings
- Silver post earring backs
- Jewelry Pliers
- Lightning Bolt template (or draw your own design)
- Super Glue
Project Instructions
- Getting Started:
Start with clean hands, unwrap and knead clay until soft and smooth, or condition by running clay though a Pasta Machine. We recommend using a designated machine for clay purposes only. When working with multiple colors, clean hands with soap and water or baby wipes (we have found that baby wipes work best) before switching colors. Shape clay, pressing pieces firmly together. Wash hands after use.
- Baking:
Cut out and use the template provided or make your own lightning bolt design on heavy paper or cardboard and cut out.
Condition 1/4 block of Black Glitter clay. Run through the clay machine on the #2 setting. Place your lightning bolt template on your sheet of clay. Cut out two lightning bolts. Smooth the edges with your fingertip. Make a hole at the top of each with the pointed tip of your 5 in 1 tool.
Condition 1/4 block of Black Glitter clay. Run through the clay machine on the #2 setting. Place your lightning bolt template on your sheet of clay. Cut out two lightning bolts. Smooth the edges with your fingertip. Make a hole at the top of each with the pointed tip of your 5 in 1 tool.


Condition 1/4 block of Pink Glitter clay. Run through the clay machine on the #2 setting. Use the circle cutter from the set and cut out two small circles from the sheet of clay. Use the 5 in 1 tool again to make holes at the bottom center of each circle.
Use jewelry pliers to open the jump rings and attach the Pink circles and Black lightning bolts together.
Squeeze a drop of Super Glue on the back of each of the Pink circles and attach the earring posts. Allow to dry before wearing.
Squeeze a drop of Super Glue on the back of each of the Pink circles and attach the earring posts. Allow to dry before wearing.
- Choosing a selection results in a full page refresh.
- Opens in a new window.