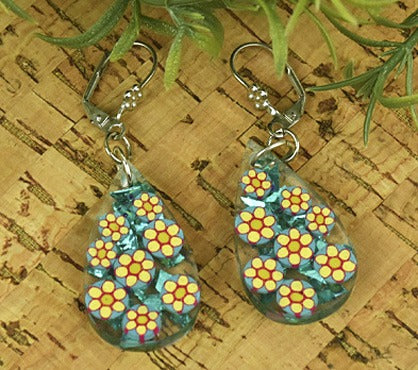

Premo Sculpey® and Clear Cast Resin Millefiori Earrings
Premo Sculpey® and Clear Cast Resin Millefiori Earrings
Designed by Amy Koranek
Read More
Read Less
Little millefiori cane slices are assembled in a resin shape and backed with foil glitter for texture and shine. The flowers are so tiny ... but in this project you will enjoy the tip of pre-baking your canes before slicing to manage the little pieces.
TIME TO COMPLETE:2 Hours to make and bake
24 Hours curing time for resin
ADDITIONAL SUPPLIES
- Alumilite Amazing Clear Cast
- Turquoise foil confetti
- Disposable or reusable measuring cups
- Disposable or reusable mixing cup
- Disposable paintbrush
- Optional - heat gun
- Optional - spritz bottle filled with 91% isopropyl alcohol
- 8mm Silver tone jump rings (2)
- 4mm Silver tone jump rings (2)
- Silver tone ear wires (2)
- Flat nose jewelry pliers

Project Instructions
- Getting Started:
Start with clean hands, unwrap and knead clay until soft and smooth, or condition by running clay though a Pasta Machine. We recommend using a designated machine for clay purposes only. When working with multiple colors, clean hands with soap and water or baby wipes (we have found that baby wipes work best) before switching colors. Shape clay, pressing pieces firmly together. Wash hands after use.
- Baking:
First, we will make the little canes for the flowers. Start with 1/16” bar of Wasabi and make a little fat rod.

Sheet 1/8 bar of Fuchsia through the pasta machine to the fourth thickest setting. Wrap the Wasabi rod in the Fuchsia sheet. Trim the ends and make a seam that butts together.

Roll the Fuchsia wrapped Wasabi rod allowing it to get longer in length and smaller in diameter. This is called reducing the cane. Set this cane aside for now.

Roll a little fat rod from 1/8 bar of Sunshine..

Wrap the Sunshine rod in the #4 sheet of Fuchsia. Trim the ends and make a seam that butts together.

Roll the Fuchsia wrapped Sunshine rod allowing it to get longer in length and smaller in diameter. Keep reducing until the cane is at least 6” in length.

Trim the ends of the Sunshine/Fuchsia cane to reveal the Sunshine circle wrapped in Fuchsia. Make sure the cane without trimmed ends is still 6” long. If it is a little short, you can gently stretch it from both ends.

Divide the Sunshine/Fuchsia cane into six 1” sections

Arrange the sections around the outside of the Wasabi/Fuchsia center from Step 4. If the petals don’t touch each other side to side, that means the center of the flower is still too large.

Carefully roll the Wasabi/Fuchsia center a little smaller. Try arranging the petals around the outside again. If the sides gently touch each other, then your flower is complete. Use gentle fingertip pressure to make sure all the petals are stuck to the center and to each other but be careful not to squish or deform them. Carefully trim away excess length from the Wasabi/Fuchsia center, if necessary, to make it the same length as the petals. Set the flower aside for now

Next, we will make a little triangular shaped piece that will fit in between all the petals so they don’t smash together when we reduce the cane. Roll 1/16 bar of Turquoise into a little rod.

Change the rod into a triangle shaped cane by pinching it along the top and pushing down onto the work surface at the same time. This will make a pinched ridge along the top and a flat bottom. Then roll the cane over and pinch again along the top and push down at the same time. Roll one more time to pinch a third side. You should now have a long skinny piece that is triangle shaped in the cross section.

Compare the size and shape of the Turquoise triangle to the space in between the petals. If the triangle shape is too large, you can reduce it more by pinching the points along each side and stretching the cane as you pinch.

When you are confident that the triangle sizes fit well with the flower, cut sections of triangle and push them in between the petals.

This is how the cane will look from the side. Gently roll it on the work surface to make it smooth.

Next, we will reduce the entire cane. Gently roll the flower cane on your work surface. It will start to get smaller in diameter and longer in length. When the cane gets to be about 1/4” in diameter, carefully slice the cane in half.

Set one of the 1/4” lengths aside. Reduce the other length further so that it is slightly smaller in diameter than the 1/4” piece. Then cut this length in half again and set one half aside. Then reduce the last piece even further. That way you will have three different diameters of flowers. Bake the canes following the baking instructions for Premo. When canes are this tiny they are easier to slice if they are baked first.

When the canes are cool, carefully slice them very thinly using the flexible Super Slicer blade.

Read all the instructions for the Alumilite and make sure you understand how to use the resin if you’ve never used it before. Mix 1/2 ounce each of parts A and B thoroughly. This is a lot of extra resin for this project, however the Alumilite instructions state that 1 total ounce is the minimum volume that should be mixed. It is good to have other projects or molds ready to receive the excess resin if at all possible. This is why I have called for 2 molds for this project. That way you can make both the earrings at the same time and also fill the extra wells for future projects.
Use a disposable paint brush to spread the inside of the wells with a thin coating of the resin. This will help relieve air bubbles that might form between the mold and the resin.
You can also use a low temperature heat gun to release air bubbles. Blow air back and forth across the surface of the resin on low heat. You will see the little bubbles twinkle and pop. Once they stop popping you can go to the next step.
A second way to release air bubbles from the surface is to spritz the surface of the resin with a fine mist of alcohol. The bubbles will pop immediately and the alcohol will dry quickly.

Arrange the cane slices as desired on top of the thin layer of resin in the mold.

Again, paint more resin across the top of each of the little cane slices. Use the bubble releasing techniques from Step 20 to make sure all bubbles are released.

Once you have painted the thin layer across the clay areas and released air bubbles, you can go ahead and flood the entire area with resin. Be careful to only fill to the level edge of the shapes. If you notice air bubbles, use one of the bubble releasing techniques described in Step 20 again.

Sprinkle the backs of the shapes with a thin layer of turquoise foil glitter. Allow the resin to cure completely, 24-48 hours, before touching.

When the shapes are completely set and not at all sticky to the touch, remove them from the mold by gently flexing it.

Add an 8 mm jump ring to the hole in each resin piece. Connect the larger jump ring to the ear wire with a 4 mm jump ring using flat nose pliers.
