

Sculpey Premo™ & Sculpey Soufflé™ Cherry Tree Beads Collaboration Earrings
Sculpey Premo™ & Sculpey Soufflé™ Cherry Tree Beads Collaboration Earrings
Designed by Amy Koranek
Read More
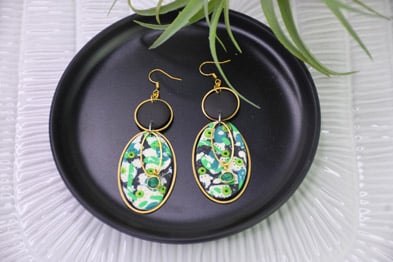
Sculpey clays team up with Cherry Tree Beads findings to create these one-of-a-kind pair of earrings featuring a clever and unique “slab construction” technique!
COMPLETION TIME:60 Minutes to make and bake.
Read Less
ADDITIONAL SUPPLIES
- Flat nose pliers
- Cherry Tree Beads Accessories:
- Coated Gold-Plated Brass 16x26mm Oval Link (2)
- Coated Gold Plated Brass 8x16mm Oval Link (2)
- Coated Brass 20mm Hoop Link (2)
- Gold-toned 4 mm jump rings (4)
- Gold-toned 8 mm jump rings (6)
- Optional: small gold-tones dark green jewel charms (2)
Project Instructions
- Getting Started:
Start with clean hands, unwrap and knead clay until soft and smooth, or condition by running clay though a Pasta Machine. We recommend using a designated machine for clay purposes only. When working with multiple colors, clean hands with soap and water or baby wipes (we have found that baby wipes work best) before switching colors. Shape clay, pressing pieces firmly together. Wash hands after use.
- Baking:
Roll 1/2 bar of conditioned Poppy Seed to a sheet 1/8” thick with the roller. Use your fingers to pinch randomly sized pieces of Frost White Glitter directly from the bar. Flatten the pieces between your thumb and finger and then press them firmly to the surface of the Poppy Seed sheet. Create a random network with the Frost White Glitter so that the Poppy Seed background is just peeking through.
Roll the sheet with the roller to smooth the white into the background.
Roll the sheet with the roller to smooth the white into the background.

Roll bits of Shamrock into little strings and press them randomly into the sheet. Roll little bits of Sea Glass into rice shapes and press them randomly into the sheet.
Roll the sheet with the roller to smooth the colors into the background.
Roll the sheet with the roller to smooth the colors into the background.

Add more pinched bits of Frost White Glitter like little clouds over the colors.
Roll the sheet with the roller to smooth the white into the background.
Roll the sheet with the roller to smooth the white into the background.

Roll tiny dots of Bright Green Pearl and press them onto the sheet. This time, do not roll over the surface, but allow the little dots to stay slightly raised on the sheet.

Use the blunt pointed tool to poke holes in the center of each Bright Green Pearl dot.

Use the needle tool to poke sets of tiny holes in the white areas near the green dots.

Use the largest oval metal findings as a template for the earring shapes. Press the large metal oval slightly into the clay making an outline.

Carefully remove the metal oval. Use the tip of the knife tool to cut out the shape on the inside of the outline that was created.

Check to make sure that the clay piece sits nicely inside the metal oval. Smooth the edges of the clay oval with your fingertips.
Make a second clay oval for the second earring.
Make a second clay oval for the second earring.

Make small balls of Poppy Seed. Press them into the center of the small metal circles. Press the clay flat enough to just barely fill the circles.
Remove the Poppy Seed clay from the circles.
Remove the Poppy Seed clay from the circles.

Line up the Poppy Seed circles with the patterned ovals. Poke a hole at the top of each large oval and a hole in the top and the bottom of the black circle. These holes will be used to connect the pieces together after baking.
Repeat for the second earring.
Repeat for the second earring.

Bake the clay pieces following the baking instructions for Sculpey PremoTM. When the pieces are completely cool, assemble with jump rings as shown using flat nose pliers to open and close them.
Connect the dangly jewels to the smaller ovals with 4 mm jump rings. Connect the large clay oval, the large metal oval, and the small metal oval with an 8mm jump ring.
Leaving the 8 mm jump ring open, add the metal circle and the black circle through the bottom hole.
Close the 8 mm jump ring.
At the top, connect the top hole in the black circle with the top of the metal circle and the ear wire with a 4 mm jump ring.

- Choosing a selection results in a full page refresh.
- Opens in a new window.