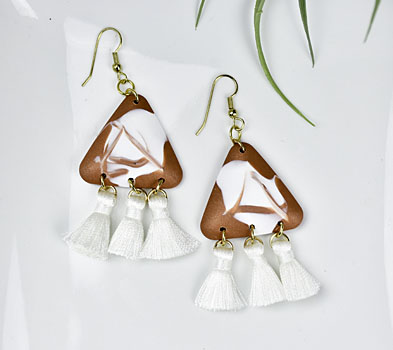

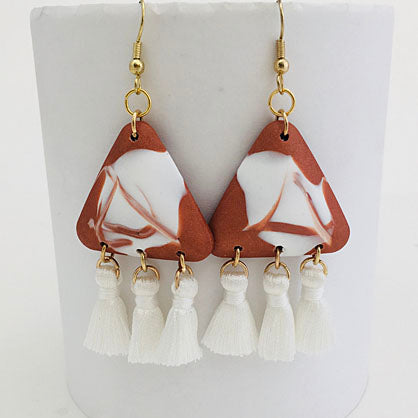
Liquid Sculpey® Tassel Trio Earrings
Liquid Sculpey® Tassel Trio Earrings
Designed by Amy Koranek
Read More
Read Less
Liquid Sculpey Copper Metallic and White team up to create a striking pair in this combination of clay, metal, and textiles.
TIME TO COMPLETE:90 Minutes to make, bake twice, and assemble
ADDITIONAL SUPPLIES
- Paper towel
- Sharp detail scissors
- 6 mm Gold tone jump rings (10)
- Gold tone ear wires (2)
- 1” White tassels with gold tone jump rings (6)
- Flat nose pliers
- Dremel drill, or pin drill, or spring drill

Project Instructions
- Getting Started with Liquid Sculpey:
- Baking:
Place a large dot of White Liquid Sculpey® (LS) into the center of the large triangle cabochon cavity.
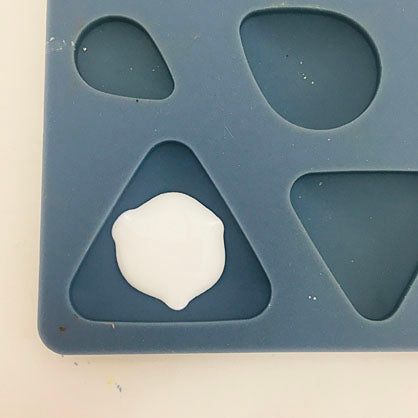
Place large dots of Copper Metallic LS in the three points of the shape.

Add more White to fill in the center of the shape and more Copper in the points to slightly below full in the mold.

Insert the tip of the knife tool into the White center, going all the way down into the bottom of the mold shape, and then drag it first through the top point...

And without lifting the tool, drag it next to the bottom right point...

Then over to the bottom left point...

Then back into the center before lifting the tool carefully out. Clean the tool with paper towel. The reason I used this tool instead of a Needle Tool, was to create a wider line of blending. Doing this same technique with the Needle Tool will produce a very thin line of blending.

Back fill with Copper Metallic LS to top up the cavity. I don’t want to risk messing up my design, so I baked the mold with that little blob of extra LS on it. This can be cleaned up after baking.
Bake the mold following the baking instructions for LS.
Bake the mold following the baking instructions for LS.

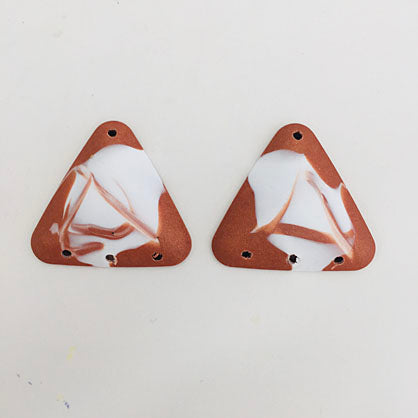
When the mold is completely cool, gently flex it to remove the baked cabochon. Trim extra blobs of LS or rough edges with sharp detail scissors.
Repeat Steps 2-9 to make a second matching piece. If you drag the tool through the liquids in the opposite direction for the second piece, you will make a mirror image pair.
Repeat Steps 2-9 to make a second matching piece. If you drag the tool through the liquids in the opposite direction for the second piece, you will make a mirror image pair.

Use a Dremel drill, pin drill, or spring drill to drill one hole in the top points, and three holes along the bottom edges.
Assemble as shown. Use flat nose pliers to open and close jump rings. Use two jump rings at the top to attach ear wires. Use one jump ring to attach each tassel.
- Choosing a selection results in a full page refresh.
- Opens in a new window.