

Liquid Sculpey® Hearts for Everyone
Liquid Sculpey® Hearts for Everyone
Designed by Amy Koranek
Read More
Read Less
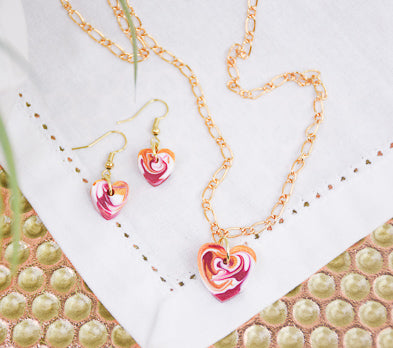
With the Sculpey® Jewelry Mold, it’s fun and easy to make all sorts of heart shaped gifts for all the moms, aunts, sisters, and girlfriends in your life. You can tweak the Liquid Sculpey® colors to match each ones individual style.
TIME TO COMPLETE:60 Minutes to make and bake
ADDITIONAL SUPPLIES
- Paper towel
- Gold tone fish hook ear wires (2 per set)
- 6mm Gold tone jump rings (3 per set)
- 4mm Gold tone jump rings (2 per set)
- 16”-18” Gold tone necklace with clasp
- Flat nose pliers
Project Instructions
- Getting Started with Liquid Sculpey:
- Baking:
After stirring each color of Liquid Sculpey® (LS) completely, drop areas of each color into the large heart shape in the mold. You can see from the photo that I used a very organized pattern for adding my LS to the heart shape.

Use the Needle Tool to gently drag the colors into each other. Dip the tip of the Needle Tool all the way to the bottom of the mold and drag it through the colors. Don’t lift the tip from the liquid until you are completely done swirling through the colors.

Repeat Steps 2 and 3 to fill and swirl the two smaller heart shapes for the earrings.
Bake the mold following the baking instructions for LS. When the mold is completely cool, gently flex it to release the baked heart shapes. .
Repeat Steps 2-4 to create as many sets of hearts as you would like.
Bake the mold following the baking instructions for LS. When the mold is completely cool, gently flex it to release the baked heart shapes. .
Repeat Steps 2-4 to create as many sets of hearts as you would like.

Use flat nose pliers to add the large jump ring to the hole in each heart. .
For the necklace, you can simply string the chain through the jump ring or keep the jump ring open, hooking it to the chain, and then close it with the pliers. .
For the earrings, add the little jump ring to each of the large jump rings. Then add the ear wire to the small jump ring with pliers.
For the necklace, you can simply string the chain through the jump ring or keep the jump ring open, hooking it to the chain, and then close it with the pliers. .
For the earrings, add the little jump ring to each of the large jump rings. Then add the ear wire to the small jump ring with pliers.

- Choosing a selection results in a full page refresh.
- Opens in a new window.