

Liquid Sculpey® Glowing Lace Earrings
Liquid Sculpey® Glowing Lace Earrings
Designed by Amy Koranek
Read More
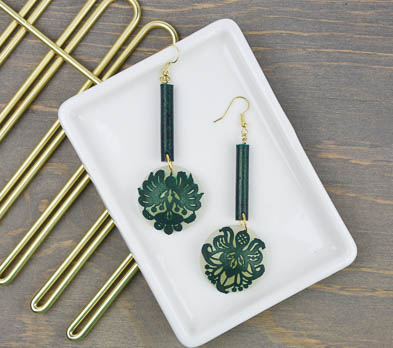
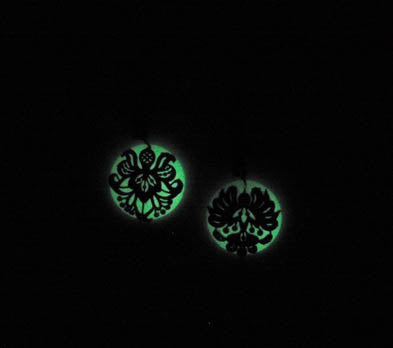
These uber dramatic earrings will be sure to wow your friends! Dramatic by day and glowing in the dark.
TIME TO COMPLETE:
90 Minutes to make, bake, and assemble
Read Less
ADDITIONAL SUPPLIES
- Paper towel
- Small sharp scissors
- 1” Gold tone eye pins (2)
- Gold tone ear wires (2)
- 4 mm Gold toned jump rings (2)
- 8 mm Gold toned jump rings (2)
- Flat nose pliers
- Dremel drill, or spring drill, or pin drill


Project Instructions
- Getting Started with Liquid Sculpey®:
- Baking:
- It is important to use oven thermometer when you bake the liquids so that you can ensure your oven is at the correct temperature.
- Do not microwave the liquids. They must be baked in a Preheated oven at 275 ºF (130 ºC) for liquid colors and 300 ºF (149 ºC) for Clear – Do not exceed baking temperatures.
- If your piece is less than 1/4” bake for 15 minutes. For thicker pieces that are 1/4” or above bake for 30 minutes.
- If your liquid project has become yellowed or discolored in the oven, when you remake it, tent it by placing either – folding an index card in half and placing your project under it by using aluminum foil over your project.
Here’s a tip for baking perfectly in silicone molds. Dampen a dish towel with water and wring out as much of the water as you can. Fold the damp towel so that the molds can sit level on top of it. The damp towel will slow down the curing process so that the LS will cure evenly throughout and avoid warping.
Fill the large circle cabochon cavity with Glow in the Dark Liquid Sculpey® (LS). Tap the mold vigorously on the work surface to release air bubbles. Bake immediately following the baking instructions for Liquid Sculpey®. Allow to cool completely before releasing the baked piece by gently flexing the mold. Repeat to make a second large circle cabochon piece.

Squirt a small amount of Emerald Metallic LS on the areas of the Lace Mold that you would like to incorporate into your design. I’m going to use the large flower areas. You only need an area large enough to cover the two large cabochon pieces.

Spread the Emerald LS with your fingertip into all the little details. Wipe away excess Emerald LS with the included squeegee. Bake the mold following the baking instructions for Liquid Sculpey®.

When the mold is completely cool, release the clay pieces by gently flexing the mold. Trim away any excess with small sharp scissors.

Drape the Emerald pieces over the Glow in the Dark cabochons. Bake again which will cause the Emerald designs to drape. When you take them out of the oven, be sure to use hand protection, and if necessary, press down on the lace pieces while they are still hot to help them attach to the Glow cabochons. Once they are stuck down you can allow them to finish cooling.

Fill the stick shapes in the 3D Jewelry Mold with Emerald Metallic LS. Tap the mold vigorously on the work surface to release air bubbles.

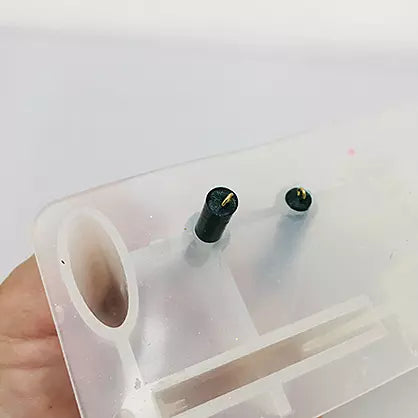
Bend a little loop in the tail end of the eye pins with flat nose pliers. This little loop will keep the eye pins from pulling out of the baked clay pieces.

Place the eye pins on the wire rod that is included in the 3D Jewelry Mold.

Dip the bent ends into the Emerald stick shapes. Position the eye pins in the center of each stick shape using the Needle Tool if needed. Place the ends of the metal rod on the little brackets which are molded into the 3D Jewelry Mold. Bake the mold following the baking instructions for Liquid Sculpey®. Allow to cool completely before handling.

To release the stick shapes from the mold, squeeze a gap between the mold and the clay piece, and squirt a drop of Liquid Softener & Thinner in the gap. Use the Needle Tool to drag the Softener & Thinner all the way around the clay piece.

Squeeze the sticks out of the mold from the bottom up.
Using a 1/16” drill bit, drill a hole in each of the cabochons at the top. Drill a hole through each of the sticks at the bottom. Lay the pieces out as you would like them to be assembled.

Attach the ear wires to the eye at the top of the sticks with a 4 mm jump ring using flat nose pliers. Attach the sticks to the cabochons with an 8 mm jump ring using flat nose pliers.

- Choosing a selection results in a full page refresh.
- Opens in a new window.