
Liquid Sculpey® Fuchsia Color of the Year Dangle Earrings
Liquid Sculpey® Fuchsia Color of the Year Dangle Earrings
Designed by syndee holt
Read More
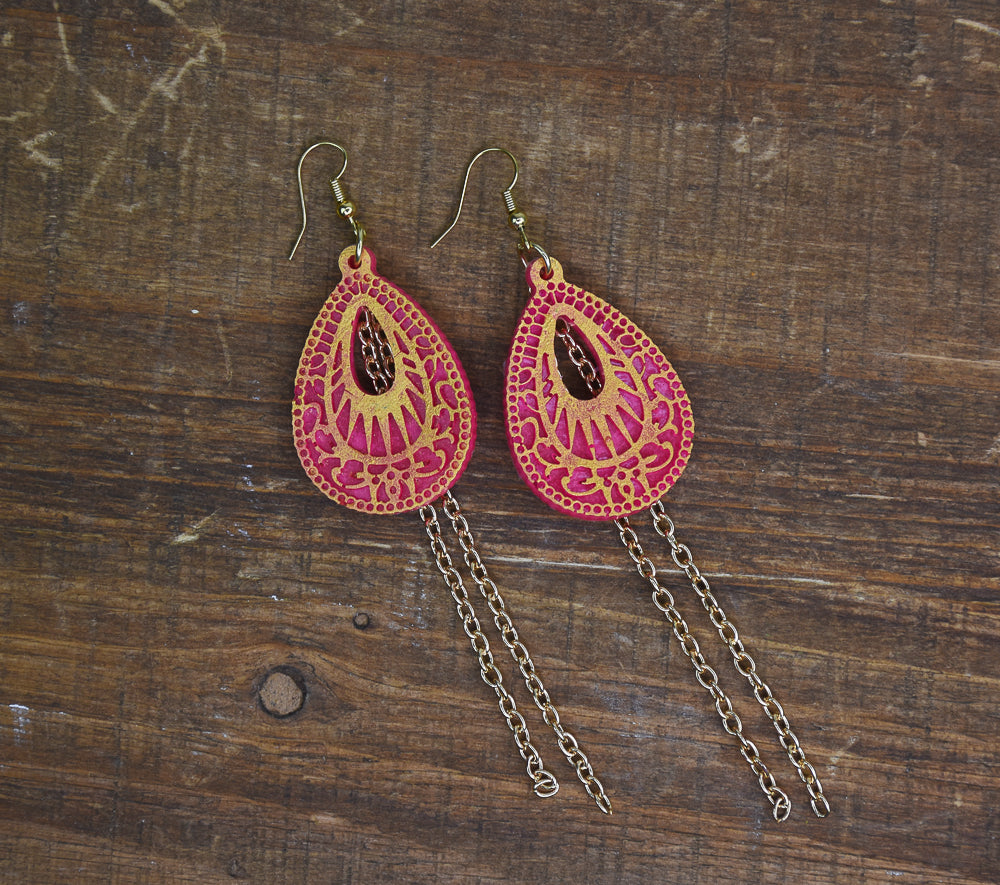
Liquid Sculpey® Fuchsia really highlights the Pantone Color of the Year, Viva Magenta. What better way to join the color trend than with a beautiful pair of dangle earrings that are created in this color with golden highlights on the detail of the mold and golden chain dangles!
TIME TO COMPLETION: 60 minutes to make, bake and take!
Read Less
ADDITIONAL SUPPLIES
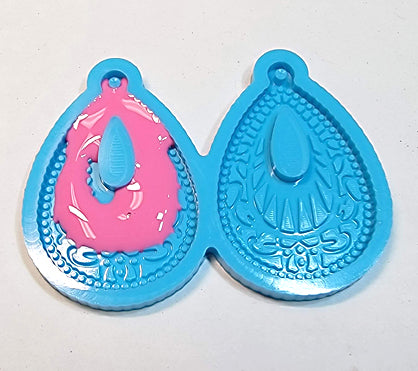
- Your favorite silicone earring mold (this one is from Etsy)
- Gold acrylic paint, a small paint brush and a makeup sponge
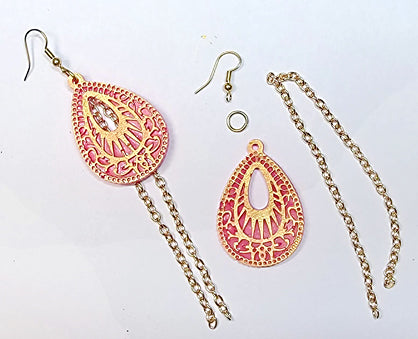
- Gold-toned ear wires and jump rings (2 each)
- Optional: Gold-toned chain to hang from the back of the jump ring (mine are about 7 inches each)
- Several toothpicks to help spread the LS

Project Instructions
- Getting Started with Liquid Sculpey® (LS):
-
Baking:
- -It is important to use oven thermometer when you bake the liquids so that you can ensure your oven is at the correct temperature.
- -Do not microwave the liquids. They must be baked in a Preheated oven at 275 ºF (130 ºC) for liquid colors and 300 ºF (149 ºC) for Clear – Do not exceed baking temperatures.
- -If your piece is less than 1/4” bake for 15 minutes. For thicker pieces that are 1/4” or above bake for 30 minutes.
- -If your liquid project has become yellowed or discolored in the oven, when you remake it, tent it by placing either – folding an index card in half and placing your project under it by using aluminum foil over your project.
Here’s a tip for baking perfectly in silicone molds. Dampen a dish towel with water and wring out as much of the water as you can. Fold the damp towel so that the molds can sit level on top of it. The damp towel will slow down the curing process so that the LS will cure evenly throughout and avoid warping.
Wash and dry your mold completely to make sure that it is dust free. Place the mold on a flat work surface. Gently squeeze a small amount of the stirred Fuchsia Liquid Sculpey (LS) into just the top area of each mold.
Use the sharp end of the toothpick to gently guide the LS around the post portion of the mold. I also run it down the sides of the mold as I fill it.

Continue to fill the mold, using the toothpick to help guide the flow of the LS. I like to gently pick the mold up just an inch or two off of the work surface and drop it back onto my work surface as I continue to fill the mold. This encourages any hidden bubbles from surfacing and popping. This mold is small and fairly sturdy so it was pretty safe to do so.

Place the filled mold on your baking sheet. Yes, I like to put a small piece of a dampened microfiber towel underneath the mold as described in the “Getting Started with Liquid Sculpey” in step 1. Place the baking sheet with the mold in your preheated oven and bake/cure according to the direction in Step 1.
Once the mold has baked/cured and cooled to just finger warm, gently pop the clay out of the mold. Artist tip: Sometimes with thin molds like this one, I like to put a heavy clean tile on top of the mold as it cools to keep the clay/mold from curling as it cools off.
Once the mold has baked/cured and cooled to just finger warm, gently pop the clay out of the mold. Artist tip: Sometimes with thin molds like this one, I like to put a heavy clean tile on top of the mold as it cools to keep the clay/mold from curling as it cools off.

Once the clay is completely cooled, I used my small paint brush to brush a thin layer of Gold acrylic paint onto a make up blending sponge and I gently DAUBED the paint onto the top surfaces of the molded design.

I allowed the first coat to dry before adding a second coat to really ramp up the golden contrast to the gorgeous Fuchsia LS. Allow to dry completely. You can see how the Gold paint really highlights the intricate design.

Assembly is pretty easy, just open the jump ring and thread through the hole at the top of the earring and add the ear wire. Of course, you can also add some dangling chain like I did as well. These are two 7-inch lengths that I threaded onto the open jump ring in the back of the earring.
Here is a look at my completed earrings.
