

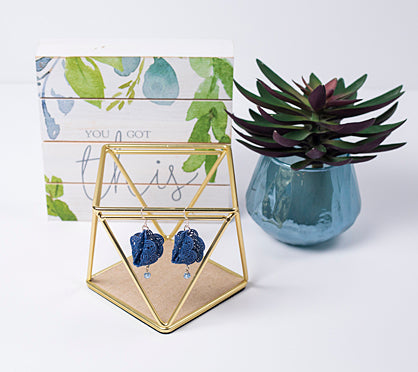
Liquid Sculpey® Folded Mandala Earrings
Liquid Sculpey® Folded Mandala Earrings
Designed by Amy Koranek
Read More
Read Less
Make and bake mandalas in the Sculpey® Silicone Bakeable Mandala Mold. Then fold them up like a fortune cookie to make a delicate looking dangle that’ll make people wonder, “How did you do that!?”
TIME TO COMPLETE:90 Minutes to make, bake, and assemble
ADDITIONAL SUPPLIES
- Paper towel
- 91% Isopropyl alcohol
- 6mm Bright silver tone jump rings (4)
- 4mm Bright silver tone jump rings (2)
- Bright silver tone ear wires (2)
- 1” Bright silver tone head pins (2)
- Light blue crystal beads (2)
- Wire cutters
- Round nose jewelry pliers
- Flat nose jewelry pliers
Project Instructions
- Getting Started:
- Baking:
Squirt a small amount of Navy Metallic Liquid Sculpey® (LS) into the center of the largest mandala shape.

Spread the LS all over the mandala filling all the details with either your fingertip or the squeegee included with the mold. Add more LS as needed to make sure all the tiny details are completely filled.

Squeegee off the excess LS from the back of the filled design with the included squeegee. To get the design of the mandala even more perfect you can try this tip. Fold a single paper towel into a thick pad. Moisten the pad with just enough alcohol to make it damp. Swipe the pad across the filled design once or twice gently. This will clean the little windows in the mandala.

Bake the mold following the baking instructions for LS. When the mold is completely cool, remove the mandala by gently flexing the mold. Repeat Steps 2-5 to create a second mandala.

Bend one of the mandalas in half and secure the top and bottom lobes together with a 6mm jump ring using flat nose pliers. Close the jump ring.

Position the jump ring that you just secured in Step 6 at the top of the mandala. Carefully pinch the extreme left and extreme right lobes toward each other and downward forming a “fortune cookie” style fold. Secure these two lobes to each other with another 6 mm jump ring.

Repeat the folding in Steps 6 and 7 for the second mandala. Connect an ear wire to the jump ring at the top for each earring.
Insert a head pin into each of the crystals. Trim the tails of the head pins to 3/4” above the crystals with wire cutters. Curl a little loop down in the tail to just above the crystals with the round nose pliers.
Connect the little loops to the mandalas at the bottom jump ring with the flat nose pliers.
