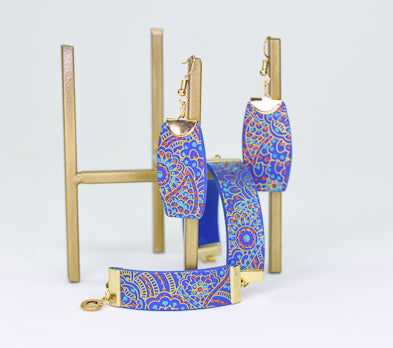


Sculpey Soufflé™ Soda Can Bracelet
Sculpey Soufflé™ Soda Can Bracelet
Designed by syndee holt
Read More
In my house my jewelry functions as part of my décor! No way am I going to hide all that work in a drawer.
I’m teaming up my go-to clay, Sculpey Soufflé™, to create the Pantone Color of the Year for 2022 – Very Peri. I’m also adding a Moiko silkscreen, an empty soda can and an old clay wrapper to help create some “dot magic” for this bracelet. TIME TO COMPLETION: Apx. 1 hour including baking and assembly
Read Less
I’m teaming up my go-to clay, Sculpey Soufflé™, to create the Pantone Color of the Year for 2022 – Very Peri. I’m also adding a Moiko silkscreen, an empty soda can and an old clay wrapper to help create some “dot magic” for this bracelet. TIME TO COMPLETION: Apx. 1 hour including baking and assembly
ADDITIONAL SUPPLIES
- Empty soda can
- Old clay wrapper
- Moiko silkscreen
- Gold, Copper and turquoise acrylic paints
- Gold-toned 1/2-inch ribbon crimps (6)
- Gold-toned snap clasp (1) (I prefer these because they are secure, take little space on the wrist)
- Gold-toned oval jump rings (4) – mine are 8x5 mm 24 gauge (oval rings have the opening on the SIDE of the oval – more secure than a round ring on these bracelets)
- Silicone brush, silkscreen paddle or old credit card
- Lined paper or index cards
- Jewelry pliers, plastic coated pliers (or taped pliers)
- OPTIONAL: More ribbon crimps and ear wires to create earrings

Project Instructions
- Getting Started:
Start with clean hands, unwrap and knead clay until soft and smooth, or condition by running clay though a Pasta Machine. We recommend using a designated machine for clay purposes only. When working with multiple colors, clean hands with soap and water or baby wipes (we have found that baby wipes work best) before switching colors. Shape clay, pressing pieces firmly together. Wash hands after use.
- Baking:
MIXING THE COLOR: I mixed several color swatches and baked them before I settled on the 8-part Cornflower to 1 part Royalty mix. I wanted a more “buoyant” or bright version of the color.
If you prefer a slightly darker color, don’t add Poppy Seed to the mix – add a little Pumpkin. Pumpkin is an opposite, or complementary, color to the Cornflower and will tone down the mix without making it overly dark. #1 above is my preferred mix. (8C/1R), #2 is 16 parts Cornflower, 2 parts Royalty and 1 part Pumpkin. #3 is 8 Cornflower, 2 Royalty and 1 Pumpkin. #4 is 4 Cornflower, 2 Royalty, 1 Pumpkin. It is amazing how much that little bit of a complementary color can affect the color!
If you prefer a slightly darker color, don’t add Poppy Seed to the mix – add a little Pumpkin. Pumpkin is an opposite, or complementary, color to the Cornflower and will tone down the mix without making it overly dark. #1 above is my preferred mix. (8C/1R), #2 is 16 parts Cornflower, 2 parts Royalty and 1 part Pumpkin. #3 is 8 Cornflower, 2 Royalty and 1 Pumpkin. #4 is 4 Cornflower, 2 Royalty, 1 Pumpkin. It is amazing how much that little bit of a complementary color can affect the color!

I use the Sculpey Tools™ Circle Cutters to portion out my clay to create my mixes. Here is my final choice of 8 Cornflower to 1 part Royalty.

I have sheeted out my clay mix on the #3 setting on my Clay Conditioning Machine and placed my silkscreen with the emulsion side down (you should be able to read MOIKO correctly in the corner). Gently press the silkscreen onto the clay and smooth out any bubbles. GENTLY!

I prefer to a silicone brush to apply my paint to a silkscreen. I also apply the paint to my brush (or scraper). Yes, this much paint will fill that entire screen!

Quickly spread the paint across the screen as evenly as possible.

Once the entire screen is covered (or clay area), carefully peel back the screen and squeal in delight at your creation! Then dash to the sink and thoroughly wash the silkscreen. Those microfiber towels are really great to dry a screen quickly.

While I’m (im)patiently waiting for the screen to dry, I trim the edges of the clay to the screened pattern.

I line the clay sheet up on a lined piece of paper (index card) and use one of the ribbon crimps to determine how wide to cut each strip and I use the lines on the card to help me measure and cut.

I generally cut 4 strips so I have an option for the 3 best for my bracelet. Set aside the remaining clay to create some earrings and/or pendant.

My strips are 3 inches long, but I generally like to start with strips that are 2-1/2 inches long. That length is the approximate length of the top of my arm, so I make them all to fit the top of my arm.

Put a couple of small puddles of paint on an old clay wrapper. Shallow puddles are easier to use for this technique than deeper pools of paint. (THANKS Lynn Yuhr!)
Those small pieces that we trimmed off the edge to make our lengths 2-1/2 inches are perfect to practice your dot technique and check your colors! Just dip the tip of the smallest Double Ended tool gall stylus to create your dots. Just dip into the puddle gently and then lightly dot the clay. I can usually get 3 dots before reloading the tool.
DESIGNER NOTE: Keep a tissue or baby wipe handy and wipe off the ball stylus frequently!

Now you can start to dot your 4 strips you have cut! If you decide that a color dot isn’t right, just wait for it to dry and dot right over it – even with a different color!
DESIGNER TIP: If my paints start to thicken (or are thick to begin with), I just give them a little spray of water and stir them with a toothpick.
DESIGNER TIP: If my paints start to thicken (or are thick to begin with), I just give them a little spray of water and stir them with a toothpick.

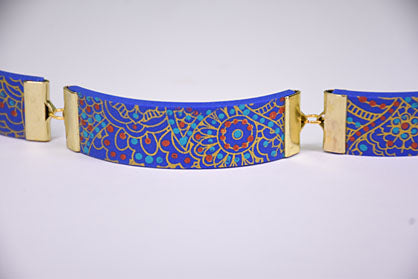
Here is a dotted strip and a plain silkscreened strip. What a different those little colorful dots make!

Once your strips are dotted, allow them to dry.

An empty soda can is a perfect shape for the gently curve we want these pieces to have. Lightly press the strips to the can.
I use my Sculpey Tools™ Hollow Bead Maker to hold my can securely so that it doesn’t roll when I transport the soda can and position it in my preheated oven.
Bake your clay according to the directions in Step 1 above.
I use my Sculpey Tools™ Hollow Bead Maker to hold my can securely so that it doesn’t roll when I transport the soda can and position it in my preheated oven.
Bake your clay according to the directions in Step 1 above.

While my first pieces are baking, I dot my remaining clay and ponder what shapes to cut for earrings and pendant! Ohhh, maybe a mini bowl?

My clay is baked and cooled and it is decision time. Which piece is my favorite? Once I select that one, I trim about another 1/2-inch off of the other two pieces. This measurement will vary with your wrist size though. This clay is thin enough that I can make that trim with just a pair of craft scissors.

I like to hold the ribbon crimp between my thumb and forefinger tightly and use my plastic-coated pliers to crimp it. (You can tape your pliers to do this also – this prevents unsightly scratches to the metal crimp.) I NEVER completely tighten my crimps until I have assembled the entire bracelet and tried it on. (This is useful if you sell your work. You can custom fit to the client, trim and tighten for a completely custom fit!)

Here are all my pieces with the crimps in place. Now I add the oval jump rings and the snap clasp and try the fit. If all is well, I can do the final squeeze with the pliers to secure the crimps!

I used my spare clay to create a pendant and earrings. These are a half round crimp, but the regular ones will work as well.
