

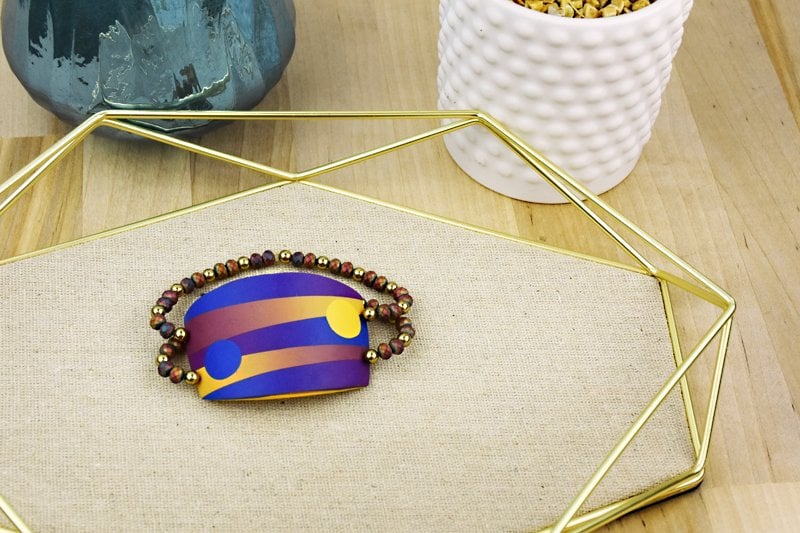
Sculpey Soufflé™ Skinner Blended Half Cuff Bracelet
Sculpey Soufflé™ Skinner Blended Half Cuff Bracelet
Designed by Syndee Holt
Read More
Read Less
Souffle clay colors are perfect for showing off your blending skills! The Skinner Blend is arguably the most important special technique in polymer clay. This is a technique to smoothly blend 2 or more colors.
ADDITIONAL SUPPLIES
- Patty paper
- Elastic string
- Beads
- Empty can
Project Instructions
- Getting Started:
Start with clean hands, unwrap and knead clay until soft and smooth, or condition by running clay though a Pasta Machine. We recommend using a designated machine for clay purposes only. When working with multiple colors, clean hands with soap and water or baby wipes (we have found that baby wipes work best) before switching colors. Shape clay, pressing pieces firmly together. Wash hands after use.
- Baking:
Mix the package of Canary with 1/4 package of the Cinnamon. This will make a lovely yellow ochre (or gold) color. Sheet the clay out on the #2 setting (second from widest) and trim to about a 3 inch square. Do the same with a portion of the conditioned Grape clay.

Use your Super Slicer blade to bisect the square from the bottom right corner to the CENTER of the top of the square. Rotate the triangle to the top as shown to create a large right angle triangle.

Position the second color as shown. If the outside edges don’t quite meet perfectly, don’t fret! The center edges are the most important. Now we have the classic 2 right angle triangles needed for a Skinner blend. Fold the top rectangle of color down over the bottom rectangle as shown.


Roll the folded clay through the clay conditioning machine. Fold the bottom to the top and roll through. Repeat this process, always keeping the lines of color perpendicular to the rollers of the machine (do not rotate the sheet of clay left or right). Fold and roll until the color blend is smooth to your satisfaction. NOTE: Sometimes the blend can appear and then disappear- don’t panic it will reappear as long as you have rotated the clay left or right. Repeat these steps using the Grape and Cornflower Blue clays.


Sheet out the remaining Canary/Cinnamon mix on the #3 setting. Use the Super slicer to cut angled pieces of both blends and stack them as shown. Once you have about a 3 inch square, use the circle cutter to carefully cut through the blended pieces (not through the backing though) and pick the clay out. Replace this circle with circles of the Gold mix and the Cornflower Blue (or whichever color you wish!)

Place the sheet of patty paper over the clay and use the acrylic roller to help smooth the edges of the clay pieces together. Go slow, take your time – don’t press so hard you smear the edges!


Use the flexible blade to cut a geometric shape. I know the width of my wrist visually so I just cut away. I recommend that you measure the top of your wrist where the half cuff will rest and then draw your shape on a piece of paper. Cut the shape out, wrap it lightly on your wrist to approve the shape. Then use the shape as a template to cut your clay. Note that my shape has no two edges the same!

Gently wrap the completed shape around a soda can and bake as directed in Step 1. NOTE: if you warm the can for about 10 seconds in the oven, the clay will adhere to the warm metal without excess pressure from you. Make sure that you allow the oven to go back to temp before you put the clay in to cure!

Once the clay has baked and cured, pop it off the soda can. Souffle clay is so easy to drill after baking that I almost always drill after baking with my pin vise hand drill. I positioned my holes about 1/4 inch in from the edges of the smaller side and matched the distance between the holes on the other side (sounds difficult, but it’s really not/ and NO I don’t measure!)

Thread a longish length of beading elastic through one set of holes from the back of the half cuff to the front. There should be enough elastic on both sides so that you can thread your beads on (to fit your wrist) and have enough room to tie off on the opposite side of the cuff. Thread your beads onto both sides of the elastic to fit your wrist. Thread each side of the elastic through the FRONT of the other side of the half cuff and knot the elastic on the back. Trim and slide your new half cuff on and admire it!

