Skip to product information
1 of 1

Sculpey Soufflé™ Racing Green Graphic Transfer Bracelet

Sculpey Soufflé™ Racing Green Graphic Transfer Bracelet

Read More
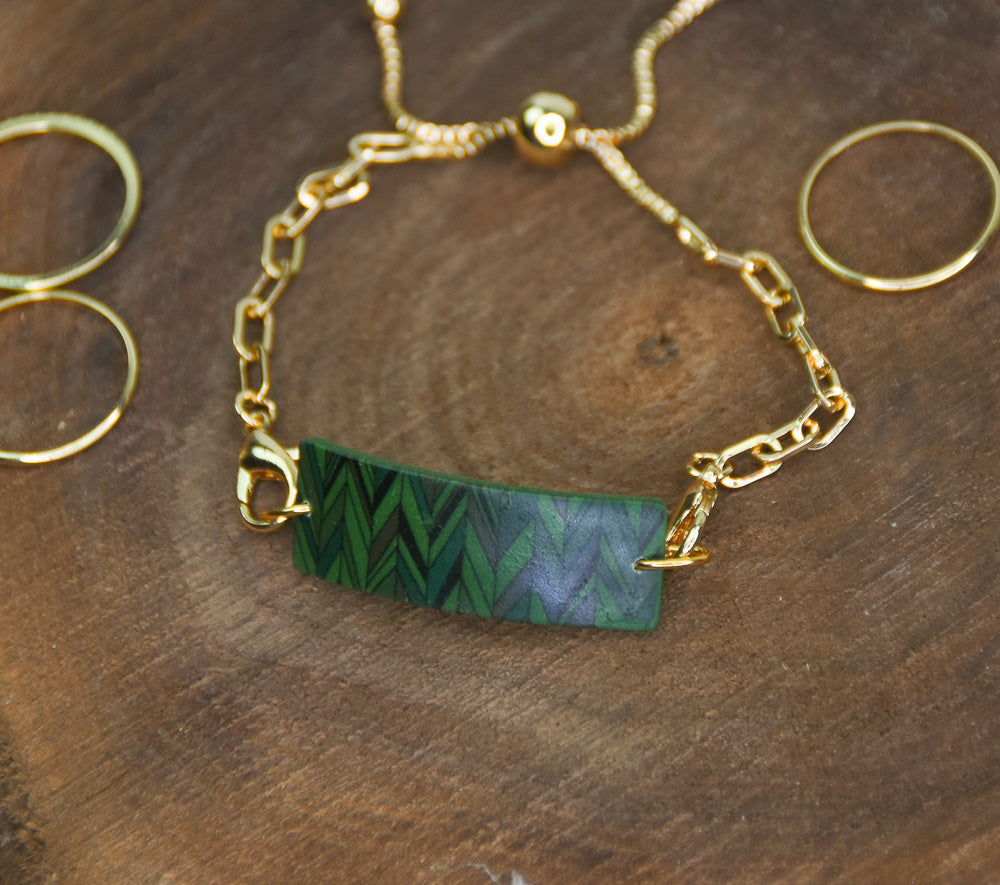
Color Transfers are popular right now, so why not be bold and try a transfer on a bold color? The effect on this simple ID bracelet style was stunning! TIME TO COMPLETION: 1 hour to make/45 minutes to bake and assemble. Designed by syndee holt
Read Less
ADDITIONAL SUPPLIES
  • Color Transfer (mine is from Spumoni Supplies on Etsy)
  • Brush for final glaze
  • Empty soda can and a small smooth tile to transfer on
  • Connected Gold-toned Metal Chain Connector
  • 2 gold-toned jump rings (mine are 8x6 mm ovals)
  • Optional: Graph paper
View full details
Project Instructions

Step 1

Getting Started:
Please make sure your work area is covered and you are not working on an unprotected surface. We recommend working on the Sculpey® Oven-Safe Work Mat, wax paper, metal baking sheet, or disposable foil. Uncured clay may damage unprotected furniture or finished surfaces. Be sure to cover your crafting area appropriately.


Start with clean hands, unwrap and knead clay until soft and smooth, or condition by running clay though a Pasta Machine. We recommend using a designated machine for clay purposes only. When working with multiple colors, clean hands with soap and water or baby wipes (we have found that baby wipes work best) before switching colors. Shape clay, pressing pieces firmly together. Wash hands after use.


Baking (also called Curing):
Begin by preheating oven to 275 °F (130 °C). After you are done creating; for best results bake/cure clay on an oven-proof surface such metal, aluminum foil, an index card or the Sculpey® Clay Mat at 275°F (130 °C) for 30 minutes per 1/4" (6 mm) thickness according to package directions. Oven safe glass or ceramic surfaces are also acceptable for baking/curing; however please note that the baking/curing times may take longer as the glass or ceramic surfaces take longer to heat up. For best baking results, use an oven thermometer. DO NOT USE MICROWAVE OVEN. DO NOT EXCEED THE ABOVE TEMPERATURE OR RECOMMENDED BAKING TIME.

Step 2

Follow the explicit directions for your colored transfer stamp closely! This one started with applying a thin layer of Translucent Liquid Sculpey (TLS) to the surface of the trimmed transfer before brayering the transfer to the sheet of prepared clay. NOTE: My sheet of clay is brayered on a medium setting on the pasta machine.

Step 3

I was excited that my first try came out so well!

Step 4

Carefully slide your clay blade under the sheet of clay to remove it from the working tile.

Step 5

I had determined that I wanted my piece to be about 1/2 inch by 1.5 inch length. But actually, my transfer came out so well, I made with 1/2 inch a little wider.
I find that cutting my pieces on graphing paper makes my day go much better (and my precious clay as well!)

Step 6

I actually got quite a bit of working pieces from that small transfer! I used my needle tool to place the holes. This is IMPORTANT! You want to make your holes BEFORE baking so that you don’t disturb the transfer surface after baking.

Step 7

I like to bake my bracelet pieces on an old soda can that I place down the middle of the “bumps” on a Hollow Bead Maker to keep it secure.
My transfer directions called for one final coat of TLS to the top of the transfer before baking. Bake as directed above in Step 1.

Step 8

Assembly on this bracelet is really simple! Just add the jump rings to the clay, close the jump rings and use the lobster clasps to attach the jump rings to the bracelet!

Step 9

Here is a look at the completed project!