

Sculpey Premo™ Square Beaded Bracelet
Sculpey Premo™ Square Beaded Bracelet
Designed by Syndee Holt
Read More
Read Less
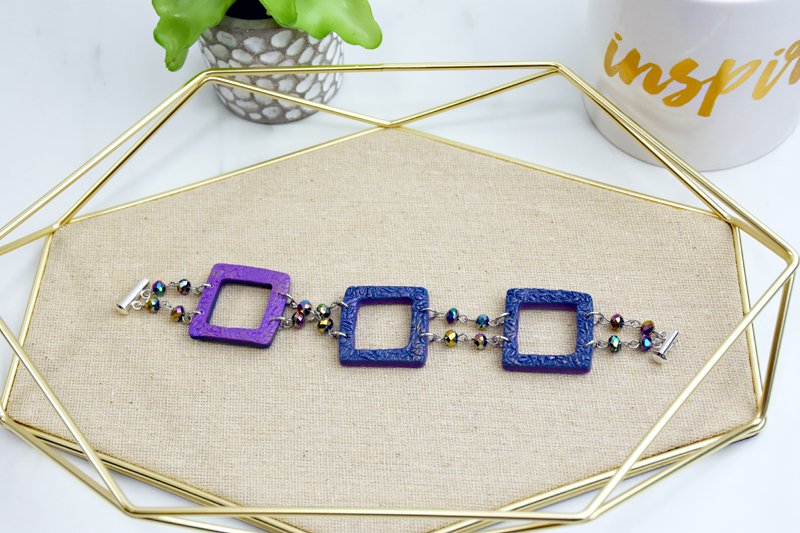
The clever Sculpey Premo™ bracelet has a secret bonus – it’s reversible! The Sculpey® Square cutters make the project super quick to make. You can swap out the colors for your own as well.
ADDITIONAL SUPPLIES
- Beaded chain
- Pearlex powder
- 12 Beads
- Texture
Project Instructions
- Getting Started:
Start with clean hands, unwrap and knead clay until soft and smooth, or condition by running clay though a Pasta Machine. We recommend using a designated machine for clay purposes only. When working with multiple colors, clean hands with soap and water or baby wipes (we have found that baby wipes work best) before switching colors. Shape clay, pressing pieces firmly together. Wash hands after use.
- Baking:
Sheet out 1/2 block of the conditioned Navy Blue clay on the second from widest setting of the clay conditioning machine. Spray the soap saver (or your selected texture) with water and press firmly into the Navy Blue clay. Repeat for the Fuchsia.

Stack the two textured layers together (textures facing out!). Use the 1-1/2 inch (38mm) to cut out 3 squares. Use the next size down cutter to cut out the center of each of the squares. (My method is to look from the front of the cutter to make sure that the two sides are even, then look from the top to make sure top/bottom are even!)

Press your finger into the lid of the Pearl Ex jar and lightly rub across the top surfaces of the texture on both sides of the squares.

Use the needle tool to put two holes two sides of each square. Take care that the holes are evenly spaced on each square. Bake as directed in step 1. NOTE: If you elect to make the single strand bracelet shown below, position the holes as shown in the photo.


Dip your glaze brush into water and touch to a paper towel (okay, I use my jeans), then tip just the tip of the brush into the glaze. Lightly glaze the squares taking care to leave to excess glaze in the bottom portions of the texture. Once this side is dry, flip the squares and glaze the other side.

Put the jump rings into your holes and attach the chain between each square. I mark out 7-1/2 inches on a sheet of paper and arrange my squares and chain to center inside the marks. Add your clasp and you are ready to wear your bracelet!


