

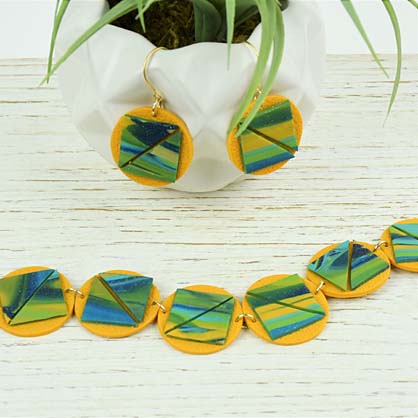
Sculpey Premo™ Marbled Mustard Tiled Bracelet
Sculpey Premo™ Marbled Mustard Tiled Bracelet
Designed by syndee holt
Read More
Read Less
Sculpey Premo™ Mustard adds a pop of color to any mix, especially a marbled clay mix. Use the Sculpey Triangle Mosiac cutters to create your colorful tiles for the bracelet.
TIME TO COMPLETE: 60 minutes
ADDITIONAL SUPPLIES
- Clean paper
- Sandpaper or small texture
- Small spray bottle of water
- Small jewelry pliers
- Gold-tone 7 mm jump rings (7)
- Closure of your choice (mine is called a “trailer hitch clasp”)
- If you want to make earrings to match, you will need 2 more jump rings and ear wires.
Project Instructions
- Getting Started:
Start with clean hands, unwrap and knead clay until soft and smooth, or condition by running clay though a Pasta Machine. We recommend using a designated machine for clay purposes only. When working with multiple colors, clean hands with soap and water or baby wipes (we have found that baby wipes work best) before switching colors. Shape clay, pressing pieces firmly together. Wash hands after use.
- Baking:
Roll out small lengths of each of the conditioned clays. Mine are a little narrower than a pencil width and about 4 inches long. I have 2 of the Mustard coils in the mix so that I could alternate color families (blues and gold) better. Twist the lengths together as shown in the bottom photo.

Lay the twisted coils on your clean worksurface (I like to use sheets of paper – I often recycle my printed paper and use the other side!). Gently roll the coils back and forth to blend the coils together. Yes! You can also keep twisting if you wish!
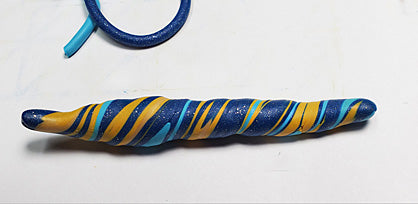
Once you have your clay twisted to your satisfaction, use the Sculpey acrylic roller to gently flatten the twisted coil enough to run through the Clay Conditioning Machine on the widest setting. Do NOT fold the clay, but run it through on the medium setting on the machine, keeping the lines in a mostly vertical position.

Place this sheet of clay on a piece of paper and firmly press the smaller version of the mosaic cutter into the clay. (NOTE: I pressed mine in and then turned it over and used the acrylic roller to roller over the cut side to ensure that all the pieces were properly cut.) Set your pieces aside for now.

Roll out another piece of the conditioned Mustard clay out on the same setting that you used for the mosaic pieces. Lightly texture this sheet with the sand paper (or texture of your choice). Spray the texture with water first to help the clay release. Use the 1.25 inch cutter to cut out at least 6 circles.

Position two marbled mosaic pieces on each circle and add a small drop of Bake n’ Bond to the back of each triangle. I put a small piece of clean paper on top and gently rubbed the pieces in place. Repeat for each of the circles.
Lay out your pieces in the pattern you want and use your Sculpey needle tool to pierce on either side of the circle for later assembly. NOTE: you can make your tiles all go in one direction are alternate them like I have. Bake as directed above.

Once your pieces have baked and cooled, assemble your bracelet using your small jewelry pliers to open and close the jump rings to connect the pieces and your bracelet clasp.
All done! If you have extra pieces, you can make earrings out of them! This is why I like to drill my clay AFTER baking with a small jewelry hand drill (sometimes called a pin vise). Souffle is SOOOO easy to drill after baking!
All done! If you have extra pieces, you can make earrings out of them! This is why I like to drill my clay AFTER baking with a small jewelry hand drill (sometimes called a pin vise). Souffle is SOOOO easy to drill after baking!
