
Sculpey Premo™ Glittering Organic-Look Flower Bracelet
Sculpey Premo™ Glittering Organic-Look Flower Bracelet
Designed by Anke Humpert
Read More
Read Less
Make a colorful and gently sparkling organic flower bracelet using the Sculpey® Accents- Multipack!
TIME TO COMPLETE: 2 hours including baking
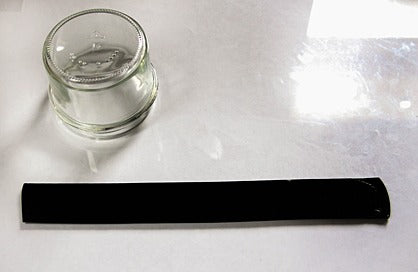
ADDITIONAL SUPPLIES
• A small craft knife (like an Exacto knife)
• Some regular printer paper.
• A glass jar or soda can (should be the size of your bracelet!).
• Some aluminum foil.

Project Instructions
- Getting Started:
Start with clean hands, unwrap and knead clay until soft and smooth, or condition by running clay though a Pasta Machine. We recommend using a designated machine for clay purposes only. When working with multiple colors, clean hands with soap and water or baby wipes (we have found that baby wipes work best) before switching colors. Shape clay, pressing pieces firmly together. Wash hands after use.
- Baking:
First condition your pack of black clay! This will be the core of your bracelet. Roll the clay out on the thickest setting of your clay conditioning machine to a long narrow strip. It should be long enough so you can wrap it around your glass jar and a bit to join the seams. The with of the bracelet is about 1 1/2 inch.
Wrap some paper around the jar to make the clay come off easier after curing. Wrap your clay strip around and join the ends to a clean connection. Don´t overlap your clay. Cure on the jar for 40 minutes at 275°F/130°C. Let cool completely before you work on the next step.

Condition the Twinkle Twinkle clay color for the outside of your bracelet. It´s one of the colors in your sample pack. Roll out a long strip on the thickest setting of your clay condition machine. Wrap it around the black bracelet core and join like you did with the core of the bracelet.

Use your blade to clean the edges of the bracelet.

Now condition the Opal clay color for the inside of your bracelet. Roll out a long strip on the thickest setting of your clay condition machine. Wrap it around the black bracelet core on the inside! Join the clay like you did before. And clean the edges with your blade. The Opal has a lot of inclusions so you need to be careful with this step

Now your bracelet should look similar to this one: the black core is cured, the Twinkle Twinkle and Opal are still uncured.

Now condition all the color of the sample pack that you would like to use for making the flowers. I started with Sunset Pearl. I divided the clay in 8 pieces of which I set 4 aside, divided the others in half, set four aside and divided the remaining in half again. So I have three different sizes of clay portions: 1/8, 1/16 and 1/32 of a half block. I rolled them all into little balls. Then I pressed them flat with my fingertips and hand sculpted them into little cup shaped flowers. I wanted them to be organic, so I purposely made them not even but a little thicker and thinner in various places of the little cups. I also used the style and detail tools to further press them into cup shapes like in the picture above.

Do the same with all the colors you want to use and in 3 different sizes! I used up all the colors except Granite and Yellow Gold Glitter. Some of the colors need a little more care when conditioning them, mostly the clay with a lot of inclusions! Take the time to condition the clay carefully so your flower petals will not break off!

When you have made all your cups stack them alternating colors and sizes. For the center of my flowers I rolled a little ball of the rest of my clay and pressed it in with my ball tipped tools. Your flowers should be pressed a little flat at the bottom, so they can be placed on the outside of the bracelet. I needed 10 flowers for the outside of my bracelet.

Attach the flowers to your bracelet. Add some Bake and Bond in between to make a stronger bond between that connection! My flowers are a little wider than my bracelet with, so I placed the bracelet on a metal bowl, that I turned up side down for curing. To help fix the flowers during the curing process wrap some aluminum foil that you folded into a thick strip carefully around your flowers! Cure on the bowl for 40 minutes at 275°F/130°C. Let the bracelet cool completely before taking it out of the oven.
