

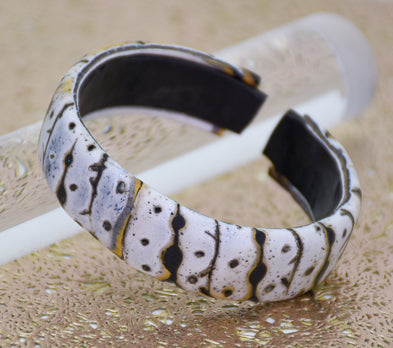
Sculpey Premo™ + Sculpey Souffle™ Mokume Gane Bangle
Sculpey Premo™ + Sculpey Souffle™ Mokume Gane Bangle
Designed by Amy Koranek
Read More
The Mokume Gane technique can be as controlled or as random as you like. Explore different color combinations and a variety of impressions for limitless looks.
COMPLETION TIME:
60 Minutes to make and bake
Read Less
ADDITIONAL SUPPLIES
- Glass bottle or metal circle cutter for bangle form
Project Instructions
- Getting Started:
Start with clean hands, unwrap and knead clay until soft and smooth, or condition by running clay though a Pasta Machine. We recommend using a designated machine for clay purposes only. When working with multiple colors, clean hands with soap and water or baby wipes (we have found that baby wipes work best) before switching colors. Shape clay, pressing pieces firmly together. Wash hands after use.
- Baking:
Make equal volume pieces of conditioned clays in Soufflé™ Poppyseed, and Premo™ in Frost White Glitter, 18K Gold, and Gray Granite. My squares shown here are about 1.5” square. The pieces should be just less than 1/8” in thickness or if you are using a pasta machine - the second thickest setting.

Stack the colors as shown. When making a Mokume Gane stack, it’s important to assemble the colors in an order that when the colors are partially blended with the colors next to them, the blend will be pleasing.

Flatten the stack with the roller to press out air bubbles. Flatten until the stack is no more than 1/4” thick.

Divide the stack in half horizontally as shown with the Clay Blade across the middle.

Layer the two halves one on top of the other.

Roll the new stack with the Clay Roller until it is about 3.5” wide and 2” tall. Trim away the excess top and bottom with the Clay Blade.
You’ll notice that my background has changed. I have the clay pressed hard to my (laminate) work surface so that it sticks down really well. This makes the next few steps easier because the clay is not able to move around.
Now for the fun part. We will make impressions through the clay stack that will later yield our cool pattern.
Use the Needle Tool to make a series of parallel and slanted lines in the clay. Make deep impressions but not going all the way through. Also try to keep the impressions of equal depth into the clay and equal distance from each other.

Repeat the impressions with the Needle Tool, this time going from the top down in between the first set of lines.

Use the Ball Tool to dimple every other line.

Use the Knife Tool to score little dashes in the lines that don’t have dimples.

Use the Blunt Tool to dot the clay between the lines.

Roll over the stack with the Acrylic Clay Roller to heal the impressions.

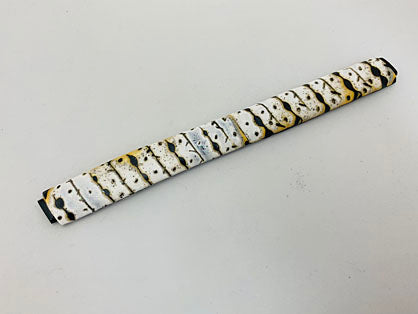
Use the Flexible Clay Blade to carefully slice the surface of the clay stack away.

Open the slices up and set them aside revealing the beautiful pattern that is inside the stack.

Keep slicing until all of the pattern is revealed to your liking.
Use the Rigid Clay Blade to divide the pattern in half lengthwise.
Use the Rigid Clay Blade to divide the pattern in half lengthwise.

Form a flat rope from Poppyseed that is 7” long and 1/2” wide. This rope should be at least 1/8” thick for the strength needed for a bangle bracelet.

Position the Poppyseed rope next to the Mokume Gane pattern.

Place one half of the pattern on one end of the rope and the other half on the other end. Butt them together in the middle and take some time to smooth this seam.

Carefully bend the patterned clay over the sides of the Poppyseed base making sure there is really good adhesion between the layers. For a bangle bracelet it is very important to not have air bubbles or gaps between the layers of clay.

Trim away excess clays to perfect your design. I trimmed the Poppyseed ends leaving a bit showing just for a design feature.
Carefully form the bangle around a glass bottle that is similar in size to your wrist. If you leave a slight gap between both ends, you create a flexible bangle that has a little opening in it which is easier to get on and off over your hand and wrist.

Bake the bangle following the baking instructions for Sculpey Soufflé™. Allow the clay to cool completely on the glass form before removing it.

Here’s a look at some more styles that I was able to create with the remaining scraps that were removed in Steps 15 and 16.

- Choosing a selection results in a full page refresh.
- Opens in a new window.