

Liquid Sculpey® Sparkling Wrap Bracelet
Liquid Sculpey® Sparkling Wrap Bracelet
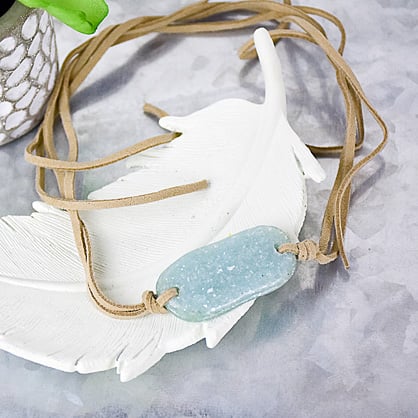
Designed by Amy Koranek
Read More
Read Less
Believe it or not, with a little care and finesse you can create just about any organic shape with just Liquid Sculpey® without using a mold. The sparkly “glass” piece featured in this wrap bracelet was done just so.
ADDITIONAL SUPPLIES
- Paper towel
- Optional Silicone miniature cupcake liner
- Small mica flake in Stardust
- Smooth clean piece of glass
- Craft knife
- 30” Tan faux leather cord (2)
Project Instructions
- Getting Started:
- Baking:
Remove the cap from the Translucent Turquoise Liquid Sculpey® (TTLS) and stir completely with one of the purple tools. Wipe the tools with paper towel to clean it. Replace the cap.
In a silicone mini cupcake liner, place a small amount (2-3 Tablespoons) of Translucent Turquoise Liquid Sculpey® (TTLS). Stir in some Stardust mica flakes (1/2 teaspoon) with one of the purple tools. Wipe the tool clean with paper towel.
In a silicone mini cupcake liner, place a small amount (2-3 Tablespoons) of Translucent Turquoise Liquid Sculpey® (TTLS). Stir in some Stardust mica flakes (1/2 teaspoon) with one of the purple tools. Wipe the tool clean with paper towel.

On a piece of glass, pour just enough of the TTLS with the mica to make an organic rectangular shape. Please note that in this photo, the piece of glass that I am using is completely smooth on the top side but textured on the back side. I am making my liquid shape on the smooth side of the glass.
TIP: if you are having trouble controlling the TTLS as you make your organic shape you can try this tip. Pre-heat the glass that you are working on for at least 15 minutes in the 275F oven. Carefully remove the hot glass from the oven with oven mitts, and just as carefully, draw the TTLS shape on the hot glass. The heat from the glass will make the TTLS partially set and it won’t run as much giving you time to make the shape that you want.
TIP: if you are having trouble controlling the TTLS as you make your organic shape you can try this tip. Pre-heat the glass that you are working on for at least 15 minutes in the 275F oven. Carefully remove the hot glass from the oven with oven mitts, and just as carefully, draw the TTLS shape on the hot glass. The heat from the glass will make the TTLS partially set and it won’t run as much giving you time to make the shape that you want.

Immediately place the glass in your oven and bake it following the baking instructions for LS. When the piece is baked you will see that the color of the TTLS has really come through and the mica is sparkly and pretty.

You will also notice that the top side of the baked piece is slightly domed and the bottom is perfectly flat. When the piece is cool, carefully peel it up from the glass and flip it over with the perfectly flat side facing up. Carefully drip more of the TTLS with the mica flakes on the flat side. Try to spread the liquid all the way out to the edges of the original shape. In this photo you can see that I have a drip of the fresh TTLS running off the lower left edge. I decided to go with it anyway, figuring that I could probably deal with that little inconsistency after it’s baked. Bake the piece again following the baking instructions for LS.

When the piece is completely cool, carefully peel it away from the glass. Then I used a sharp craft knife to carefully remove the little drip.

The piece is beautifully shaped with nice smooth bevels on the top and bottom edges.

Poke holes in each end of the piece for stringing. You can use a Dremel drill or pin drill to make nice neat holes. String each 30” piece of faux leather halfway through one of the holes. Tie an overhand knot securing each cord tightly to the piece. Your wrap bracelet is ready to wrap and wear.
