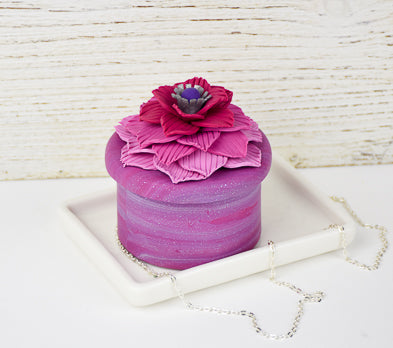

Sculpey Soufflé™ Wild Orchid Flower Trinket Box
Sculpey Soufflé™ Wild Orchid Flower Trinket Box
Designed by Phoebe Doehring
Read More
Sculpey Soufflé™ Wild Orchid is a perfect color for floral designs! This projects takes you through easy steps to build what LOOKS like an intricate floral sculpt that you can build in no time with the aid of some clever Sculpey Tools™.
TIME TO COMPLETION: 30 minutes to build, 30 minutes to bake
Read Less
ADDITIONAL SUPPLIES
- Wooden Trinket box: Woodpile 3”
- Wide tooth comb
- Super Glue
- Clay Knife
- Tape measure
- Acrylic Paint: Americana Royal Fuchsia (*optional)
- Paintbrush

Project Instructions
- Getting Started:
Start with clean hands, unwrap and knead clay until soft and smooth, or condition by running clay though a Pasta Machine. We recommend using a designated machine for clay purposes only. When working with multiple colors, clean hands with soap and water or baby wipes (we have found that baby wipes work best) before switching colors. Shape clay, pressing pieces firmly together. Wash hands after use.
- Baking:
Roll one snake each of all four of your colors that are approximately 1/2” thick by 6” long.
Press the four snakes together and twist. Fold in half, roll, and twist again. Repeat this process a few more times to marble the clay colors together.
Press the four snakes together and twist. Fold in half, roll, and twist again. Repeat this process a few more times to marble the clay colors together.

Roll into a ball and flatten to fit into your clay machine. Run it through on the #2 setting.
Measure the diameter of your wooden trinket box with your tape measure. Measure the height of the box as well. Cut out a strip of clay the proper dimensions.
Measure the diameter of your wooden trinket box with your tape measure. Measure the height of the box as well. Cut out a strip of clay the proper dimensions.

Wrap the strip of clay around the box. Trim away excess clay. Make sure to push out any air bubbles from the center out. Marry the seams together with your fingertip.
Roll up the excess clay into a ball, flatten and run it through the clay machine on the #2 setting again. Set the round wooden lid down on top of this sheet of clay. Cut out a circle slightly larger than the lid so that you can cover the edges.
Roll up the excess clay into a ball, flatten and run it through the clay machine on the #2 setting again. Set the round wooden lid down on top of this sheet of clay. Cut out a circle slightly larger than the lid so that you can cover the edges.

Place the circle of clay on top of the lid of the box and press out any air bubbles from the center out. Smooth the clay over the edges. Trim away all excess clay with your clay knife.
Bake the box according to directions. Allow to cool completely.
*optional: paint the inside of your box and under the lid with acrylic paint. Americana Royal Fuchsia was used here.
Bake the box according to directions. Allow to cool completely.
*optional: paint the inside of your box and under the lid with acrylic paint. Americana Royal Fuchsia was used here.

Combine 1/8 of a block of White Souffle with 1/4 of a block of Wild Orchid. Blend the colors together to make a medium shade of Wild Orchid. Roll into a ball.
Combine 1/4 of a block of White Souffle with 1/4 block of Wild Orchid. Blend the colors together to make a light shade of Wild Orchid, almost Pink. Roll into a ball.
Roll an equal sized ball of Wild Orchid. (approximately 1 to 2” in size)
Combine 1/4 of a block of White Souffle with 1/4 block of Wild Orchid. Blend the colors together to make a light shade of Wild Orchid, almost Pink. Roll into a ball.
Roll an equal sized ball of Wild Orchid. (approximately 1 to 2” in size)

Run each of the three graduated shades through your clay machine on the #2 setting.
Using your graduated teardrop/petal shaped cutters, cut out the following:
• 10 - 1 1/4” petal shapes from the Wild Orchid
• 10 - 1 1/2” petal shapes from the Medium shade of Wild Orchid
• 5 – 1 3/4” petal shapes from the Light Shade (Pink) of Wild Orchid
• 6 – 2” petal shapes from the Light Shade
Now use your Sculpey comb tool and run the comb down each petal vertically.

Roll a snake of Royalty clay that is approximately 1/2” by 3” long. Round one end of the snake as this will be the center for your flower. You will be building the flower around this snake of clay.
Roll a very small snake of Premo! White Gold Glitter that is approx.. 1/4” by 2”. Run this snake through your clay machine on the #2 setting. Use your clay knife to cut little fringe like cuts along the snake. Wrap the fringed piece around the rounded end of the Royalty center close to the top. Trim away excess. Flare out the little fringe ends with your fingers. Next you will begin adding petals.
Roll a very small snake of Premo! White Gold Glitter that is approx.. 1/4” by 2”. Run this snake through your clay machine on the #2 setting. Use your clay knife to cut little fringe like cuts along the snake. Wrap the fringed piece around the rounded end of the Royalty center close to the top. Trim away excess. Flare out the little fringe ends with your fingers. Next you will begin adding petals.

Start with the smallest and darkest color petals first. Press on 4 small Wild Orchid petals around your fringed center. (rounded ends up) Flare the petals out a bit. Press on 5 more small petals beneath the first all the way around. Flare these petals.

Next comes the medium shade petals. Press 5 more petals onto your flower beneath the previous.

Continue to build your flower in this way gradually building the flower from the smallest, darkest petals to the largest, lightest petals.
Make sure you press firmly as you go along using the Royalty snake to build upon almost like a stem.
Once all petals are attached you can gently flare and continue to shape the petals until you are pleased with the result.
Make sure you press firmly as you go along using the Royalty snake to build upon almost like a stem.
Once all petals are attached you can gently flare and continue to shape the petals until you are pleased with the result.

Cut away the excess snake of Royalty now.
Carefully place your flower onto your baking tile or sheet and bake according to the directions. Allow to cool completely.
Carefully place your flower onto your baking tile or sheet and bake according to the directions. Allow to cool completely.

Attach your flower to the top of your clay covered trinket box with Super Glue. All the glue to dry completely.

- Choosing a selection results in a full page refresh.
- Opens in a new window.