

Sculpey Soufflé™ Tropical Trinket Tray
Sculpey Soufflé™ Tropical Trinket Tray
Designed by syndee holt
Read More
Read Less
I love little serving and trinket trays! Polymer clay is water proof, so these are great little additions under my houseplant pots as well. This unique combination of Soufflé™ clay colors and clever surface treatments really makes this simple tray a standout.TIME TO COMPLETION: 45 minutes to make, 30 minutes to bake
ADDITIONAL SUPPLIES
- Silkscreen in your favorite pattern- mine is a leaf fromMoiko. Make sure that it is at least the size of one half of your tray (4x3 inches for me)
- A plastic scraper for your silkscreen- I like to use a silicone brush for both my silkscreens and my transfers.
- Light green acrylic paint (mine is Folk Art Citrus Green), brush
- Embossing powder in a white or light color (mine is Ranger White Embossing Powder)
- Optional: A clean microfiber towel

Project Instructions
- Getting Started:
Start with clean hands, unwrap and knead clay until soft and smooth, or condition by running clay though a Pasta Machine. We recommend using a designated machine for clay purposes only. When working with multiple colors, clean hands with soap and water or baby wipes (we have found that baby wipes work best) before switching colors. Shape clay, pressing pieces firmly together. Wash hands after use.
- Baking (also called Curing):
Condition and sheet out a package of the Soufflé™ Racing Green on a medium setting. Make sure that it will fit the silkscreen you are using.
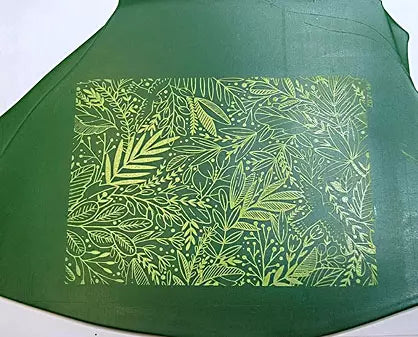
Place the silkscreen with the emulsion down and load your brush with your selected paint
Place the silkscreen with the emulsion down and load your brush with your selected paint

Quickly apply the paint to the entire screen and remove any excess paint from the screen with your scraper.

Remove the silkscreen. Check your screened clay to make sure that you got a clean pattern.
Wash your silkscreen under running water immediately. I like to dry mine by putting it in a folded microfiber towel and rubbing gently. Remove the screen and allow it to completely dry.
Set the screened clay aside to dry completely.
Artist Tip: If I don’t get a perfect silkcreen, I have found that if I wash the sheet of clay immediately and dry it, that I can often rescreen on the same piece of clay!
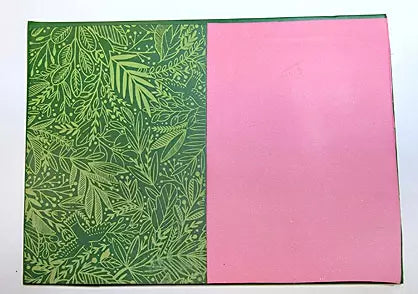
While the silkscreened clay is drying, sheet out your conditioned Soufflé™ Guava on the same setting on your clay machine.
Add a couple of pinches of embossing powder to the sheet of clay spreading it with your fingertip. Excess powder can be tipped back into the bottle.
Add a couple of pinches of embossing powder to the sheet of clay spreading it with your fingertip. Excess powder can be tipped back into the bottle.

Fold the clay so that the embossing powder side is completely inside the fold.
Run the clay through your conditioning machine several times to evenly spread the embossing powder.
You can add more embossing powder if you wish, but remember that it will “bloom” or look a little larger when it bakes.
You can even bake a small piece to see if you like the effect or if you need to add more.
Sheet the clay out on the same thickness as your silkscreen.

Trim both pieces to the same size.
Condition and sheet out the second block of Soufflé™ Racing Green on the same thickness as before. We are looking for a sheet that will be larger than the two pieces together.
Condition and sheet out the second block of Soufflé™ Racing Green on the same thickness as before. We are looking for a sheet that will be larger than the two pieces together.

Gently roll the two sheets to make sure that there are no air bubbles between the top and the bottom sheets of clay and to help blend the center seam of the Racing Green and Guava.
br>Trim the bottom sheet to leave just a small selvage around each side.
br>Trim the bottom sheet to leave just a small selvage around each side.
Use your fingers to start to curl the edge of a long side up, gently pinching a curve as you work down the edge.

Pinch up a short edge and use your thumb and forefinger to form the corner.
Continue until all the edges are pinched/curled up
Continue until all the edges are pinched/curled up

I put a sheet of thin deli paper (or plastic wrap) over the seam and gently rubbed it with my finger to make sure that the seam was blended after all the edge manipulations in the previous steps.

I rolled the edge of my Etch n’ Pearl to smooth the pinched edges. Any smooth round tool with work, but I liked the gently curve to the tip of the Etch n’ Pearl for this.
Bake the tray as directed in Step 1 above.
Bake the tray as directed in Step 1 above.

Once the tray has baked and cooled, I sanded the sharp corners just a bit before I applied a thin layer of the Sculpey Gloss Glaze to the inside of the tray. I like to spray a bit of water on my brush to help dilute the glaze and prevent brush marks. Allow the glaze to dry.

Here is a look at my final dish!
