

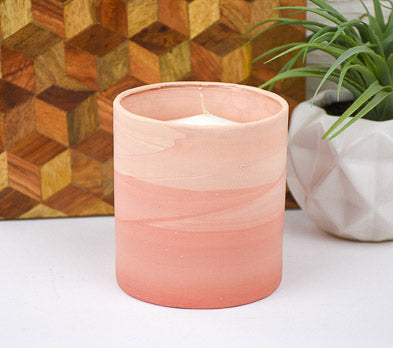
Sculpey Soufflé™ Faux Sandstone Vase
Sculpey Soufflé™ Faux Sandstone Vase
Designed by syndee holt
Read More
Read Less
Soufflé™ has the perfect baked surface to imitate sandstone and many other unpolished stones. We use it here to create a one-of-kind vase by covering existing glassware.
TIME TO COMPLETION: 60 minutes
ADDITIONAL SUPPLIES
- Smooth glass votive (it should not be taller than the width of your Clay Conditioning Machine)
- Plain paper – about 4 sheets
- Large piece of clean cardboard to lay the clay out on to apply it to the vase (I use cardboard because the thin sheet of clay won’t stick to it like it will to a smoother surface like glass or smooth tile)
- Tiny needle such as a butterfly collector needle or acupuncture needle
- Measuring tape
- Ruler or straight edge
Project Instructions
- Getting Started:
Please make sure your work area is covered and you are not working on an unprotected surface. We recommend working on the Sculpey® Oven-Safe Work Mat, wax paper, metal baking sheet, or disposable foil. Uncured clay may damage unprotected furniture or finished surfaces. Be sure to cover your crafting area appropriately.
Start with clean hands, unwrap and knead clay until soft and smooth, or condition by running clay though a Pasta Machine. We recommend using a designated machine for clay purposes only. When working with multiple colors, clean hands with soap and water or baby wipes (we have found that baby wipes work best) before switching colors. Shape clay, pressing pieces firmly together. Wash hands after use.
- Baking:
Measure your selected vase for height and circumference. Roll out an elongated teardrop of conditioned Ivory clay that is as long as your pasta machine. Repeat with the Cinnamon clay and stack them so that the wide ends are opposite each other.
Finally add a teardrop of Latte on the opposite side of the Ivory. NOTE: I chose to use less of the Latte in my teardrop (see the wide end?) so that the Cinnamon and Ivory had more room to “play”.
Finally add a teardrop of Latte on the opposite side of the Ivory. NOTE: I chose to use less of the Latte in my teardrop (see the wide end?) so that the Cinnamon and Ivory had more room to “play”.


Twist the clays together to create vertical stripes.

Use the Acrylic Roller to press the stripes and flatten them by rolling back and forth as you press down.

Run the flatten sheet through the Clay Conditioning Machine on the widest setting.

You will note that the stripes are very defined after Step 4. So fold in half lengthwise and roll through about 3 more times until the colors are blending into each other a little more. See how the Cinnamon and Ivory are sort of gathered at the left side of my blend? That is what the elongated teardrops created – more of those colors at one end.

Roll the clay out on a thinner setting, making sure that you have enough to cover the entire vase with one piece.

Use a ruler or other straight edge to trim your clay to the desired height.

Align the vase with the edges of the clay so that the darker area is at the bottom of the vase. Slowly roll the vase with the clay attached, pulling the clay slightly and applying gently press to the INSIDE of the vase to help prevent bubbles. Trim the edges to butt up against each other (roll the vase over the leading edge slightly and back up the vase – there should be a mark on the unmounted clay from that edge. Trim just on the inside of the mark).

Trim the edges and use the clean white paper to press against the clay and work any bubbles out. You can see bubbles on the inside so you know where to work. I chose to cover my top lip and that made is tricky to work air bubbles out. Very fine needles can be used to prick bubbles to work the air out of them and then use the paper so smooth the pin prick.

Bake according to the directions above. Allow to cool completely in the oven before removing – and admiring your new Sandstone Vase!
