

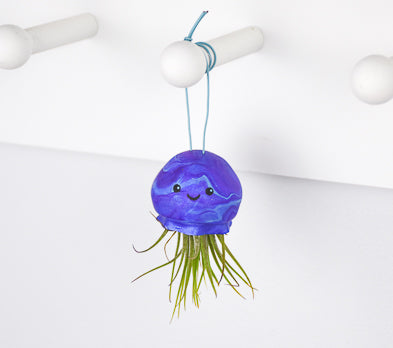
Sculpey Premo™ Metallic Jellyfish Air Plant Holder
Sculpey Premo™ Metallic Jellyfish Air Plant Holder
Designed by Phoebe Doehring
Read More
Create a fantastic air plant holder for a quick gift for your favorite gardener or for your own plant collection! Time to create: 20 minutes to create, 30 minutes to bake
Read Less
ADDITIONAL SUPPLIES
- Acrylic Paints: Black, Turquoise
- Paintbrush
- Turquoise Cording
- Air Plant
Project Instructions
- Getting Started:
Start with clean hands, unwrap and knead clay until soft and smooth, or condition by running clay though a Pasta Machine. We recommend using a designated machine for clay purposes only. When working with multiple colors, clean hands with soap and water or baby wipes (we have found that baby wipes work best) before switching colors. Shape clay, pressing pieces firmly together. Wash hands after use.
- Baking:
Roll a snake of Indigo Metallic clay this is approximately 1/2” x 4” long. Roll one snake each of Purple, Purple Pearl, and Turquoise clay that are approximately 1/4” x 4” long.

Press the snakes together, roll and twist. Fold in half and twist again. Repeat this process a few times until the colors marble. Roll the marbled clay into a ball. For the jellyfish body you will want a ball that is approx.. 1-1/2” in diameter.

Create a little pinch pot round jellyfish body by pushing your thumb into the clay in the center and then pinching the edges. Curl the edges under slightly so that the body bulges out and in again a bit. The body should be approximately 2” with an opening of 1-3/4” to accommodate your air plant.

Run a small snake of marble clay that is approximately 1/2” x 2” long. Run this snake through your clay machine on the #2 setting. Trim this piece to fit around the inner edge of the jellyfish body. Press in firmly and marry the seam together with your fingertip. Fan the edges a bit to give this edge a wavy look.
Use your Sculpey 5 in 1 tool to make two holes at the top of your jellyfish so that you can string your cording through later. This will be what holds your air plant in place.
Bake as directed in Step 1 above. Bake at 275 degrees for 30 min. Allow to cool.
Use your Sculpey 5 in 1 tool to make two holes at the top of your jellyfish so that you can string your cording through later. This will be what holds your air plant in place.
Bake as directed in Step 1 above. Bake at 275 degrees for 30 min. Allow to cool.

Paint a cute kawaii face on the jellyfish with your Black acrylic paint. Add a small dot of Turquoise paint to each eye. Allow paint to dry.
Cut a 4 or 5” piece of cord. Thread your cord down through the top of the jellyfish and then back up and out the 2nd hold. Before pulling it tight thread the cord under a few of the long tendrils of your air plant to hold it in place. Pull up the cord pulling your air plant up and into the jellyfish body. Tie off your cord and trim excess.
Cut a 4 or 5” piece of cord. Thread your cord down through the top of the jellyfish and then back up and out the 2nd hold. Before pulling it tight thread the cord under a few of the long tendrils of your air plant to hold it in place. Pull up the cord pulling your air plant up and into the jellyfish body. Tie off your cord and trim excess.

- Choosing a selection results in a full page refresh.
- Opens in a new window.