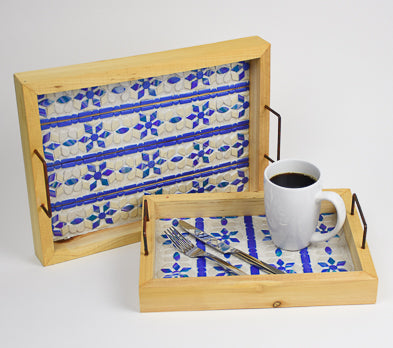

Sculpey Premo™ Indigo Metallic Coffee Table Tray
Sculpey Premo™ Indigo Metallic Coffee Table Tray
Designed by Amy Koranek
Read More
This timeless mosaic design complements just about any decor. The Indigo Metallic color gives rich depth and a pop of color.
COMPLETION TIME:
3.5 Hours to pre-bake the wood tray, decorate, and bake two more times. I like to allow the tray to sit overnight before the final baking to allow air bubbles to escape from the Liquid Sculpey® grout if at all possible.
Read Less
ADDITIONAL SUPPLIES
- Wood tray
- Sandpaper
- Pencil
- Ruler
- Paper towels
- Pasta machine

Project Instructions
- Getting Started:
Start with clean hands, unwrap and knead clay until soft and smooth, or condition by running clay though a Pasta Machine. We recommend using a designated machine for clay purposes only. When working with multiple colors, clean hands with soap and water or baby wipes (we have found that baby wipes work best) before switching colors. Shape clay, pressing pieces firmly together. Wash hands after use.
- Baking:
When working with a wooden object to cover with clay, it is best to take some time to prepare the wood beforehand. Start by sanding away any rough areas particularly along the edges and corners. Bake your tray before applying any clay to it in a preheated oven at 275F for 30 minutes. This will help release any moisture or sap that is trapped in the wood. It’s best if this happens before the clay is applied so that you can remove the sap and it won’t show up in your clay areas. The sap can look yellow when it appears on the surface after baking. Once it is released, you can easily sand it away. Heavy weight wood like the one I have pictured in these photos has a lot of trapped air in the grain as well and pre-baking it will release it. If you want to paint your tray, it’s best to paint after pre-baking and before applying clay. Paint any exposed surfaces that will not be covered with clay. The tray I’m creating here is not painted at all so that the natural wood grain is the finish.
I’m using a pretty large tray, 10” x 14” with raised sides and metal handles on the end. If your tray is smaller, you can adjust the amount of clay that you need.
I’m using a pretty large tray, 10” x 14” with raised sides and metal handles on the end. If your tray is smaller, you can adjust the amount of clay that you need.

It is a really good idea to first mark some grid lines on the tray with pencil and ruler. These marks will be covered by the clay so they won’t show in the finished design. You may want to consider marking center lines down the center of each slat so you can keep your clay pieces lined up.
We will use Translucent Liquid Sculpey® (TLS) as the adhesive between the wood tray and the clay. Once the tray has been pre-baked, allow it to cool completely and then coat each surface that will be covered with clay with a thin layer of TLS. In this photo, the top slat is already covered with a smooth layer of TLS. The second slat has TLS squirted on it but not spread. You can use whatever tool you like, including your fingertips to spread the TLS. Wipe tools and hands clean with paper towels.
We will use Translucent Liquid Sculpey® (TLS) as the adhesive between the wood tray and the clay. Once the tray has been pre-baked, allow it to cool completely and then coat each surface that will be covered with clay with a thin layer of TLS. In this photo, the top slat is already covered with a smooth layer of TLS. The second slat has TLS squirted on it but not spread. You can use whatever tool you like, including your fingertips to spread the TLS. Wipe tools and hands clean with paper towels.

If you like, you can allow the TLS to set on the wood for several hours or even overnight. The longer the TLS is allowed to soak into the wood grain, the more tacky it will become. This makes it a nice adhesive. Or, if you prefer to have a slick surface - one that the clay pieces can slide around on and be re-positioned easily - you can start your clay work immediately after the TLS is applied.
While TLS is an excellent adhesive between porous surfaces - like wood, cardboard, heavy paper - and polymer clay, it works best on horizontal surfaces, not on vertical surfaces. If using TLS to apply clay to vertical surfaces, you will definitely need to allow the TLS to fully soak into the wood grain before applying clay.
While TLS is an excellent adhesive between porous surfaces - like wood, cardboard, heavy paper - and polymer clay, it works best on horizontal surfaces, not on vertical surfaces. If using TLS to apply clay to vertical surfaces, you will definitely need to allow the TLS to fully soak into the wood grain before applying clay.

Next, sheet 1 bar of Indigo Metallic through a pasta machine on the thickest setting. Use the mini geometric cutters to cut out several rectangles and circles from the sheet. Use the Clay Blade to cut each of these in half. I cut them in half because I’m going to use them to border the gaps between the slats in my tray. If your tray does not have gaps, you don’t have to cut them in half.

Alternate rectangle and circle halves along the gaps in the slats. Later, in Step 17, we will need 20 more of the small Indigo Metallic circles, so leave whatever scraps of the sheet of Indigo available.

Repeat for each gap until the gaps are completely bordered from end to end. Set the tray aside while we mix up the marbled mosaic color.

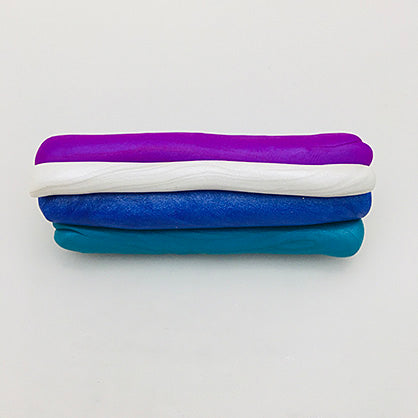
For our marbled mosaic we will use one bar of Indigo Metallic, 1/4 bar of Peacock Pearl, 1/4 bar of Purple Pearl, and 1/8 bar of Pearl. Remember that the tray I’m working on in this tutorial is rather large and if your tray is not so big you can adjust the amount of clay accordingly. Or if you are more comfortable with this method - you can mix up small amounts of the marbled mosaic color to see how far it goes. Then you can always mix more to fill in as needed. As long as you keep the colors the same proportions in each batch, the marbled pieces should match pretty well.
Roll the Indigo Metallic into a thick log. Roll the other color pieces into small ropes.
Roll the Indigo Metallic into a thick log. Roll the other color pieces into small ropes.

Border the Indigo Metallic log with the smaller ropes. I divided the small amount of Pearl in half and placed half of it between the Peacock Pearl and the Indigo Metallic.

Then I placed the other small piece of Pearl in between the Purple Pearl and the Indigo Metallic.
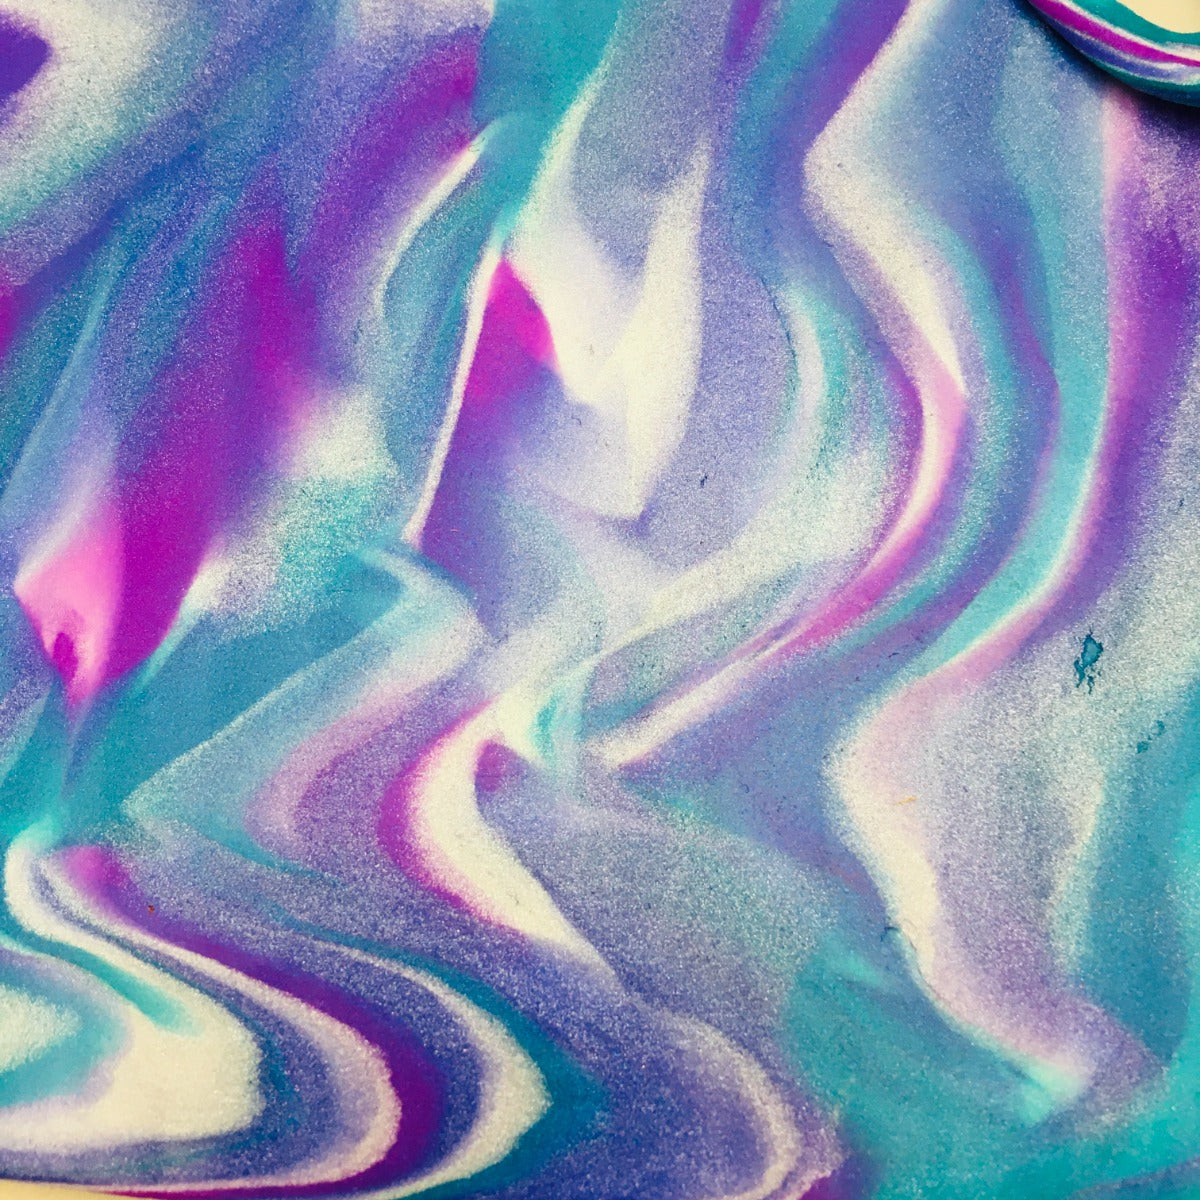
Roll the log of colors until it is smooth and at least double in length. This is the method I am using to simply marble the colors together. You are welcome to use your favorite marbling technique if you prefer.

Roll and twist the rope. Fold the rope in half and in half again.

Roll and twist the rope. You can repeat these steps as much as you like until you have lots and lots of stripes.

Roll and twist the rope until it is long and skinny. Then coil the rope up.

Roll the coil into a ball.

Flatten the ball into a sheet with the Acrylic Clay Roller. I stretched the flattened piece to help it take on a rectangular shape.

Then sheet it through the pasta machine on the thickest setting.
To begin the outline of the pattern we will start by positioning 12 of the Indigo circles from Step 7 equally spaced down the center of each slat. Cut out 24 diamond shapes from the marbled mosaic clay and place one on either side of the circles as shown. My tray actually has four slats, but only three are shown in this photo.

Cut out more diamonds so that each of the Indigo circles becomes the center of a flower with six diamond shaped petals.

At each end of each slat, position another Indigo circle, bordered by three marbled diamond petals as shown.
Cut out football shapes from the marbled mosaic clay and place one equidistant midway between each of the flowers.
Cut out football shapes from the marbled mosaic clay and place one equidistant midway between each of the flowers.

Sheet the remainder of the Pearl through the pasta machine on the thickest setting. First cut out diamond shapes and place four around the outside of each flower. Leave gaps between the diamonds and the flowers that will later be filled in with Liquid Sculpey® (LS) grout.

Cut out more Pearl diamond shapes. Cut each diamond in half lengthwise and place one half above and one half below each flower.

Cut out Pearl teardrop shapes next. Position four teardrops around each football shape as shown.

Bake the tray following the baking instructions for Sculpey Premo™. This will set all the tiles in place and cure the TLS to the wooden tray. You can see in this photo that the baked TLS looks more matte now and you can clearly see the wood grain through it.

Remove the cap from the Pearl LS and set it aside. Stir a bottle of Pearl LS using one of the tools from the Clay Tool Starter Set or your favorite long skinny tool. Pull the tool out of the bottle and notice the flow of the Pearl LS off of the tool. This project will go most smoothly if the Pearl LS has a runny consistency to it. My test for runny consistency is that the LS drips off of the tool in a smooth drip, not in uneven globs. If necessary, add a few drops of Sculpey® Clay Thinner & Softener to the Pearl LS and stir it in completely. Perform the drip test again. Add more drops if needed making sure to stir completely each time. Wipe tools clean with paper towels.
Screw the cap back on the bottle of Pearl LS completely. Open the adjustable opening on the cap wide open. Squirt Pearl LS in all the gaps between the mosaic tiles.
Screw the cap back on the bottle of Pearl LS completely. Open the adjustable opening on the cap wide open. Squirt Pearl LS in all the gaps between the mosaic tiles.

Continue adding Pearl LS to the entire tray around every tile. Use the Needle Tool or the Knife Tool to spread the Pearl LS into all the little cracks and crevices.

When the grout is completely spread into all the cracks and crevices, tap the tray on the work surface to release trapped air. Pop bubbles with the Needle Tool. It will be best if you allow the uncured LS to sit overnight, so that air bubbles can continue to release naturally before the final cure.
Bake the tray following the baking instructions for Sculpey Premo™ one more time. Allow to cool completely before handling.
Bake the tray following the baking instructions for Sculpey Premo™ one more time. Allow to cool completely before handling.

- Choosing a selection results in a full page refresh.
- Opens in a new window.