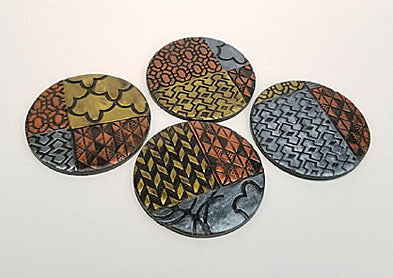
Sculpey Premo™ Geometric Coasters
Sculpey Premo™ Geometric Coasters
Design by syndee holt
Read More
Read Less
These cool coasters are so fun to make! Your friends will all want a set- mine did!
ADDITIONAL SUPPLIES
- 75 inch (70mm) circle cutter
- Small spray bottle of water
- Mic powders in your choice of colors

Project Instructions
- Getting Started:
Start with clean hands, unwrap and knead clay until soft and smooth, or condition by running clay though a Pasta Machine. We recommend using a designated machine for clay purposes only. When working with multiple colors, clean hands with soap and water or baby wipes (we have found that baby wipes work best) before switching colors. Shape clay, pressing pieces firmly together. Wash hands after use.
- Baking:
Sheet out 1/2 package of the conditioned Black clay on a medium setting on your clay conditioning machine. Lightly spray the texture sheet with water and press firmly into the clay sheet. Remove the texture sheet. And stack the textured sheet of clay on another sheet of clay that is rolled out on the widest setting on the clay conditioning machine.

Select the area of textures you want for the coaster and firmly press the cutter through the clay.

Gently remove any remaining moisture from the surface of the clay and apply your selected mica powder. I like to use the rubber chisel tip on the medium Style n’ Detail tool for this. You can also use your finger – just make sure that you have a very small amount of powder on your tool or finger each time and slowly build up the level of color you want on the texture. The tool will be helpful if you are using more than one color on the coaster as it will create a straight line of color for you!
I’ve also created them in just two colors and an entire set that is multi colored.
I’ve also created them in just two colors and an entire set that is multi colored.


Bake as directed and allow the clay to cool. Apply a very light coat of the Gloss glaze to the upper surfaces of the texture and allow the glaze to dry thoroughly.


- Choosing a selection results in a full page refresh.
- Opens in a new window.

