Sculpey Premo™ Fiery Planet Vase
Sculpey Premo™ Fiery Planet Vase
Designed by syndee holt
Read More
Read Less
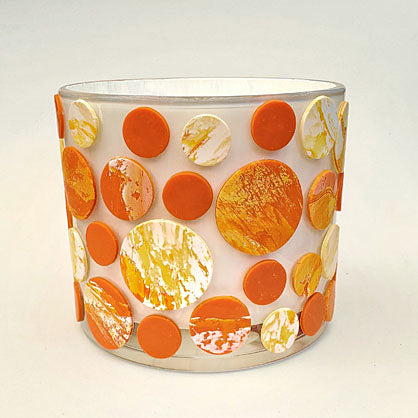
The secret to this eye-catching vase is using a hard (in this case, my White)and a soft clay together. It is a fun, easy project to complete quickly- nothing is really measured and there is no pattern to the dots! Perfect project to do with your non-clay friends.
TIME TO COMPLETION: 60 minutes
ADDITIONAL SUPPLIES
- Several sheets of plain paper (for leaching clay)
- Smooth glass vase (mine is 26 inch circumference)
- White Multi-Surface paint for inside of vase and small brush
- Cookie size sheet of waxed paper
Project Instructions
- Getting Started:
Start with clean hands, unwrap and knead clay until soft and smooth, or condition by running clay though a Pasta Machine. We recommend using a designated machine for clay purposes only. When working with multiple colors, clean hands with soap and water or baby wipes (we have found that baby wipes work best) before switching colors. Shape clay, pressing pieces firmly together. Wash hands after use.
- Baking:
Ahead of time: If your White clay appears to be its normal softness, slice it and sheet it through the pasta machine on the widest setting and then lay the sheets between sheets of clean white paper. A heavy book on top will help. I found my oldest package of clay to use for this.
Pinch off a lima bean size of the Clay Softener and add it to about 1/3 of a package of the Burnt Orange and thoroughly mix together using the Clay Conditioning Machine. Set aside and repeat for at least one more 1/3 of a package of clay. NOTE: These mixed clays should go on a sheet of waxed paper.
Starting with a piece of the, now stiff, White clay, add a small piece of the mixed Burnt Orange. This is not something that really has to be measured, but here is my starting mix and when I sheeted it through the Clay Conditioning Machine. The final sheet is on a #3 or middle setting.

Now let’s reverse the colors and use a sheet of the mixed Burnt Orange and a pinch of the stiff White clay (This one is literally pinched right off the block!) Again, nothing here is measured or mixed because we want each batch to be slightly different for the vase. Run this mix through just once or twice so that the White clay breaks up in a kind of crackle through the softer Burnt Orange.
Here is a look at the two mixes so far. You can repeat this again using different amount of each color to make 2 more mixes, but reserve some of the plain Burnt Orange to circles as well. The final sheet is a #3 or middle setting on the Clay Conditioning Machine.
Here is a look at the two mixes so far. You can repeat this again using different amount of each color to make 2 more mixes, but reserve some of the plain Burnt Orange to circles as well. The final sheet is a #3 or middle setting on the Clay Conditioning Machine.

Use the circle cutters to cut out your favorite pieces of the mixes.

Cut out and add your pieces using different sizes of the cutters and don’t forget to add some plain Burnt Orange circles. There is NO pattern here, just add them around the vase.

Once all the circles are in place, use a clean sheet of paper to gently pat the circles flat against the glass. Bake according to the directions above and allow the glass to completely cool in the oven before removing. NOTE: Glass will hold the heat for a long time so be careful when you touch it.

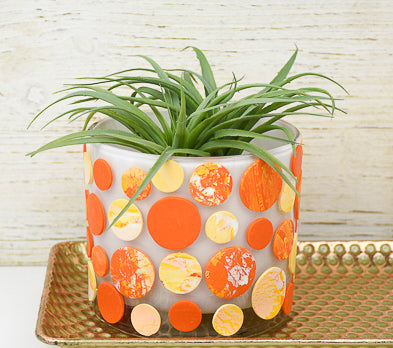
Once the vase is baked and cooled, I decided to paint an all-surface White paint on the inside of the vase. I put about 3 coats to make sure that it looked solid color. As with all hand-made art, please don’t put this into the dishwasher! Wash gently by hand if needed.