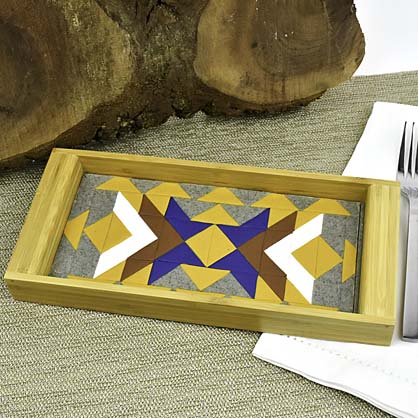
Sculpey Premo™ Desert Tiled Tray
Sculpey Premo™ Desert Tiled Tray
Designed by Amy Koranek
Read More
Read Less
Use the Triangle Mosaic Cutters with a great palette of Premo colors to assemble a tray with desert style.
COMPLETION TIME:2 Hours to make and bake.
ADDITIONAL SUPPLIES
- Wood tray
- Sandpaper
- Pencil
- Ruler
- Paper towel
- Paper template the same size as your tray
- Deli paper or wax paper
- Rough cloth

Project Instructions
- Getting Started:
Start with clean hands, unwrap and knead clay until soft and smooth, or condition by running clay though a Pasta Machine. We recommend using a designated machine for clay purposes only. When working with multiple colors, clean hands with soap and water or baby wipes (we have found that baby wipes work best) before switching colors. Shape clay, pressing pieces firmly together. Wash hands after use.
- Baking:
In the first couple of steps we will take time to prepare the tray for the clay insert. Sand any rough edges with sandpaper. If the tray that you are using has a sealer on it, lightly sand just the area where the clay will be applied to remove the sealer. If the tray is not sealed, and is raw wood, it can be pre-baked in the oven at 275F for 20 minutes to release excess sap from the wood. Then the sap can be lightly sanded away. By pre-baking the tray, you won’t be surprised by sap coming out of the wood when you are baking your clay design.
When your tray is prepared, lightly draw center horizontal and center vertical lines in the across the tray for guidelines.
When your tray is prepared, lightly draw center horizontal and center vertical lines in the across the tray for guidelines.

Spread a thin layer of Translucent Liquid Sculpey® (TLS) on just the inside bottom of the tray where the clay triangles will go later. Spread the TLS light enough that you can still see the pencil guidelines. Set the tray aside while you cut out your clay triangles.

Sheet the Mustard through the pasta machine on the thickest setting or use the Acrylic Clay Roller to make a sheet that is about 1/8” thick. From this sheet cut out as many large triangles as you can using the large Mosaic Triangle Cutter. Carefully remove the triangles from the cutter using either your fingertip or the ball ended tool. Organize the triangles on a piece of paper so they are easy to move around.

Sheet the remaining Mustard again and cut out as many small triangles as you can with the small Mosaic Triangle Cutter. Remove the cut triangles from the cutter and organize them on a sheet of paper.


Repeat with all the colors listed above cutting out some large and some small triangles. Organize them on a piece of paper so they don’t stick to your work surface and you can easily move them around.

Using a paper template that is about the same size as the tray, practice laying out your design.

When you are happy with your design, start in the very center of the tray laying out the first pieces. Make sure they are lined up really well with the guidelines.

Work outward in both directions adding more triangles. Try to keep them really snug to each other.

Continue working all the way across the middle making the center row of triangles. When you get to the outside edges, you might have to trim pieces with the Super Slicer to make them fit

Keep working in rows, always making sure to really snug the triangles together.

Continue filling the tray carefully with the triangle pieces.

Cover the clay pieces with a piece of wax paper or deli paper. Burnish the pieces into place with your fingertips. Make sure the pieces feel level.

Carefully peel the paper away.

If you like you can texture the surface of the triangles with a rough piece of cloth. This will make the pieces look more like fabric or a more natural surface. Just wad a rough piece of cloth up in your hand and push into the clay. Lift and move the cloth repeatedly until the whole surface is textured. If the TLS is squeezed up through the cracks, you can carefully blot excess away with paper towel.

Here’s a look at my tray with all the pieces in place and textured. You can see that in the corners of the tray, I trimmed pieces to fit using the Super Slicer.

Bake the tray following the baking instructions for Premo. Allow the tray to cool completely before handling. During baking the TLS will become translucent and will no longer be visible in the cracks.


