

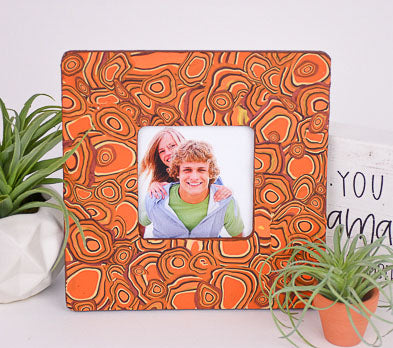
Sculpey Premo™ Burnt Orange Bullseye Frame
Sculpey Premo™ Burnt Orange Bullseye Frame
Designed by syndee holt
Read More
Read Less
This intricate looking frame is really quite easy to make using simple “canes” to create the patterns. Then just slice and bake!
TIME TO COMPLETION: 90 minutes
ADDITIONAL SUPPLIES
- Simple flat wooden frame
- Several sheets of plain white paper
- Deli paper or Waxed Paper
- Warm dark brown paint and brush for frame edges
Project Instructions
- Getting Started:
Start with clean hands, unwrap and knead clay until soft and smooth, or condition by running clay though a Pasta Machine. We recommend using a designated machine for clay purposes only. When working with multiple colors, clean hands with soap and water or baby wipes (we have found that baby wipes work best) before switching colors. Shape clay, pressing pieces firmly together. Wash hands after use.
- Baking:
Roll a ball of Orange clay about 1.5 inches in diameter.

Roll the ball into a cylinder that is 3/4 inches thick and trim the ends.

Sheet out some of the Bronze clay on the second from widest setting. Trim to both ends of the cylinder as well as the back of the cylinder as shown.

Roll the cylinder up with the sheet of clay until the leading edge just touches the rest of the sheet. Roll the cylinder back slightly and find the slight crease the lead edge made. Trim the clay just inside that line.
Lay the trimmed Bronze edge back onto the cylinder and the two edges of the Bronze should just meet now. Roll with a light pressure to seal the two clays together.
Lay the trimmed Bronze edge back onto the cylinder and the two edges of the Bronze should just meet now. Roll with a light pressure to seal the two clays together.


Add a slightly thinner wrap of Ecru in the same fashion.

Add two layers of the Burnt Orange to the cane. NOTE: I elected to keep the excess on this wrap so that it was slightly irregular in the cane.

Add several more thick and thin wraps to the cane, ending with a wrap of Burnt Orange. The cane is now about 1.5 inches in diameter.

To start reducing the cane, I put the center of the cane between my thumb and forefinger and squeeze, rotating the cane until I get a dumbbell shape.

Then I repeat this squeeze and rotate out to each end. NOW, I can lay it on my work surface and gently roll back and forth to smooth it somewhat. HOWEVER, I want to have some variety in the diameter of the cane for this project.

Now I can cut the cane, roll some of the pieces slightly smaller, so that I have a variety of sizes to choose from.

I can even add another thin wrap of Bronze around some of the cane.

I made another cane with a larger center created with the Burnt Orange and some thick and thin wraps around the outside. Reduce it like steps 9 and 10.
Now I can start to make thin slices of the canes. It doesn’t matter that they are not perfect slices, I actually want some imperfect slices. I use the deli paper or waxed paper to store the cut slices on.
Make slices of the different sizes (reductions) of the two canes.
NOTE: you can also cut some of the end pieces along the axis of the cane to get some great stripes.


Squeeze a wiggly line of the Sculpey Clay Adhesive along the frame and spread it evenly to the edges with your finger. (OKAY, you can use a spreader as well!) You just want a thin layer of the medium so that it doesn’t squeeze up under the cane slices.
Set this aside and let the medium absorb into the wood a little. In the meantime, ready the cane slices!
Set this aside and let the medium absorb into the wood a little. In the meantime, ready the cane slices!

Because we have all these great cane slices already, the application is breezy and chaotic fun! I chose NOT to wrap the cane slices around the edges. Just let them hang over the edge for now. Fill the entire frame.

Here is a photo of my frame entirely covered. See how I’ve used some of the end pieces to add some straight stripes? I kind of like that look.

Now the actual fussy part begins. Cover the frame with a sheet of clean paper and use the acrylic roller to roll back and forth to level the pieces. I also SLID the roller back and forth with very firm pressure to bond the slices together and flatten to a smooth surface. Lift the paper often to check your progress.

Place the frame face down on another clean sheet of paper and use the craft knife to trim the INSIDE and OUTSIDE edges of the excess clay.

Check once more that you have a smooth surface and bake the frame according to the directions in Step 1.
Once the frame is baked and cooled, you can paint the edges with a nice warm brown acrylic paint and allow it to dry thoroughly before adding your photo and displaying your new frame!
Once the frame is baked and cooled, you can paint the edges with a nice warm brown acrylic paint and allow it to dry thoroughly before adding your photo and displaying your new frame!

- Choosing a selection results in a full page refresh.
- Opens in a new window.