

Sculpey Premo™ and Sculpey Soufflé™ Glamor & Concrete Coasters
Sculpey Premo™ and Sculpey Soufflé™ Glamor & Concrete Coasters
Designed by Amy Koranek
Read More
Read Less
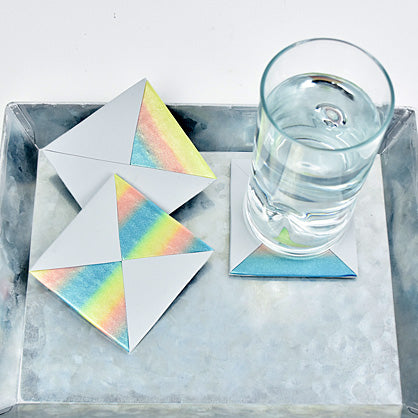
Concrete Soufflé is a nice complement to the glamor of the Iridescent Premo colors.
COMPLETION TIME:90 Minutes to make and bake
ADDITIONAL SUPPLIES
- 3-5/8” Square paper or card stock template
- 3-1/2” Square foam, cork, or felt in coordinating color
- Silicone glue
- Barrier paper like deli paper or wax paper
Project Instructions
- Getting Started:
Start with clean hands, unwrap and knead clay until soft and smooth, or condition by running clay though a Pasta Machine. We recommend using a designated machine for clay purposes only. When working with multiple colors, clean hands with soap and water or baby wipes (we have found that baby wipes work best) before switching colors. Shape clay, pressing pieces firmly together. Wash hands after use.
- Baking:
Roll 1/2 bar of each Iridescent Blue, Pink and Yellow into 1/4” ropes. Cut the ropes in half.

Lay the ropes sides touching as shown. Press them together enough so that they stick to each other

Sheet the ropes through the pasta machine on the thickest setting pressing them through with the stripes perpendicular to the rollers. After sheeting fold the sheet in half matching like color to like color.

Press the folded sheet - fold end first - through the pasta machine again. Continue folding and pressing the clay through, fold first, stripes perpendicular to the rollers, several times until you have a blend that you are happy with. Sheet it through once more on the second thickest setting.

Cut a square out of the blended clay sheet using a paper template that is 3-5/8” square. Cut the square diagonally into four equal triangles.

Separate the triangles slightly. Carefully place them on a sheet of paper and set them aside for now.

Sheet Concrete Soufflé through the pasta machine on the third thickest setting. Cut out three squares using the 3-5/8” square template. These will be the backing of the coasters.

Sheet Concrete Soufflé through the pasta machine on the second thickest setting. Cut out two squares using the 3-5/8” square template. Cut one square in half diagonally. Cut the other square into four equal triangles.

Here are all the parts you will need for the coaster tops.

Build each coaster on top of one of the thin squares from Step 8. Make one square using the top triangle of the blended sheet, one of the 1/2 sized Concrete triangles, and one of the 1/4 sized Concrete triangles.

Place a piece of barrier paper over the assembled square coasters. Gently roll over the barrier paper making all the clay pieces beneath the paper nice and flat.

Repeat Steps 11 & 12 to build the set of coasters, each one on one of the thin bases from Step 8 as shown here. Bake the coasters following the baking instructions for Premo. As soon as you remove them from the oven, use an oven mitt to move the warm coasters to a completely flat place to cool.

When the coasters are completely cool, glue felt, or foam, or cork squares to the backs as desired.

Allow the glue to dry completely before using.
