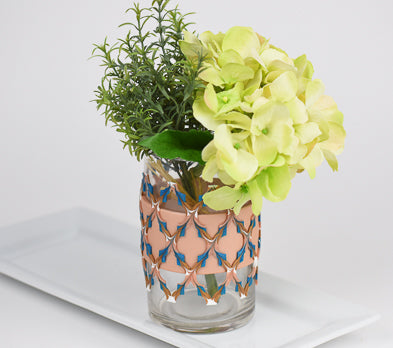

Sculpey Premo™ and Liquid Sculpey® Graphics Vase
Sculpey Premo™ and Liquid Sculpey® Graphics Vase
Designed by Amy Koranek
Read More
Sculpey Premo and Liquid Sculpey team up with Marvelous Molds to create this vase that evokes Moroccan lace . COMPLETION TIME: 2 Hours to make and bake (bakes 3 times)
NOTE: 1 oz bars of each color are required for this project, so a Sculpey Premo TM Multipack 24 piece can also be used.
Read Less
NOTE: 1 oz bars of each color are required for this project, so a Sculpey Premo TM Multipack 24 piece can also be used.
ADDITIONAL SUPPLIES
- Marvelous Molds Moroccan Lattice Silicone Onlay
- Glass vase approximately 3” in diameter and 6” tall
- Paper towel
- Scissors
- Ruler
- Rubber bands (2)

Project Instructions
GETTING STARTED WITH PREMO AND LIQUID CLAY:
Please make sure your work area is covered and you are not working on an unprotected surface. We recommend working on the Sculpey® Oven Safe Work Mat, wax paper, metal baking sheet, or disposable foil. Uncured Liquid Polymer Clay may damage unprotected furniture or finished surfaces. Be sure to cover your crafting area appropriately.
Getting Started with Premo Clay:
Start with clean hands, unwrap and knead clay until soft and smooth, or condition by running clay though a Pasta Machine. We recommend using a designated machine for clay purposes only. When working with multiple colors, clean hands with soap and water or baby wipes (we have found that baby wipes work best) before switching colors. Shape clay, pressing pieces firmly together. Wash hands after use.
Getting Started with Liquid Sculpey
Stir Liquid Sculpey® completely. Thin with Sculpey® Liquid Clay Softener as needed - Wash hands after use (we have found that baby wipes work best) .
If your liquid project has become yellowed or discolored in the oven, when you remake it, tent it by placing either – folding an index card in half and placing your project under it or by using aluminum foil over your project.
Please make sure your work area is covered and you are not working on an unprotected surface. We recommend working on the Sculpey® Oven Safe Work Mat, wax paper, metal baking sheet, or disposable foil. Uncured Liquid Polymer Clay may damage unprotected furniture or finished surfaces. Be sure to cover your crafting area appropriately.
Getting Started with Premo Clay:
Start with clean hands, unwrap and knead clay until soft and smooth, or condition by running clay though a Pasta Machine. We recommend using a designated machine for clay purposes only. When working with multiple colors, clean hands with soap and water or baby wipes (we have found that baby wipes work best) before switching colors. Shape clay, pressing pieces firmly together. Wash hands after use.
- Baking:
Getting Started with Liquid Sculpey
Stir Liquid Sculpey® completely. Thin with Sculpey® Liquid Clay Softener as needed - Wash hands after use (we have found that baby wipes work best) .
- Baking:
If your liquid project has become yellowed or discolored in the oven, when you remake it, tent it by placing either – folding an index card in half and placing your project under it or by using aluminum foil over your project.
Place the Marvelous Molds Moroccan Lattice Silicone Onlay flat on the Clay Mat in front of you. Drip dots of White Liquid Sculpey® (LS) in the intersections of the lattice design. Please note that when filling this shallow mold, you don’t want to fill it all the way to level. We want to allow the LS to spread out a bit and we are going to do a swirl effect later that will require a little extra room.

Next drip dots of Peacock Pearl LS in a consistent pattern in the design.

Drip dots of Rose Gold LS in a consistent pattern in the design. I used the Rose Gold to connect the Peacock Pearl to the White.

Next add dots of Bronze LS in a consistent pattern in the design. I used the Bronze to connect the Peacock Pearl to the White.
Tap the mold vigorously on the work surface to release air bubbles. If there are stubborn air bubbles these can be popped with the Needle Tool.
Again, we don’t want to overfill the mold, even leaving it a bit below level. But if you notice any little corners or details where there is no LS, fill these in now with the appropriate color. You can also use the Needle Tool to help move colors into little details as needed.

Starting at the top row, dip into the White dot at the far left top, and drag the Needle Tool through the LS without lifting the tip out until you have come all the way to the bottom row. Lift the tool out of the LS and wipe it off with paper towel. Repeat dragging the Needle Tool from top to bottom diagonally all the way through the liquids, wiping the tool clean between each row.

Working from right to left, this time, drag from top to bottom diagonally all the way through the liquids. Wipe the tool clean between each row.

Bake the mold following the baking instructions for Liquid Sculpey®. Allow the mold to cool completely before peeling the design away from it.
If you wish, you can skip to Step 11 to start preparing the clay band for the background while the liquids are baking.
My glass vase is large enough that I will need two of these designs to go around it. So I filled the mold again, being careful to imitate the first design as closely as possible, preparing a second lattice.

This is a look at the side of the baked design that was face down in the mold. The lines on this side are more crisp because the LS doesn’t like to move against the traction of the mold surface.

This is a look at the exposed side of the design. Note how this side has a more swirled look. This is because the liquids were able to flow more on the open side of the mold. Choose whichever side you prefer to decorate your vase.

Mix together 1 ounce of Copper Premo™, 1 ounce of Translucent Premo™, 1 ounce of Pearl Premo™, and 1/2 ounce of White Premo™. My vessel is rather large so it took this much clay to go around the vessel and to get the background color that I desired. My goal was to create a blended color that would complement and highlight the cool lattice design on top of it.
Roll the blended clay out into a 2” wide band that is 1/8” thick. Wrap the band around the center area of the glass. Trim the ends and blend the seam with your fingertips.
Roll the blended clay out into a 2” wide band that is 1/8” thick. Wrap the band around the center area of the glass. Trim the ends and blend the seam with your fingertips.

Audition how the lattice design will work with the clay band. For my vessel, I needed to trim my second lattice design so that both lattice designs together would wrap end to end around the vessel on top of the Premo™ background.
I tried to position the lattice design evenly so that the top and bottom lattices are partially overhanging the clay band.
I tried to position the lattice design evenly so that the top and bottom lattices are partially overhanging the clay band.

Once you are happy with the placement of the lattice design, push on it carefully with your fingertips to help it embed in the clay band just slightly. Baked LS loves to bond with raw Premo™ (and Soufflé™), so just embedding it slightly is enough to make them bond together during the next baking.

I was concerned that the unsupported parts of the lattice would bend during baking, so I held them in place against the glass with a rubber band at the top and at the bottom.

Here’s a look at my finished piece - all ready for the flowers.

- Choosing a selection results in a full page refresh.
- Opens in a new window.