

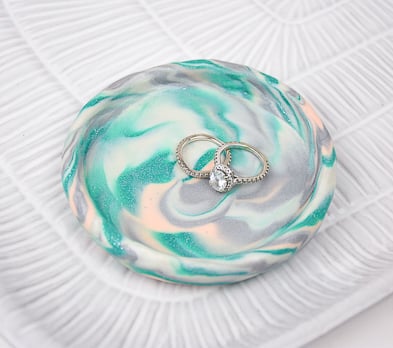
Sculpey III® Turquoise Glitter Trinket Tray
Sculpey III® Turquoise Glitter Trinket Tray
Designed by Amy Koranek
Read More
Read Less
In this tutorial I will show you an easy way to marble clay colors together. Marbling is easy and makes your finished piece look like it has a lot of depth and interest. I have intentionally chosen a variety of types of clay- a flat color (Beige), two mica colors (Pearl and Silver), and a glitter color (Turquoise Glitter) to give the finished piece a lot of contrast.
COMPLETION TIME: 60 Minutes to make and bake
ADDITIONAL SUPPLIES
- 1 piece of scrap copy paper or deli paper
Project Instructions
- Getting Started:
Start with clean hands, unwrap and knead clay until soft and smooth, or condition by running clay though a Pasta Machine. We recommend using a designated machine for clay purposes only. When working with multiple colors, clean hands with soap and water or baby wipes (we have found that baby wipes work best) before switching colors. Shape clay, pressing pieces firmly together. Wash hands after use.
- Baking:
To make this cool marbled tray, let’s start with equal amounts of each color. Use 1/4 block of each color for a total of 2 ounces. A 2 ounce dish is a nice size for rings, trinkets, and change. It’s also a nice size for gift making and giving - four colors of clay will give you four handmade dishes.
Roll each of the 1/4 bars into a little thick rope about 2.5” long.
Roll each of the 1/4 bars into a little thick rope about 2.5” long.

Bundle the colors together as shown. I placed the two lighter colors opposite each other and the two darker colors opposite each other to create more contrast. But you can bundle them however you like.
Squeeze the bundle together in the palm of your hand to choke the air out of the middle and make a solid thick rod.
Squeeze the bundle together in the palm of your hand to choke the air out of the middle and make a solid thick rod.

Roll and twist the rod on the work surface to begin creating a twisted rope.

Keep rolling and twisting to create a thinner striped rope. Keep going til the rope is about 8” long.

Fold the rope in half and then in half again to create another thick rod. This helps make the stripes more random and more multiplied.

Once again, roll and twist the rope until it is about 3/8” thick. Taper both ends with your fingertips.

Coil the rope tightly into a nautilus shape. Make sure there are no gaps between the coils. Place the coiled patty onto a piece of scrap paper. We are going to work on both sides of the patty and placing it on paper makes it easy to pick up and flip over.

Flatten the coiled patty with the Acrylic Clay Roller to even it out and to bond all the coils together. Flip the patty over and roll over the back side as well to make sure all the coils are bonded together with no gaps.

This next step is what I like to do to take away some of the harshness of the stripes and help the colors blur a bit. With the flattened patty on the scrap paper, I take my pointer finger and drag it through the colors. It takes a while and several passes so I just relax and drag my finger through lots of areas turning the paper and going at it from various angles. Use the paper to flip the piece over and drag through the back as well.
If the piece starts to flatten out too much, you can push in from the sides with the palms of your hands to thicken it up again. Then roll over it with the roller again to make it even.
If the piece starts to flatten out too much, you can push in from the sides with the palms of your hands to thicken it up again. Then roll over it with the roller again to make it even.

When you have it as blended as you would like, pinch up the outside edges to create a rim. This shape is more like a little tray.

Bake the tray following the baking instructions above for Sculpey III® and allow to cool completely before handling.

- Choosing a selection results in a full page refresh.
- Opens in a new window.