

Sculpey III® Snow Globe
Sculpey III® Snow Globe
Designed by Precious Nunez
Read More
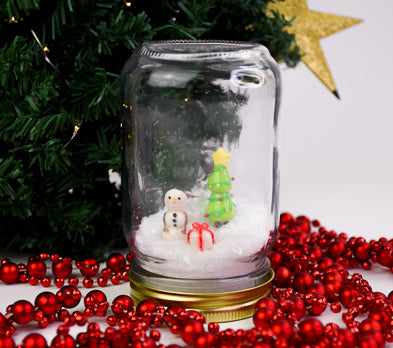
This Snow Globe is a fun yet creative project to make during the holiday whether it is a gift for a special friend or for yourself as decor, we are sure it’ll make the season a little jollier! This project is completely customizable to your liking, just have fun!
Time to complete: Sculpting time approximately 40 minutes and 50 minutes to Bake
NOTE: This project uses the following clays from the Sculpey III® 30 Color Sampler:
Read Less
NOTE: This project uses the following clays from the Sculpey III® 30 Color Sampler:
- White
- Chocolate
- Lemonade
- Granny Smith
- Sweet Potato
- Translucent
- Light Blue Pearl
- Ballerina
- Red Hot Red
- Emerald
- Black
ADDITIONAL SUPPLIES
- Mason Jar with lid
- Faux Snow
- Super Glue
- Scissors
- Toothpick or Metal eye pin
- Acrylic Paint (optional)
Project Instructions
- Getting Started:
Start with clean hands, unwrap and knead clay until soft and smooth, or condition by running clay though a Pasta Machine. We recommend using a designated machine for clay purposes only. When working with multiple colors, clean hands with soap and water or baby wipes (we have found that baby wipes work best) before switching colors. Shape clay, pressing pieces firmly together. Wash hands after use.
- Baking:
Roll out lots of white clay into one large ball and slightly flatten on both sides, this will be the base. Make sure it fits within the rim of your jar to ensure a snug fit. Then bake the base itself to the package instructions. Feel free to paint the base with acrylic paint if you wish.

Roll two balls of green clay one of them slightly larger than the other, this will be the tree. Roll them in a slight cone shape shown below. Cut off the tip of the larger cone to make a flat base for the following cone and stack on each other.

Roll a small brown ball into a thick snake and trim both sides to create the tree trunk. Trim a metal strand from an eye pin or use a toothpick to help support parts of the tree as shown.

Roll a thin snake of dark green clay and wrap it around the tree starting at the top, this will be the string lights.

Roll six tiny balls of each color of clay. Place them along the green snake staring from the top to the bottom of the tree to give your tree some festive lights .

Take a small ball of yellow clay and shape it into a star and place on the tip of the tree as a tree topper.

Roll three balls of white clay large, medium, and small to form the base of a snowman. Slightly flatten the large and medium ball so they easily stack. Then place the small ball on top of the stack to give the snowman a round head.

Roll a very thin snake of brown clay and cut two pieces for the arms. Add three short snakes to the end of the previous snakes to give the snowman stick fingers.

: Apply the arms to the side of the snowman and adjust to your liking. Add details such as buttons, carrot nose, pink cheeks, and a smile!

To make a gift roll out a white ball of clay and form it into a cube, flatten some clay with your rolling pin and cut two thin strips. Add the strips vertically and diagonally across the cube. Cut another strip of red clay and curl each end inward towards the middle of the strip to make a bow then place on the middle of the cube on top. Bake all pieces from step 3-11.

Take the removable part of the lid and place super glue across the inner surface then place the white base from Step 2 on the lid and allow it to dry till secured.

Place each charm on the base according to your liking while securing each piece to the base with super glue. After drying, apply a coat of Gloss Glaze to protect the charms and to further secure them to the base .

Pour faux snow into the jar according to your liking but be sure you can still see your pieces!

Place the part of your lid that is decorated into the jar and secure with the twist to secure part of the lid then turn it over to reveal your new snow globe!

