

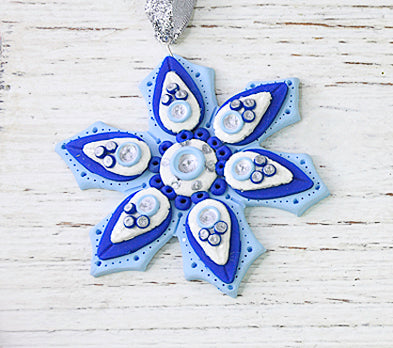
Sculpey III® Layered Snowflake Ornament
Sculpey III® Layered Snowflake Ornament
Designed by Amy Koranek
Read More
Read Less
Create this gorgeous layered snowflake ornament for yourself, your family or your best friend! It is sure to be a keepsake for many years.
COMPLETION TIME:45 Minutes to make and bake.
ADDITIONAL SUPPLIES
- Acrylic roller
- Snowflake template
- Scissors
- 25” Circle cutter
- Graduated teardrop cutters
- 8” Silver ribbon
- 2” Eye pin
- Bright silver paint
- Paintbrush
- Iridescent glitter
Project Instructions
- Getting Started:
Start with clean hands, unwrap and knead clay until soft and smooth, or condition by running clay though a Pasta Machine. We recommend using a designated machine for clay purposes only. When working with multiple colors, clean hands with soap and water or baby wipes (we have found that baby wipes work best) before switching colors. Shape clay, pressing pieces firmly together. Wash hands after use.
- Baking:
Roll the Sky Blue Sculpey III® to a thickness of 1/8”. Cut out a 3.25” circle from the clay. Set the scraps aside.

At this point you can cut out the snowflake shape from the template that is provided and use it to cut out the basic shape of the snowflake.

In the following instructions I will show you how I designed the snowflake without a template.
Mark the six radial arms of the snowflake lightly.
Mark the six radial arms of the snowflake lightly.

Lay the template on top of the circle and use the cutters to follow the design. Cut into each radial arm line with the 1” teardrop cutter.

The basic shape should now be apparent with six arms. Mark the center of each of the arms at the edge.

Cut angled tips using the 3/4” teardrop from the center of each arm dropping down slightly.

Bend an eye pin in half using the Blunt Point tool handle to make a nice curve. Imbed the bent eye pin into the snowflake with the eye exposed past the edge of the clay.

Roll 1/4 bar of Blue to a thin sheet. Cut out six 1” teardrops and position those on top of each arm sandwiching the eye pin in place at the top.

Roll 1/4 bar of White to a thin sheet. Sprinkle some iridescent glitter on top. Spread the glitter over the surface making a thin layer.

Cut out six 3/4” teardrop shapes and place them on top of the Blue teardrops.

Make a little pancake of White and place it in the middle.

Add little balls of Blue around the center connecting the White circle to the Blue teardrops. Poke a hole into each one.

Make divots with the Ball Tool in each White teardrop. Place a Sky Blue ball into each divot. Seat the balls into the divots by pushing another divot in each one with the Ball Tool.
Repeat to place a larger Sky Blue ball in the center.
Repeat to place a larger Sky Blue ball in the center.

Poke decorative holes at the tips of the arms.

Score lines in between each arm and at the tips of the arms.

Use the Needle Tool to add decorative dots around the outsides.

Add a set of three Blue dots to each teardrop area and seat them with the Ball Tool. Bake the snowflake following the baking instructions for Sculpey III®.

When the snowflake is completely cool, dip the tip of the paintbrush handle into bright silver acrylic paint. Paint dots in all the divots and around the center.

When the paint is completely dry, add a ribbon to the eye pin.
