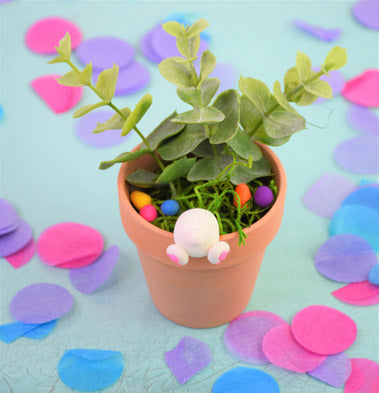

Sculpey III® Decorative Easter Bunny Pot
Sculpey III® Decorative Easter Bunny Pot
Designed by Precious Nunez
Read More
Read Less
This Easter bunny pot is a cute yet creative way to make your own Easter decor with the little ones from the comfort of your own home! Perfect as a table setting, gift, or fun craft to enjoy. Let your creativity shine with this awesome project!
TIME TO COMPLETION: 30 minutes to sculpt and 30 minutes to bake
ADDITIONAL SUPPLIES
- Scissors
- Fake Florals/Greenery
- Terracotta Pot
- Wooden Toothpick 1-2
- Super Glue
- Acrylic Paint (optional)

Project Instructions
- Getting Started:
Start with clean hands, unwrap and knead clay until soft and smooth, or condition by running clay though a Pasta Machine. We recommend using a designated machine for clay purposes only. When working with multiple colors, clean hands with soap and water or baby wipes (we have found that baby wipes work best) before switching colors. Shape clay, pressing pieces firmly together. Wash hands after use.
- Baking:
Roll out some white clay into one large ball, this will be the body.
Then roll out two medium-sized egg shape pieces of clay and flatten slightly, these will be the feet.
Lastly, roll out a small sized ball of white clay, this will be the cotton tail.
Adjust sizes according to your desired bunny.
Then roll out two medium-sized egg shape pieces of clay and flatten slightly, these will be the feet.
Lastly, roll out a small sized ball of white clay, this will be the cotton tail.
Adjust sizes according to your desired bunny.

Use the needle tool or any of the Sculpey Clay Tools to make an indent on the bottom side of the largest white ball of clay (the body). This will help the bunny stay comfortable on the rim of the pot. Use the needle tool to make two indents on the bottom side of both bunny feet, this is giving the feet more detail.

Place the body on the rim of the pot to make sure it fits comfortably. Take off and adjust if needed for a snug fit with the same tool you previously used to make the bottom indent.

Roll six tiny balls of pink clay and two bigger sized balls for the feet.
Place one of the bigger sized balls on the middle of the paw for each foot.
Then, place three of the six small balls on the edges where you placed the indents to better represent the bunny’s paws.
Place one of the bigger sized balls on the middle of the paw for each foot.
Then, place three of the six small balls on the edges where you placed the indents to better represent the bunny’s paws.

Place each foot on the body in the bottom area of the bunny. It is best to place these with small amounts of TLS to secure them to the body. You may adjust the positions to your liking. I place the bunny back on the rim for attachment ease.

Add the small white tail to the body right above the feet, attach with TLS as well.

Roll 3-6 small balls of various colored clay, these will be for the eggs.
Roll the balls into egg shapes, bake all clay pieces from steps 2-8.
Roll the balls into egg shapes, bake all clay pieces from steps 2-8.

Assemble all pieces in your pot after baking according to your liking. Fill the bottom belly indent with super glue and place it on the rim. Stuff the loose greenery/grass to fill the pot. Feel free to paint little details and designs on the easter eggs or keep them plain.

