

Original Sculpey® Terra Cotta RV Home Décor Planter
Original Sculpey® Terra Cotta RV Home Décor Planter
Designed by Phoebe Doehring
Read More
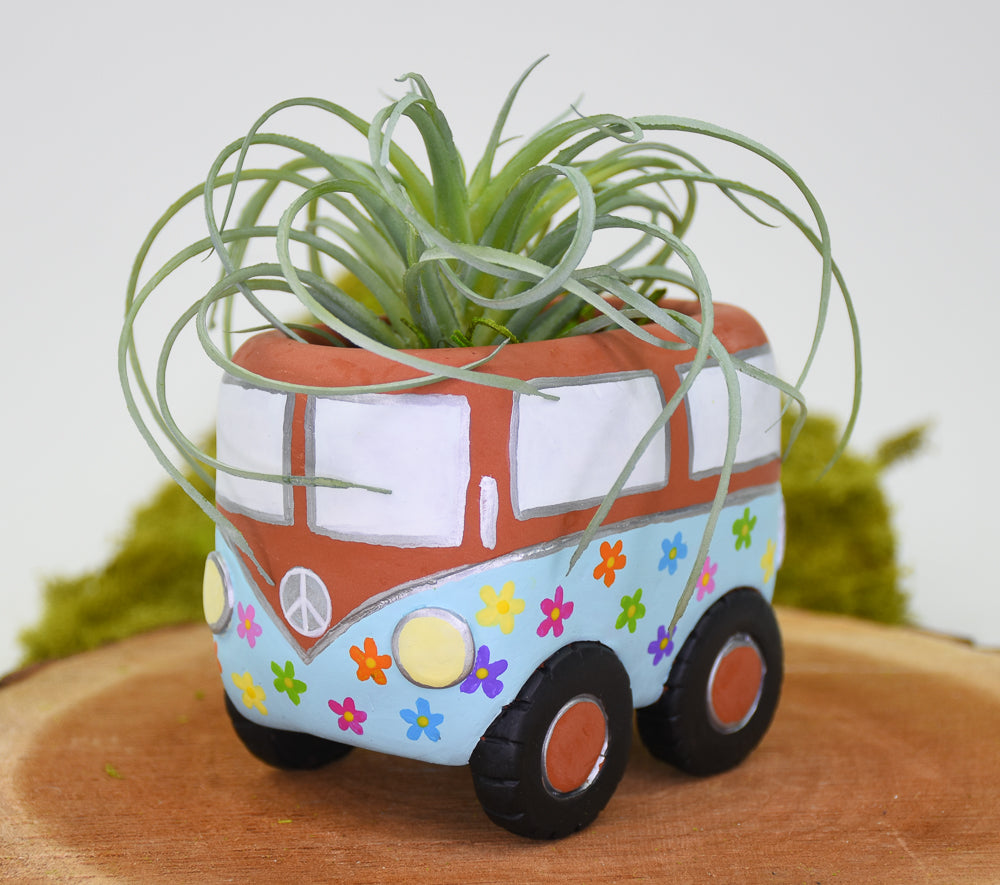
Original Sculpey® Terra Cotta is the perfect clay to create this little RV planter. Once the design has been baked and cooled, you can paint it any colors you wish and even add some flowers for a 60's vibe! Add your air plants, small succulents or artificial plants and enjoy!
Difficulty/Time to Create: 45min.
Bake Time: 30 minutes
Read Less
Difficulty/Time to Create: 45min.
Bake Time: 30 minutes
ADDITIONAL SUPPLIES
- Wet/Dry Sandpaper 400 grit
- Acrylic Paints (Americana Deco Art): Wild Berry, Black, White, Silver, Turquoise, Spa Blue, Irish Moss, Royal Fuschia, Bright Yellow, Lavender, Orange
- Paintbrushes: fine tip, medium tip
- Clay knife
- Ruler
Project Instructions
- Getting Started:
Start with clean hands, unwrap and knead clay until soft and smooth, or condition by running clay though a Pasta Machine. We recommend using a designated machine for clay purposes only. When working with multiple colors, clean hands with soap and water or baby wipes (we have found that baby wipes work best) before switching colors. Shape clay, pressing pieces firmly together. Wash hands after use.
- Baking (also called Curing):
Condition 1/2 block of Sculpey Terra Cotta clay to start. Flatten and run the clay through the clay machine on the #1 setting. Fold in half. Cut out the following shapes using your clay knife:
• 2 rectangles approximately 3” x 2-1/2” (these will be the sides of the RV)
• 2 squares approximately 2 ½” x 2-1/2” (these will be the front and back of the RV)
Set aside for now. Run clay through the clay machine again on the #1 setting. Cut out the following from this sheet:
• 1 rectangle approximately 3” x 2 1/2” (bottom of RV)
• 1/2” circles (2 each for headlights)
• 1/2” squares (2 each for tail lights)
You might need to condition some more clay. Flatten and run the clay through the clay machine on the #1 setting. Fold this sheet to be 4 times thick for the wheels. Cut out four 1-1/4” circles for the wheels.

Use your 1/2” circle cutter and press into the center of each wheel to create an indentation for a hubcap. Use your 5 in 1 tool and make horizontal tire tread lines around each wheel.
Take your two double thick rectangular pieces that are the sides of the RV and cut out two wheel wells on the side of each to accommodate the tires later. Use the 1-1/4” circle cutter for this.
Take your two double thick rectangular pieces that are the sides of the RV and cut out two wheel wells on the side of each to accommodate the tires later. Use the 1-1/4” circle cutter for this.

Time to assemble your van RV. Make a box shape. First place the base rectangular piece down. Set the two sides on and then the front and back. Start pressing and marrying all the seams together. This is tricky to start but once you start pressing things together it gets easier. Use your fingertips as tools to round the edges.

Fold in the top edges to create a curved top to the van. Keep smoothing and refining until you are happy. It might be a bit bumpy but you can sand it down later if you can’t get all the bumps out.

Once you are pleased with the van shape you can create an indented line with your 5 in 1 tool that starts about 1/2 way down the van and runs all the way around it. In the front bring the line to a V shape just like on a VW van.
Press on your two small circle headlights. Press on the two small square taillights.
Press the wheels into the wheel wells. You may have to use your clay knife and cut out a little clay here from the base to accommodate the wheels. Make sure the wheels are straight and secure.
Place the RV van on your baking sheet or tile. Make sure all the wheels are in line and straight and check to see you are happy with it.
Bake according to package directions and allow to cool completely.

Use your Wet/Dry sandpaper under some running water and carefully sand the RV van until it is as smooth as you would like it to be. Dry completely before painting.
Paint the lower portion of the van under the indented line your created with the Spa Blue color. You will need at least two coats in most colors.
Paint two front windows, two side windows, and one back window with White paint.
Paint the headlights a Light Yellow by mixing some Bright Yellow and White together.
Paint the taillights Wild Berry.
Paint the tires Black, leaving the hubcaps Terra Cotta.
Paint around the windows, lights and hubcaps, and the indented line Silver. Paint a round Silver circle in the front of the van. When that dries paint a White Peace sign over the top.
To finish paint flowers on the lower portion of the van in Lavender, Fuschia, Irish Moss, Turquoise, Orange and Light Yellow. Give flowers a Bright Yellow center.
Once paint is dry add your air plant or succulent!

- Choosing a selection results in a full page refresh.
- Opens in a new window.