

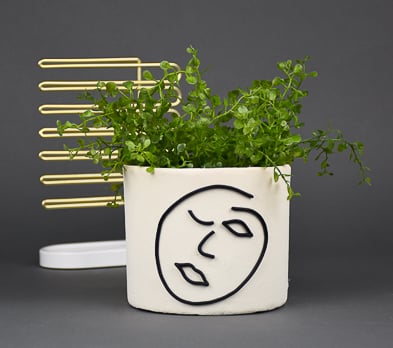
Original Sculpey® Abstract Face Planter
Original Sculpey® Abstract Face Planter
Designed by Gretchen Amberg
Read More
Create a super graphic face planter that is very on trend in just about an hour!
TIME TO COMPLETION: 65 minutes
Read Less
ADDITIONAL SUPPLIES
- Round Glass Vase – 5” diameter
- Small Paint Brush
- Optional – Clay Extruder
- 60-Grit Sandpaper
Project Instructions
- Getting Started:
Please make sure your work area is covered and you are not working on an unprotected surface. We recommend working on the Sculpey® Oven-Safe Work Mat, wax paper, metal baking sheet, or disposable foil. Uncured clay may damage unprotected furniture or finished surfaces. Be sure to cover your crafting area appropriately.
Start with clean hands, unwrap and knead clay until soft and smooth, or condition by running clay though a Pasta Machine. We recommend using a designated machine for clay purposes only. When working with multiple colors, clean hands with soap and water or baby wipes (we have found that baby wipes work best) before switching colors. Shape clay, pressing pieces firmly together. Wash hands after use.
- Baking:
Spread a thin layer of Liquid Sculpey® Oven-Bake Clay Adhesive over the outside of the glass planter.
Condition 3/4 of the package Original Sculpey. Roll the clay into a sheet on a medium/thin setting to a size that is long enough to wrap around the glass planter with some overlap and wide enough to cover the planter from top to bottom.
Once you have wrapped the strip around the glass use the Super Slicer blade to cut at an angle through the overlap section of the strip. After you have cut through both layers remove the excess clay. Add a small amount of Liquid Sculpey® Oven-Bake Clay Adhesive to one of the cut ends. Press the two ends together and blend the seam.

Gently hold the planter in one hand use the other hand to position the Super Slicer blade so that the flat of the blade is against the bottom of the planter. Slowly rotate the blade to trim the extra clay away from the bottom of the planter. Repeat this action around the top of the planter. Remove all extra clay and set the clay to the side.

Tear a small piece from the sheet of 60-grit sandpaper. Firmly press the sandpaper into the surface of the clay to add texture. Continue pressing the sandpaper into the clay until the entire planter has been textured. Bake the planter for 20-minutes and let cool.

Condition 1/2 block of the Black Glitter clay. Extrude or roll a long strand of clay to approximately 1/8” in diameter. The strand of clay needs to be at least 20” long.
Cut a piece from the long strand which is 2.75” in length. Fold the piece of strand in half and pinch the ends together. Pinch the loop end of the clay so both ends of the shape are pointed. Use the end of the paint brush to make an indentation in the middle of one side of the long edge. Set the formed piece to the side to be used for the lips.
Cut a piece from the long strand which is 2.75” in length. Fold the piece of strand in half and pinch the ends together. Pinch the loop end of the clay so both ends of the shape are pointed. Use the end of the paint brush to make an indentation in the middle of one side of the long edge. Set the formed piece to the side to be used for the lips.

Cut a piece from the long strand which is 2.25” in length. Fold the piece of strand in half and pinch the ends together. Pinch the loop end of the clay so both ends of the shape are pointed. Set this piece to the side to be used as the open eye.

Cut a piece from the long strand which is 1.5” in length. Measure 0.5” in from one end of the strand and bend to approximately 90-degrees. Set this piece to the side to be used as the nose.
Cut a piece from the long strand which is 1” in length. Curve the strand of clay to match the curve in the bottom of the open eye piece. Set this piece to the side to be used as the closed eye.
Pick up the open eye. Use the small paint brush to add a thin coat of Bake and Bond to the back of the eye. Lightly press the eye onto the planter. Continue adding the facial features until they are arranged to your liking.

Pick up what is left of the strand of clay. Brush a thin coat of Oven Bake Adhesive onto approximately 3” on one end of the strand. Position the end of the strand of clay so it forms an eyebrow over the open eye. Continue adding Bake and Bond to the strand of clay as you wrap it around the facial features to create the outline of the face.
Once all of the features and face outline are in place gently press into place so they do not move. Bake the planter for 20-minutes and let cool.
Once all of the features and face outline are in place gently press into place so they do not move. Bake the planter for 20-minutes and let cool.
