


Liquid Sculpey® Spooky Window Clings
Liquid Sculpey® Spooky Window Clings
Designed by Amy Koranek
Read More
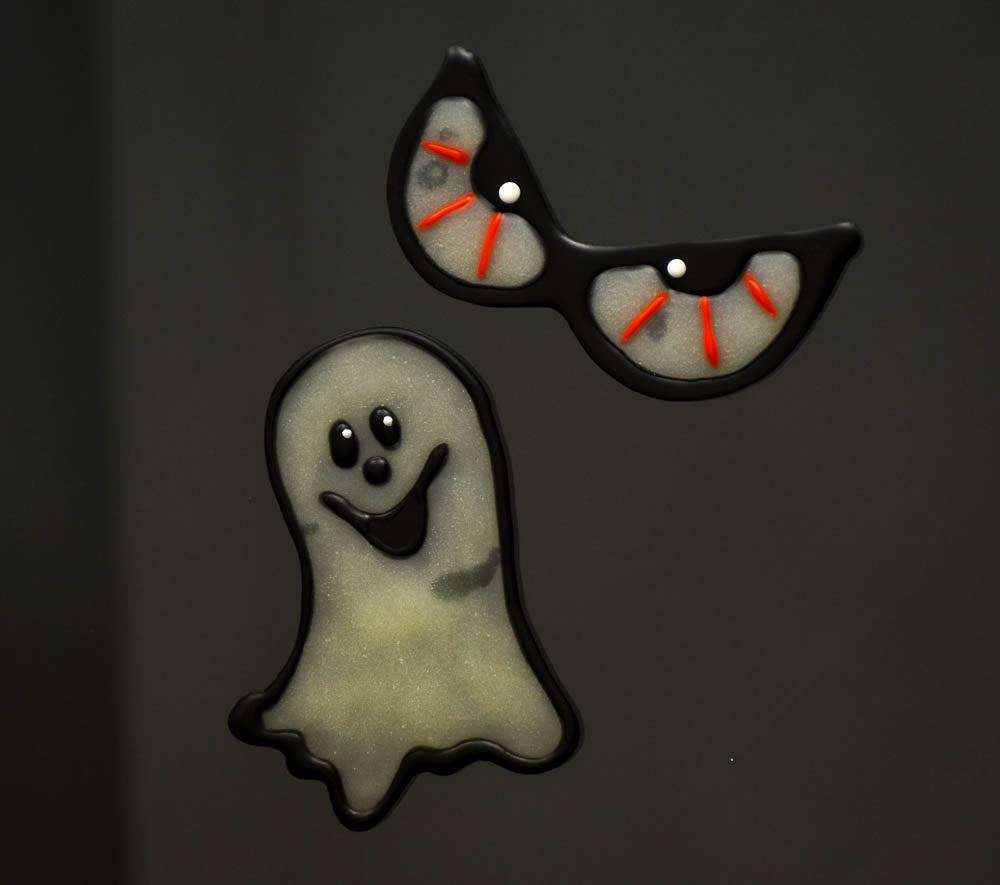
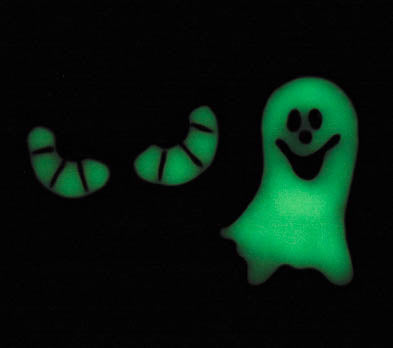
Create a scary window scene with glowing creatures featuring Liquid Sculpey® Glow in the Dark.
TIME TO COMPLETE:
90 Minutes to make and bake
Read Less
ADDITIONAL SUPPLIES
- Paper towel
- Printed image (from the internet) of friendly ghost if you like
- Printed image (from the internet) of spooky eyes if you like
- Clean piece of glass that is clear and smooth
- Small sharp scissors
- Plastic sheet divider for storage


Project Instructions
- Getting Started with Liquid Sculpey®:
- Baking:
- It is important to use oven thermometer when you bake the liquids so that you can ensure your oven is at the correct temperature.
- Do not microwave the liquids. They must be baked in a Preheated oven at 275 ºF (130 ºC) for liquid colors and 300 ºF (149 ºC) for Clear – Do not exceed baking temperatures.
- If your piece is less than 1/4” bake for 15 minutes. For thicker pieces that are 1/4” or above bake for 30 minutes.
- If your liquid project has become yellowed or discolored in the oven, when you remake it, tent it by placing either – folding an index card in half and placing your project under it by using aluminum foil over your project.
Here’s a tip for baking perfectly in silicone molds. Dampen a dish towel with water and wring out as much of the water as you can. Fold the damp towel so that the molds can sit level on top of it. The damp towel will slow down the curing process so that the LS will cure evenly throughout and avoid warping.
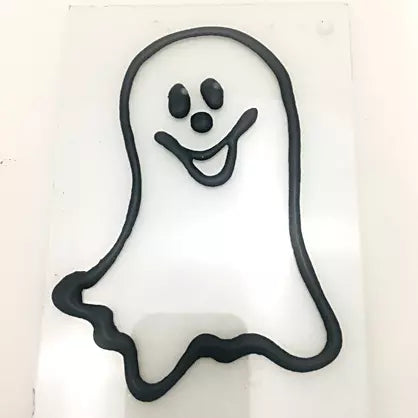
If you have an image of a friendly ghost that you like (you can easily print one from the internet), place it under the clean clear glass. Trace the image with Black Liquid Sculpey® (LS). If your Black LS is very runny and hard to manage as an outline, here is a tip that may make the Black LS bead up better and hold the outline. Pre-heat the glass in a 275ºF oven for 20 minutes. Then while the glass is hot, carefully draw or trace the image onto the glass. Please be careful and don’t touch the glass with your hands or wrists. But do try to hold the tip of the Black LS fairly close to the glass.
Bake the ghost outline on the glass following the baking instructions for Liquid Sculpey®.
Bake the ghost outline on the glass following the baking instructions for Liquid Sculpey®.
When the glass is completely cool, add Glow in the Dark LS to the inside area of the ghost.
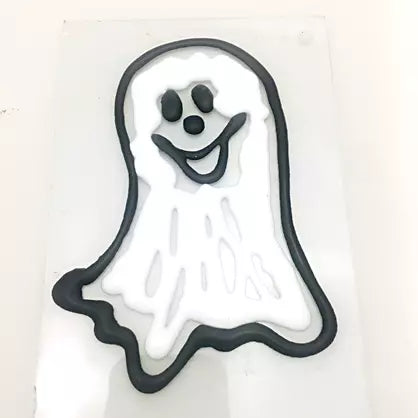
Spread the Glow in the Dark LS all the way to the edges and fill in all the little areas with a clay tool.

Add tiny White LS dots to the eyes. Bake the ghost on the glass again. After this baking I added another layer of Glow in the Dark LS to the ghost and baked one more time so he would be really super glowy!
You can trim the outside edges of the ghost with small sharp scissors if needed.
You can trim the outside edges of the ghost with small sharp scissors if needed.

If you have an image of spooky eyes that you like (you can easily print one from the internet), place it under the clean clear glass. Trace the image with Black Liquid Sculpey® (LS). If your Black LS is very runny and hard to manage as an outline, here is a tip that may make the Black LS bead up better and hold the outline. Pre-heat the glass in a 275ºF oven for 20 minutes. Then while the glass is hot, carefully draw or trace the image onto the glass. Please be careful and don’t touch the glass with your hands or wrists. But do try to hold the tip of the Black LS fairly close to the glass.
Bake the spooky eyes outline on the glass following the baking instructions for Liquid Sculpey®.
Bake the spooky eyes outline on the glass following the baking instructions for Liquid Sculpey®.

Next add Red veins to the eyes and White highlights. Bake again to set the veins and the highlights.

Squirt Glow in the Dark LS in the spaces between the veins. Spread the Glow into all the little areas with a clay tool.

Bake the spooky eyes on the glass one more time.
Allow the eyes to cool before peeling them from the glass.
You can trim the outside edges of the ghost with small sharp scissors if needed.
Allow the eyes to cool before peeling them from the glass.
You can trim the outside edges of the ghost with small sharp scissors if needed.

The spooky eyes and the ghost are ready to be used as window clings. Store window clings for next year’s use by placing them on a plastic sheet divider.
