
Liquid Sculpey® Sparkling Snowflakes
Liquid Sculpey® Sparkling Snowflakes
Designed by Amy Koranek
Read More
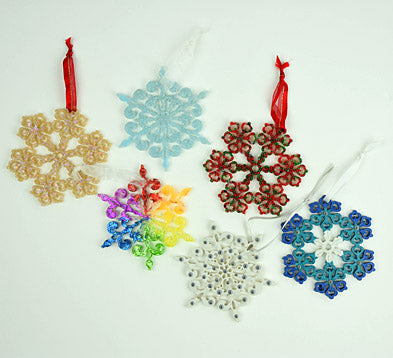
This really big silicone mold is fun to fill and a fantastic inspiration. I set out to make a couple samples for you and ended up really running crazy with it and all it’s possibilities. I ended up with five design ideas to share here, a couple more for inspiration, and even one as a keepsake. When they are complete, just attach an accent ribbon to finish them off as package tags or tree ornaments. Or leave the ribbon off to create a seasonal coaster.TIME TO COMPLETE:
45 Minutes to make and bake a snowflake, or in an hour you can fill the entire mold and bake four at once.
NOTE: You will need one bottle of Liquid Sculpey® Clear for EACH snowflake you create.
Read Less
NOTE: You will need one bottle of Liquid Sculpey® Clear for EACH snowflake you create.
ADDITIONAL SUPPLIES
- Paper towel
- Silicone snowflake mold
- Silicone baking cups for mixing in glitters and beads
- Small sharp scissors
- Old credit card or plastic hotel room key for squeegee
- Gold chunky glitter or mica flakes
- Silver chunky glitter or mica flakes
- Foil glitters in red, orange, yellow, green, blue, and violet
- Red and green seed beads
- Seed beads of your choice
- Coordinating ribbons of your choice

Project Instructions
- Getting Started with Liquid Sculpey®:
- Baking:
Gold Glittery Snowflake-
This snowflake was created by simply adding a lot of chunky gold glitter to the Clear Liquid Sculpey® (LS). I cannot stress enough how important it is to stir your Clear LS really, really, really well. Clear LS has a tendency to separate in the bottle and it just needs a little coaxing to re-incorporate all that good stuff into the liquid. Once it is stirred well, pour half of the bottle into a small silicone baking cup. Add a covering of chunky gold glitter to the surface of the LS. I’m using Mr. Nola’s Glitter in the color “Ellen” which I really love because it is actually several sizes of gold glitters and iridescent glitters all in one mixture. And it’s SUPER shiny!
This snowflake was created by simply adding a lot of chunky gold glitter to the Clear Liquid Sculpey® (LS). I cannot stress enough how important it is to stir your Clear LS really, really, really well. Clear LS has a tendency to separate in the bottle and it just needs a little coaxing to re-incorporate all that good stuff into the liquid. Once it is stirred well, pour half of the bottle into a small silicone baking cup. Add a covering of chunky gold glitter to the surface of the LS. I’m using Mr. Nola’s Glitter in the color “Ellen” which I really love because it is actually several sizes of gold glitters and iridescent glitters all in one mixture. And it’s SUPER shiny!

Stir the glitter into the LS well. If you feel that your LS is thick, you can thin it with a couple of drops of Sculpey® Softener & Thinner - just one drop at a time stirring between each drop. You can add more glitter to the mix depending on how saturated you would like your snowflake to be. In this photo, you can see that my mixture has a slight gold tint to it from the gold glitter that is mixed in. Wipe tools clean with paper towel.

Carefully pinch a little pour spout in the side of your silicone cup. Drip the glittery LS into the silicone snowflake shape that you have chosen for this design. I always start by filling the largest areas first and allow the LS to run into the smaller areas on its own. Keep filling the mold to level. If you run out of your glittery clear mixture, you can always make up a little more to fill up the mold shape.
You can use an old credit card or plastic hotel room key to squeegee off excess from the window areas of the snowflake shape. You can also wipe gently with paper towel to remove excess.
Tap the mold on the work surface to release air bubbles.
You can use an old credit card or plastic hotel room key to squeegee off excess from the window areas of the snowflake shape. You can also wipe gently with paper towel to remove excess.
Tap the mold on the work surface to release air bubbles.

You can either fill more snowflake shapes in the mold or bake immediately following the baking instructions for Liquid Sculpey®. When the mold is completely cool, gently flex it to remove the snowflake shape. If there are excess little dribbles of baked LS around the edges of your snowflake, these can be easily trimmed away with small sharp scissors. Then add a ribbon if you like to turn it into a package tag or ornament.

Gold Glittery with Translucent Windows-
Here’s a look at another variation I did on the Gold Glittery Snowflake - after I de-molded the gold glittery snowflake, I laid it right side up on a piece of glass and applied enough pressure to it that it kind of wanted to stick to the glass. Then I backfilled some of the open areas with Translucent Turquoise LS and baked again following the baking instructions for Liquid Sculpey®. This created a cool window look to the snowflake.
Here’s a look at another variation I did on the Gold Glittery Snowflake - after I de-molded the gold glittery snowflake, I laid it right side up on a piece of glass and applied enough pressure to it that it kind of wanted to stick to the glass. Then I backfilled some of the open areas with Translucent Turquoise LS and baked again following the baking instructions for Liquid Sculpey®. This created a cool window look to the snowflake.

Translucent Turquoise Glitter-
This snowflake was made using the exact same process outlined above in Steps 2-5 but instead of Clear LS I used Translucent Turquoise LS, and instead of gold glitter I used a chunky white silver glitter. It turned out very pretty and frosty looking.
This snowflake was made using the exact same process outlined above in Steps 2-5 but instead of Clear LS I used Translucent Turquoise LS, and instead of gold glitter I used a chunky white silver glitter. It turned out very pretty and frosty looking.

Shades of Blue Snowflake-
In this design I’m squirting the Liquid Sculpey® (LS) straight from each bottle - after stirring well, of course. When stirring your LS in the bottle you can do a thickness check by lifting your stirring tool from the bottle and watching how quickly or slowly the LS drips off the tool back into the bottle. I call this the Dip & Drip technique. When working with multiple colors of LS in one design, it works best if each of the colors are similar in consistency. If you have one that is very much thicker (slow drip) than the others, you can thin it by adding a drop of Sculpey® Clay Softener & Thinner and stirring it in completely. Then test again using the Dip & Drip method. The liquids don’t have to be exactly the same thickness, but comparable is good.
I started in the center of this snowflake design by squirting Pearl LS into the center wheel.

Next, I squirted Peacock Pearl into the centers of each of the six pad areas of the snowflake.

I added a little more Peacock Pearl to the same area again to help the LS start to flow into some of the smaller areas, even encouraging it to flow into the Pearl area.

After those steps, I added Peacock Pearl to the areas between the pads to create a ring of Peacock Pearl all the way around the Pearl center.

Finally, I carefully added Navy Metallic to the outside areas, focusing on dripping the Navy into the largest areas possible and allowing it to run into the smaller areas. You can always coax the liquids to go where you want them to with any of the tools from the Clay Tool Starter Set.
When the mold is filled to level wipe away boo boos with paper towel or cotton swab.
Tap the mold on the work surface to release air bubbles.
When the mold is filled to level wipe away boo boos with paper towel or cotton swab.
Tap the mold on the work surface to release air bubbles.

Bake the mold following the baking instructions for Liquid Sculpey®. When the mold is completely cool, gently flex it to remove the snowflake. If there are excess little dribbles of baked LS around the edges of your snowflake, these can be easily trimmed away with small sharp scissors.

If you want to add some Silver highlights like I did in this example, you will need to start with a hot snowflake. Place the de-molded snowflake on a baking sheet and bake again following the baking instructions for Liquid Sculpey®. Then carefully remove the baking sheet from the oven using hand protection. Hold the tip of the Silver LS very close to where you would like the dot to form and drip tiny drops of Silver LS into place while the snowflake is hot. This will help the dots to form immediately and not spread. Then bake the snowflake again for ten minutes to set the dots. Then add a ribbon if you like to turn it into a package tag or ornament.

Iridescent Snowflake-
For this super sparkly version, just follow Steps 2-5. Instead of Clear LS use Translucent Turquoise LS (TTLS), and instead of gold glitter use iridescent foil glitter. Mix a good amount of the foil glitter into the TTLS.
For this super sparkly version, just follow Steps 2-5. Instead of Clear LS use Translucent Turquoise LS (TTLS), and instead of gold glitter use iridescent foil glitter. Mix a good amount of the foil glitter into the TTLS.

Fill the cavities of a snowflake mold with the TTLS/foil mixture making sure to get it into all the little nooks and crannies. Tap the mold on the work surface to make sure air bubbles are released.
Then smear a thin layer of the TTLS/foil mixture across the back of the design and across the open windows.
Then smear a thin layer of the TTLS/foil mixture across the back of the design and across the open windows.

Bake following the baking instructions for Liquid Sculpey®. Allow to cool completely. Then gently flex the mold to release the snowflake. You will see that the windows have a cool sparkly effect because of the iridescent glitter behind them.

Red & Green Seed Beads-
Adding seed beads is also a fun way to add dimension and texture to your snowflakes. For this design, I filled the snowflake mold halfway to level with Clear LS.
Adding seed beads is also a fun way to add dimension and texture to your snowflakes. For this design, I filled the snowflake mold halfway to level with Clear LS.

Then I sprinkled on lots of red and green seed beads.

I took my time and helped coax the seed beads into place in the Clear LS with a clay tool.
Then I added even more seed beads to make sure all the little details were filled and that the snowflake looked like it had an even distribution of beads. You can add more Clear LS as needed to make sure the shape is completely filled to level.
Wipe clay tools clean with paper towels.

After baking this style looks very shiny and ornate.

Iridescent Rainbow-
Foil glitter works really well with Clear LS and in this sample, I’m using a shredded foil glitter. I’m adding the glitters to the already filled mold so I don’t have to mix each one separately. It’s a little messy but the finished piece is super cool!
Fill the snowflake mold to halfway level with Clear LS.

Select six colors of iridescent foil glitter to use in your design. I went with six colors since the snowflake shape has six points. I sprinkled one point of the snowflake from tip to center with red iridescent foil glitter. I was careful to keep most of it in the area where I wanted it but I didn’t fret over the free falling bits.

Then I sprinkled orange, yellow, green, blue, and violet on each of the other points from tip to center.

Next, I backfilled each area with more Clear LS to fill each area to just about level. I left them slightly lower than level to allow myself room in the next step to move more of those stray glitters into the design.

Lastly, I used one of my clay tools to carefully push as much of the stray bits into the LS areas as possible. I didn’t mind the little strays that found themselves in the wrong color areas, hoping that these would add to the “rainbowyness” of the whole design.

Then bake the iridescent flake following the baking instructions for Liquid Sculpey®. Little bits of baked LS along the edges of the snowflake can be carefully trimmed away with small sharp scissors. Allow the mold to cool completely then carefully remove the finished piece by gently flexing the mold. Little bits of baked LS along the edges of the snowflake can be carefully trimmed away with small sharp scissors. Voila! Rainbow perfection!

Keepsake Ornament-
As I was digging through my treasures to find fun things to embed in Liquid Sculpey® snowflakes, I happened upon a real find - seed beads I had used in my wedding trousseau 32 years ago! I had kept this little mixed assortment of seed beads for who knows what reason. So here they go - permanently embedded in a snowflake ornament for old time’s sake!
I used the same method as for the Red & Green Seed Beads (Steps 18-21) filling the cavity half way with Clear LS, then packing it with my treasured beads, then baking. This one’s going on my own tree this year :)

- Choosing a selection results in a full page refresh.
- Opens in a new window.