

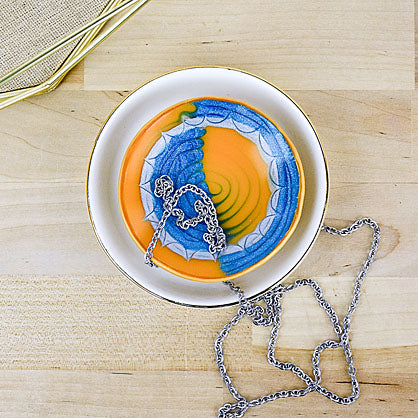
Liquid Sculpey® Balance Bowl
Liquid Sculpey® Balance Bowl
Designed by Amy Koranek
Read More
Read Less
It’s always good to keep things in balance. One foot in chaos, one foot in order, full heart and mind in creativity. Remind yourself of this truth daily by making a little Balance Bowl.
ADDITIONAL SUPPLIES
- Paper towel
- Clean & smooth piece of glass with 1/4” grid markings or Clean & smooth piece of glass and paper template with 1/4” grid markings
- 3” Circle cutter or 3” paper template
- Craft knife
- Small shallow glass or metal bowl
- Optional - Heat gun
Project Instructions
- Getting Started:
- Baking:
First, we need to stir the liquids. Remove the caps from the Liquid Sculpey® (LS) colors. Stir each color with one of the modeling tools and clean the tool with paper towel after each color. Replace the caps to each bottle. Now we are ready for the fun!
Carefully squirt a half circle of Translucent Amber LS onto the glass. Squirt a half circle of Peacock Pearl LS next to the Amber LS to create a full circle about 2” in diameter. I’m using a piece of glass that has a grid marked on the back of it to help me gauge the size of my circle. You can also place a grid underneath your glass if you don’t have this type of marked glass. I generally squirt it out in lines and the lines will have a tendency to fill themselves in if they are really close together.
Carefully squirt a half circle of Translucent Amber LS onto the glass. Squirt a half circle of Peacock Pearl LS next to the Amber LS to create a full circle about 2” in diameter. I’m using a piece of glass that has a grid marked on the back of it to help me gauge the size of my circle. You can also place a grid underneath your glass if you don’t have this type of marked glass. I generally squirt it out in lines and the lines will have a tendency to fill themselves in if they are really close together.

Next, squirt a thick line of Silver LS all the way around the Amber/Peacock circle.

Finally, repeat the half and half circle, but with opposite colors around the outside of the Silver ring. If the lines have not all filled themselves in, either carefully add just enough of the correct color of LS to fill in or use an Etch ‘n Pearl tool to coax the lines closed. Also use the tip of the small Etch ‘n Pearl to pop bubbles. At this point your design should be just over 3” in diameter.

Insert the tip of the small Etch ‘n Pearl into the Peacock Pearl very near the midline.

Carefully swirl the tip of the tool in ever increasing spirals. Don’t lift the tip of the tool until you are completely done spiraling. In this way the tip of the tool will drag bits of color from one side of the mid line to the other creating a beautiful swirl.

When you have swirled all the way out to the Silver, carefully lift the tool out and wipe it off with paper towel.

Dip the tool into the outer ring of Amber/Peacock and carefully swirl all the way around this area twice to make two more swirls. What you may not notice until the piece is baked is how beautifully the Peacock Pearl is swirling through itself leaving a mica trail.

This is the most difficult step, so take a deep breath before creating the pattern that goes just into the Silver LS ring. When you’re ready, dip the tip of the tool into the Silver LS, and really carefully, make a little arching pattern around the ring of the Silver LS without lifting the tool until the ring is complete. It’s okay if the Silver arches go a bit out of the boundary on either side. For inspiration look at Photo 11 to see how the Silver mica creates a lovely pattern that you can see after baking.
Bake the design on the glass following the baking instructions for LS. When the piece is completely cool carefully peel it off of the glass.
Bake the design on the glass following the baking instructions for LS. When the piece is completely cool carefully peel it off of the glass.

Use the 3” circle cutter or 3” paper template as a guide on top of the baked circle. Use a craft knife to trim away excess on the outside of the cutter so your shape is perfectly round.

Sheet 1/2 block of 18K Gold Premo through the pasta machine on the thickest setting. Make a nice smooth sheet that is large enough to accommodate the LS circle design. Burnish the LS design down on top of the clay sheet with your fingertips, or roll it into place with the Acrylic Clay Roller. The baked liquid design will love to stick to the clay sheet.

Trim around the outside of the design as closely as possible with a craft knife.

Place the disc into a shallow glass or metal bowl with the design side facing up. Carefully push the clay disc down into the bowl forcing it to conform to the shape of the bowl. The bowl needs to be shallow enough that the liquid piece can conform to the shape without wrinkling itself. Bake the bowl again following the baking instructions for Premo. When the piece is completely cool, carefully pop it out of the bowl.

Sheet another 1/2 block of Premo 18K Gold through the pasta machine on the thickest setting. Place the sheet on the bottom of the baked bowl and press our air bubbles with your fingertips from between the fresh and the baked layers. Force the edge of the clay sheet up evenly around the outside edge of the baked bowl. Trim with the Super Slicer to make a neat edge. Smooth the cut edges with fingertips.

Carefully push the bowl down on your work surface to make a flat spot in the center of the bottom of the bowl. Cut a 1” circle from the sheeted 18K Gold Premo and place it on the flat spot on the bottom of the bowl.

Turn the bowl back over right side up and make sure the little foot of the bowl is nice and flat by pushing down on the bowl one more time. Bake the bowl one final time following the baking instructions for Premo. When you remove the bowl from the oven while it is still hot, you can apply more heat with a heat gun to the surface to really make the metallic colors deepen. Turn the heat gun on HI and hold it 4” to 6” from the surface of the clay. Move the heat constantly over the surface until you see the colors deepen and the surface shine. Then turn the heat off quickly to avoid burning the clay.
