Skip to product information
1 of 1

Liquid Sculpey® 3D Popsicle Art

Liquid Sculpey® 3D Popsicle Art

Read More
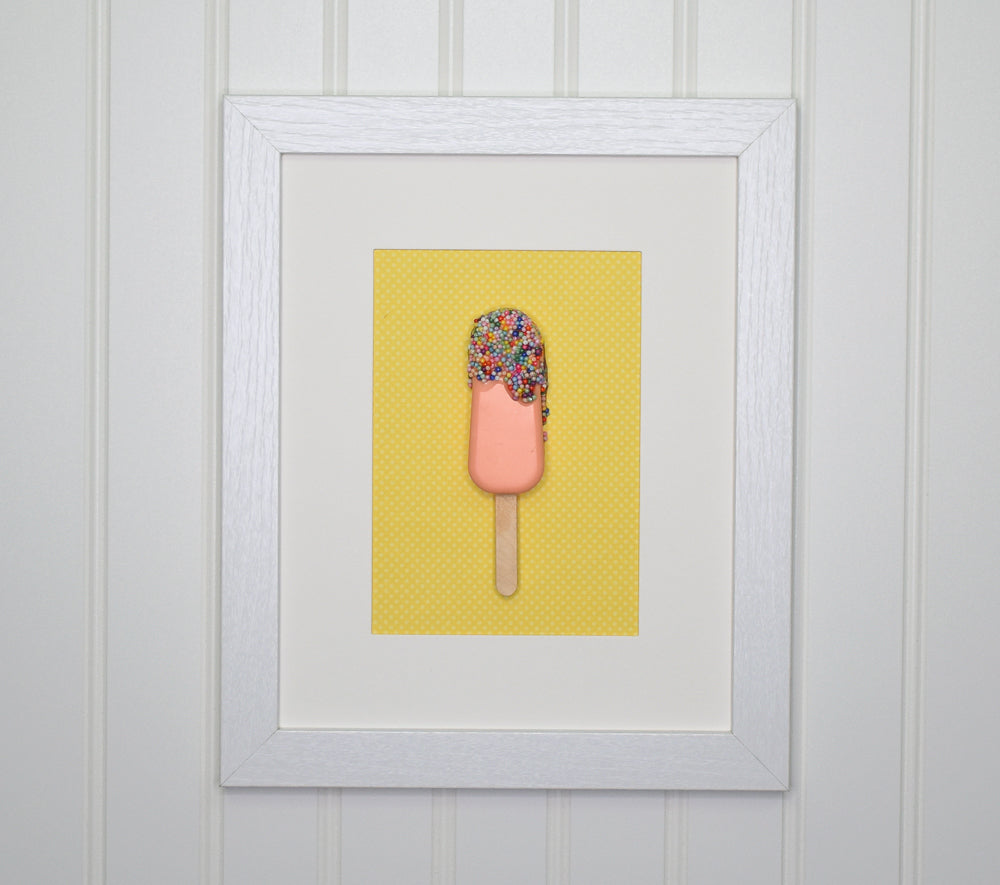
Create this modern masterpiece with the help of some Liquid Sculpey® and a popsicle mold. This is perfect to hang just about anywhere in your home, but careful, it may make you crave something sweet and cool!
Read Less
ADDITIONAL SUPPLIES
  • Paper towel
  • Silicone popsicle mold
  • Popsicle stick
  • Bakable confetti glitter sprinkles
  • Small sharp scissors
  • 8 x 10 Photo frame with 5 x 7 or 4 x 6 matte
  • 8 x 10 Yellow patterned scrapbooking paper
  • Pencil
  • Ruler
  • 1” Double stick tape
  • Silicone glue
View full details
Project Instructions

Step 1

Getting Started with Liquid Sculpey®:

Please make sure your work area is covered and you are not working on an unprotected surface. We recommend working on the Sculpey® Oven Safe Work Mat, wax paper, metal baking sheet, or disposable foil. Uncured Liquid Polymer Clay may damage unprotected furniture or finished surfaces. Be sure to cover your crafting area appropriately. - Stir Liquid Sculpey® completely. Thin with Sculpey® Liquid Clay Softener as needed - Wash hands after use (we have found that baby wipes work best)

Baking:

-It is important to use oven thermometer when you bake the liquids so that you can ensure your oven is at the correct temperature.

-Do not microwave the liquids. They must be baked in a Preheated oven at 275 ºF (130 ºC) for liquid colors and 300 ºF (149 ºC) for Clear – Do not exceed baking temperatures.

-If your piece is less than 1/4” bake for 15 minutes. For thicker pieces that are 1/4” or above bake for 30 minutes.

-If your liquid project has become yellowed or discolored in the oven, when you remake it, tent it by placing either – folding an index card in half and placing your project under it by using aluminum foil over your project.

Here’s a tip for baking perfectly in silicone molds. Dampen a dish towel with water and wring out as much of the water as you can. Fold the damp towel so that the molds can sit level on top of it. The damp towel will slow down the curing process so that the LS will cure evenly throughout and avoid warping.

Step 2

When making a large project with Liquid Sculpey® (LS) like this one, here is a good method for guesstimating the amount of LS that will be needed to fill the mold.

Pour the mold full of water. In this case, since my mold has four popsicle shapes in it which are identical, I only need to fill one of the wells with water. Then carefully pour the water into the Silicone Mixing Cup. Take note of how much water is poured into the Mixing Cup. This is approximately how much LS you will need in total.

Pour the water out of the container and dry the mold and the cup carefully and thoroughly or pop them into a preheated 275F oven and allow the water to evaporate before filling either with LS.

Add Light Orange LS to the dry Silicone Mixing container to the level that the water was previously. In my case, that was a total of 30 ml of water. I’m adding 25 ml of Light Orange LS to the cup.

Step 3

Then I added an additional 5 ml White LS to the container for a total of 30 ml.

Mix the Light Orange and the White LS completely together to make a creamsicle color.

Step 4

Position a popsicle stick through the hole in the mold leaving as much of the stick out as you prefer.

Step 5

Carefully pour the mixed Light Orange into the mold around the stick.

Step 6

Keep pouring until the stick is laying in the LS.

Tap the mold every once in a while to help air bubbles to release.

Step 7

Keep filling to level.

Step 8

Pop visible air bubbles with a Needle Tool.

Step 9

Another way to help air release is to tap the outside of the molded shape with a heavy tool. In this case I’m using the 12 mm Ball Tool, but you can also use the Ball End Tool from the Clay Tool Starter Set.

Step 10

Bake both the popsicle mold and the Silicone Mixing Cup in the oven following the baking instructions for Liquid Sculpey®.

When the items are baked and cooled completely, you can clean the cup by simply peeling the residue away.

Step 11

Remove the popsicle by gently flexing the mold.

Step 12

If the back of the popsicle has a ridge on it, you can simply trim it away with small sharp scissors.

Step 13

The excess that dripped around the stick can be left for effect or can be peeled off.

Step 14

Layer a small coat of Clear LS on the top portion of the popsicle. Sprinkle bakeable confetti sprinkles into the Clear LS. Add more Clear LS as needed and add as many sprinkles as you like.

Step 15

Bake again following the bakinginstructions for Clear Liquid Sculpey®.

Allow to cool completely beforehandling.

Trim excess Clear LS and sprinkles as desired with small sharp scissors.

Step 16

Plan the layout of how you want the popsicle to be positioned in the frame. Mine will go right in the middle.

Step 17

I tested several different colors of scrapbooking paper and liked this dotted yellow best. Of course, you can choose whatever color paper you prefer!

Step 18

Flip the scrapbooking paper over and apply double stick tape to the top and bottom of the paper.

Mark the center of the scrapbooking paper with ruler and pencil.

Poke a very small hole in the center of the paper where you marked the axis.

Step 19

Stick the scrapbooking paper to the base layer in the frame using the double stick tape.

Place the matte over the paper and frame the layers.

Step 20

Lay the popsicle on the scrapbooking paper and make very faint lines indicating where the top and edges will lay with pencil. Use a ruler to double check the positions.

Add a bead of silicone glue down the middle but only where it will be hidden by the popsicle.

Step 21

 Position the popsicle in the glue and allow to dry completely.