


Sculpey Premo® and Liquid Sculpey® Mandala Frame
Sculpey Premo® and Liquid Sculpey® Mandala Frame
Designed by Amy Koranek
Read More
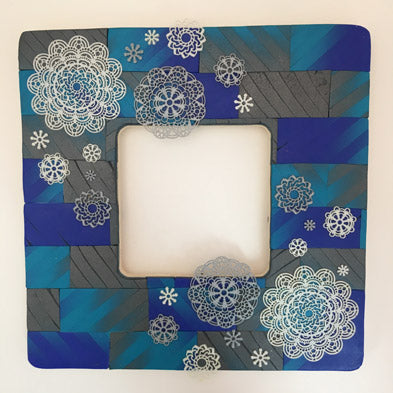
This gorgeous frame shows off a classic technique called a Skinner Blend to create the lush color blends that are accented with Liquid Sculpey Lace Mandalas.
TIME TO COMPLETION: 90 minutes including baking
Read Less
ADDITIONAL SUPPLIES
- Wood frame
- Coordinating paint
- Paintbrush
- Scissors
Project Instructions
GETTING STARTED WITH PREMO AND LIQUID CLAY:
Please make sure your work area is covered and you are not working on an unprotected surface. We recommend working on the Sculpey® Oven Safe Work Mat, wax paper, metal baking sheet, or disposable foil. Uncured Liquid Polymer Clay may damage unprotected furniture or finished surfaces. Be sure to cover your crafting area appropriately.
Getting Started with Premo Clay:
Start with clean hands, unwrap and knead clay until soft and smooth, or condition by running clay though a Pasta Machine. We recommend using a designated machine for clay purposes only. When working with multiple colors, clean hands with soap and water or baby wipes (we have found that baby wipes work best) before switching colors. Shape clay, pressing pieces firmly together. Wash hands after use.
Getting Started with Liquid Sculpey
Stir Liquid Sculpey® completely. Thin with Sculpey® Liquid Clay Softener as needed - Wash hands after use (we have found that baby wipes work best) .
Please make sure your work area is covered and you are not working on an unprotected surface. We recommend working on the Sculpey® Oven Safe Work Mat, wax paper, metal baking sheet, or disposable foil. Uncured Liquid Polymer Clay may damage unprotected furniture or finished surfaces. Be sure to cover your crafting area appropriately.
Getting Started with Premo Clay:
Start with clean hands, unwrap and knead clay until soft and smooth, or condition by running clay though a Pasta Machine. We recommend using a designated machine for clay purposes only. When working with multiple colors, clean hands with soap and water or baby wipes (we have found that baby wipes work best) before switching colors. Shape clay, pressing pieces firmly together. Wash hands after use.
- Baking:
Getting Started with Liquid Sculpey
Stir Liquid Sculpey® completely. Thin with Sculpey® Liquid Clay Softener as needed - Wash hands after use (we have found that baby wipes work best) .
- Baking:
Prepare the frame by painting all the exposed areas that will not be covered with oven bake clay in a coordinating paint color. This would be the back of the frame and all the edges. Allow the paint to dry completely.
Cover the front surface of the frame with a thin layer of Silver Liquid Sculpey® (LS). Pour a stream of the LS in the middle of all the sides. Spread with your finger or a craft spatula.
Cover the front surface of the frame with a thin layer of Silver Liquid Sculpey® (LS). Pour a stream of the LS in the middle of all the sides. Spread with your finger or a craft spatula.

Cover the front side of the frame with the LS from edge to edge. Set the frame aside while you prepare the mandalas and solid clays. The LS will seep into the wood gradually making a good surface for the solid clays to grab onto.

Prepare mandalas with both Silver LS and Pearl LS. For the finished frame you will need two molds full of each Silver and Pearl mandalas. To make the mandalas, place a small amount of LS in the center of each mandala. Spread the LS into the crevices with either your fingertip or the squeegee. Add LS as needed to make sure all the details are filled. Use the squeegee at a 45 degree angle to remove excess LS from the mold.
Bake the mold at 275 for 15 minutes.
Bake the mold at 275 for 15 minutes.

When the mandalas are completely cool, gently flex the mold and peel them out. Repeat Step 4 until you have the desired amount of mandalas in both Silver LS and Pearl LS.

Next prepare the solid clays for the frame background. Sheet 1/2 block each Silver, Peacock Pearl, and Ultramarine Blue through the pasta machine on the thickest setting. You’ll need sheets that when all three are laid overlapping by 1/2”, they are the same width as the rollers on the pasta machine. Press the overlapping seams together with hand pressure.

Press the striped sheet through the pasta machine on the thickest setting to seal the seams together.
Fold the sheet in half matching color to color.
Fold the sheet in half matching color to color.

Press the sheet through the pasta machine on the thickest setting pressing the same color to the same color. Always put the fold in first. Keep folding the sheet matching color to color and pressing through the pasta machine until you have a desirable blend. I like to stop when the colors are not completely mixed. Especially when using pearl colors because the mica in the pearls makes cool wave patterns that I like. This is a variation on the Skinner Blend.

Sheet the blend through the pasta machine on the second thickest setting and then on the third thickest setting to make it longer.

Cut 1/2” of the solid Silver from the sheet and also 1/2” of the solid Ultramarine Blue from the sheet to make the sheet narrower.
Use the narrow pieces you just removed and any additional solid color clays from Step 6 to make a backing sheet. Keep this backing sheet wider than the blended sheet. Thin the backing sheet to the third thickest setting. We are going to create a veneer from the blended clays and you’ll need a background sheet to create it on. This technique is based on a workshop I took with Lindly Haunani who is a veneer mastermind.
Use the narrow pieces you just removed and any additional solid color clays from Step 6 to make a backing sheet. Keep this backing sheet wider than the blended sheet. Thin the backing sheet to the third thickest setting. We are going to create a veneer from the blended clays and you’ll need a background sheet to create it on. This technique is based on a workshop I took with Lindly Haunani who is a veneer mastermind.

Using the Super Slicer, start in the bottom corner of the blended sheet and cut 1/4” angled strips

Pick up the strip on the side of the blade and move it to the backing sheet. Place the strip onto the backing sheet. Keep cutting strips diagonally across the blended sheet and moving them to the backing sheet in the same order, but each time you lay a strip down, jog it up or down 1/4” from the last strip. Keep the strips as close together as you possibly can so there are not gaps between them.

Keep applying the blended strips to the backing sheet until it is full

Trim any pieces that run off of the sheet. Press the veneered sheet through the pasta machine on the thickest setting, then again on the second thickest setting.
Cut the veneer into 1” wide strips and into 2” wide strips.
Cut the veneer into 1” wide strips and into 2” wide strips.

Then cut the 1” wide strips into 2” lengths. Cut the 2” wide strips into 1” wide pieces. You should have several 2” x 1” rectangles with the angles of the stripes going in different directions.

Bring the frame back in front of you. Start in the very middle of the vertical sides. Lay rectangles across this area making sure they are centered top to bottom.

Add rows of the rectangles above and below the initial rows. Trim the pieces at the edges.

. Keep filling up the frame with the rectangles. Trim all the way around the outside edges and the inside edges.
Add the baked mandalas on top of the unbaked solid clays. Gently seat them into the solid clays with finger pressure. You can cut and trim the mandalas with scissors as needed to accommodate your design.
Bake the frame again at 275 for 30 minutes.
Designer’s Note: The original frame shown in Step 18 was made using Graphite Pearl instead of Silver Premo.

- Choosing a selection results in a full page refresh.
- Opens in a new window.