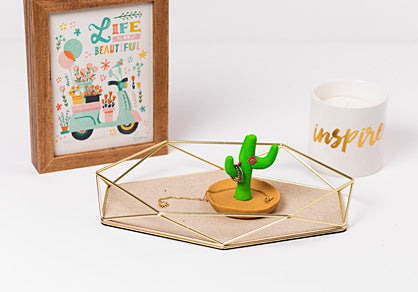


Sculpey® III Little Cactus Trinket Dish
Sculpey® III Little Cactus Trinket Dish
Designed by Amy Koranek
Read More
Read Less
Cactus motif is in style right now – you can add a cute cactus to your style in less than two hours!
ADDITIONAL SUPPLIES
- Round toothpicks (2)
- Optional - Wire cutters
- Paper towel

Project Instructions
- Getting Started:
Start with clean hands, unwrap and knead clay until soft and smooth, or condition by running clay though a Pasta Machine. We recommend using a designated machine for clay purposes only. When working with multiple colors, clean hands with soap and water or baby wipes (we have found that baby wipes work best) before switching colors. Shape clay, pressing pieces firmly together. Wash hands after use.
- Baking:
Condition and form the entire block of Jewelry Gold into a ball.

Flatten the ball into a pancake and roll over it to smooth it with the roller from the Bead Making Kit. Once it’s nice and flat, bevel the edge with your fingertips pushing the edge down to the work surface.

Flip the dish over. Pinch a little rim up all the way around the edge.

Texture the surface of the dish with the baking pad in the Bead Baking Kit. This might bend the little rim down again.

Push the rim back up evenly with the baking pad from the sides which will texture the outer rim of the dish as well. Set the dish aside for now.

Break off 1/4 block of Granny Smith and make the cactus trunk with this much clay.

Break off another 1/4 block of Granny Smith and shape this much clay into three little cactus arms. Use the blade from the Bead Making Kit to cut off the rounded fat ends of the arms.

Break or cut one of the toothpicks into three short pieces. Insert these pointed end first into each arm.

Poke an arm into the side of the trunk. Push the flat toothpick end into the trunk and make sure there is good connection between the arm and the trunk.

Carefully bend the arm up into position.

Add the other two arms.

Bring the dish back and make a large divot in the middle with the 12 mm Ball Tool.

Add one of the little cutoffs from Step 8 into the divot.

Break or cut one tip off of another toothpick and insert the remaining tip into the trunk of the cactus giving it stability.

Carefully push the entire cactus, toothpick end down, into the center of the dish. Make sure the trunk is well connected to the dish using fingertip pressure. Use the rubber tipped tools to score details in the trunk and arms

Make little balls out of Candy Pink. You will need five balls for each flower. Make a little Granny Smith center for each flower.

Press five petals in clusters for each flower using the pointed rubber tipped tool. Add the centers and poke a hole in each one with the 2 mm ball tool. Bake the little cactus following the baking instructions for Sculpey® III. Wad up some pieces of paper towel to use as supports under each arm while baking. Allow to cool completely before handling.

- Choosing a selection results in a full page refresh.
- Opens in a new window.